Before and After Home Tour: Two and a Half Year Update
Two and a half years ago we built a Ryan Homes Palermo. Come see the progress we’ve made in our before and after home tour!

It’s hard for me to believe that we’ve been in our current house for two and a half years already! It was always my intention to do a recap of our progress each year (You can see our one year update here and our four year update here.), but the two year mark came and went and I completely missed it! So today you’re getting a two and a half year update instead. 🙂
[There are a ton of photos in this post, and I also tried to link as many sources as I could from each room, so if you’re looking for something, click the photo of the item in the little carousel at the end of each room.]
Let’s get started!
Ryan Homes Palermo Before and After Home Tour
This post contains affiliate links. For more information, see my disclosures here.
We moved into our current house in mid-September of 2016. We decided to build with a community builder, Ryan Homes (Our model is called a Palermo.), which means that our build was not custom.
We had to choose from the builder’s options for just about everything in the house, but we liked that we were pretty much getting a blank slate with good bones that we could customize and add character to however we liked.
Here’s what we’ve done so far…
Exterior

The exterior was one of the things that sold us on our house in the first place, so we haven’t changed much. We added some furniture, planters, and decor and somehow convinced the grass to grow, but other than that, we pretty much left it alone.

At some point I would love to replace the black door with a wooden door instead, but I don’t mind the black for now, so it isn’t a huge priority.
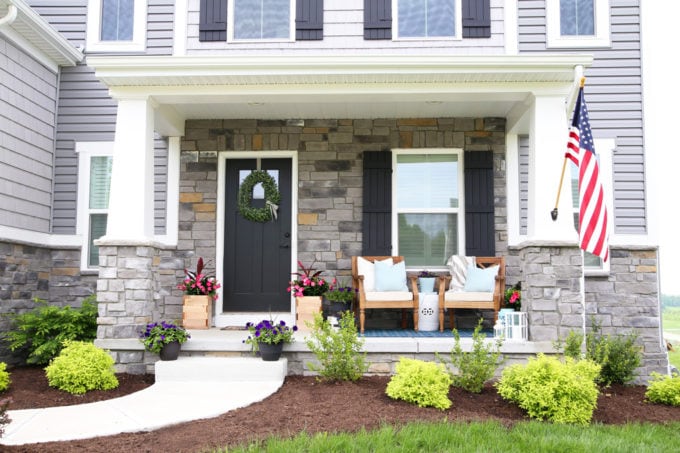
We are still loving the big wooden chairs that we purchased a few years ago, and our planters (originally from Target) are going strong as well!
Related: How I Create Pretty Planters the Lazy Way
Shop Our Front Porch

Entry
The “entrance” to our house is sort of two-fold. Our family mostly enters from the garage into the mudroom, but when visitors enter from the front door, they are greeted by a small entryway, which is basically just a bump-out in the hallway to our main living space.
When we first moved in, I stuck a dresser that we already owned in this spot as a placeholder until I figured out what I actually wanted to put there…

Eventually, I found this beautiful cabinet (similar), which has worked well as an entry piece and as a little bit of extra storage. (For example, our kids’ portable art station lives behind one of those doors!)

Wall Paint Color: Behr Marquee Silver City
Shop Our Entry
Mudroom
I was so excited to have a mudroom in this house. From the very beginning, I pictured a beautiful built-in bench, hooks for coats, and a shelf where I could create pretty displays.
But these things take time, so at first we just plopped down the entry bench and hook/shelf piece that we used in our last house and made do with that for a while.

But then last year my mudroom dreams came true, and we finally got the built-in mudroom look that I had imagined!

Creating a custom bench with drawers took a bit more highly skilled woodwork than we were comfortable with, so it is one of the few projects we ended up hiring out. It was so worth it, though– I love the way it turned out!

Along with the storage we gained from the mudroom built-ins, I also added a few more organizational systems to make this space really work for us, like a command center gallery wall to keep all of our school paperwork straight…

pegboard | magnet board | frame | clock
And I also revamped the closet, ripping out the wire shelf and rail, and replacing it with IKEA’s ALGOT system, now called BOAXEL (which we’ve used in a bunch of closets in both of the homes we’ve owned).

Related: Our Organized Mudroom Reveal
Wall Paint Color: Behr Marquee Silver City, mixed at half strength
Door Paint Color: Sherwin Williams Rainwashed, color matched in Behr Marquee Paint
Shop Our Mudroom
Dining Room
Like all of the other rooms in our house, our dining room started out blank, white, and pretty bare. We put in a new light fixture and added wood shutters for privacy, but other than that, we just moved in our old furniture and called it a day.

This past year, though, the dining room finally got a little TLC! I was ready for some color, so I painted the walls my favorite shade of aqua. I also brought in a new dining table, chairs, and a bench. (The bench actually came unfinished. I painted it and stained the top to coordinate with the chairs.)

I’m still using my grandmother’s hutch, which I painted a few years ago, and it continues to be one of my favorite pieces in our house!

I grabbed the boys’ old dresser and gave it a little makeover as well, turning it into a sideboard to give us some additional storage in this space. Add in a cute round mirror, and this space is complete…at least for now! 😉

Related: Full Dining Room Reveal
Paint Color: Sherwin Williams Rainwashed, Color Matched in Behr Marquee Paint
Shop Our Dining Room
Kitchen
One of the reasons we decided to build a house was because we didn’t want to take on another full kitchen renovation like we did in our last house. But even though we weren’t planning to rip out any cabinets or knock down any walls, we knew we still wanted to make some significant changes to this space.

First, we didn’t love any of the countertop options that our builder offered, so we just had them put in the standard laminate that came with the house, and we replaced them with quartz counters shortly after we moved in. (Caesarstone London Grey, to be exact.)
While the installers were putting in the countertops, we had them replace the sink and faucet as well.
We also beefed up the trim work on the island, replacing the skinny corbels with something more substantial and adding more wood pieces for interest. We framed out the opening between the kitchen and the sunroom too.

We installed a marble subway tile backsplash and hung clear pendants over the island, as well as painting the walls and adding hardware. So for a kitchen that we didn’t want to “do much” to, we ended up with quite a few projects! Oops!

Wall Paint Color: Behr Marquee Silver City
Shop Our Kitchen
Living Room
Our living room was the room that was probably the most intimidating to me when we moved in. The kitchen and living room are actually one long space with no separation in between, which makes the living room feel pretty big, and it was also extremely bare and boring.

One of the first projects we did was to create an entertainment unit using pieces from the IKEA BESTA system and adding our own custom trim work. Creating that focal point immediately made the space feel less stark and more homey.

I love chunky trim, especially in our somewhat “cookie cutter” house, because it adds character and makes the space feel more custom, so we trimmed out the windows in a craftsman style.
We then went on to add high board and batten to the walls, paint, hang curtains, and select bamboo shades, which all helped tremendously as well.

It sounds sappy, but the day this room was painted, I walked in and actually teared up because I felt like finally, finally, this house that we had been living in for nearly two years felt like the cozy, welcoming home I had been envisioning for so long.

Board and Batten Paint Color: Behr Marquee Cameo White
Wall Paint Color: Behr Marquee Silver City
Shop Our Living Room
Sunroom
The sunroom or “morning room” is my most favorite place to sit because it has the best views! Before we had a deck, we just stuck our outdoor furniture in this space so that we could enjoy it immediately.

But once we had the deck, that furniture headed outside and I got to decorate for real!
Many people who have our same model of home will use this space as an eating area since it’s right off the kitchen, but we already had a dining room and stools at the kitchen island (which is actually where we eat most of our meals), so we decided to do a little seating area instead.

Since it is a smaller space, it was a bit of a challenge to find furniture that was the right scale, but I eventually found this set, which ended up being the perfect fit. My friend Kristi and her talented mama re-covered the cushions for me so that they fit my style a little better.

Eventually we’ll trim out these windows like we did in the living room, and I would love to plank the half vaulted ceiling in here as well!
Related: Full Sunroom Reveal and Details
Wall Paint Color: Behr Marquee Silver City, mixed at half strength
Shop Our Sunroom
Deck
Our house didn’t come with a deck. With Ryan Homes, they give you the door to the outside, but it is up to you to add the deck or patio once you move in.
With the height of our door, we really could have gone either way– a few steps down to a patio or straight out to a low-ish deck.

We went with the deck option, and I’m so glad we did!

Donnie built a farmhouse style table and matching benches, which is the perfect spot to eat meals in the summer.

We also have a little seating area for just hanging out and enjoying the view. It’s nice because the boys can easily run down the stairs and play in the yard while we relax on the deck and watch them!

Related: How to Plan a Deck Project
Shop Our Deck
Donnie’s Office
Donnie’s office is the one room where I had next to zero input on anything! It is his domain, so I left it up to him to decorate and arrange things the way he wanted, only giving my opinion when asked.
It is a small space, and it started out pretty crowded because we didn’t have great systems in place.

Donnie decided to use the Elfa system from The Container Store to really maximize storage space in his office, and after more than a year, he is still really loving it.
He has a ton of books and video equipment that he wanted to store here, so the shelf + drawer combo of the Elfa system worked really well for him.

Donnie likes to have options when he’s working, so rather than trying to squeeze both a standing and sitting desk in this space, he found this motorized desk that moves up and down to whatever height he chooses.

He had always wanted a POANG chair but couldn’t fit one in his tiny 8′ x 8′ basement office in our last house, so it was one of the first purchases he made for this office! He also put another small set of Elfa shelving in this corner to act as a side table and to hold a lot of the smaller items that he uses often.

Like in the living room, Donnie trimmed out the windows and the door with chunky craftsman style trim work. (And the turquoise and red pieces of art by the door are pieces that he made as a child which his mom had framed for him– so sweet!)
Related: Donnie’s Office Reveal
Wall Paint Color: Behr Chain Reaction
Shop Donnie’s Office
Garage
Before we head upstairs, I wanted to make sure we peeked into the garage and the basement. These may not be the most glamorous spaces in the house, but we have worked HARD on each of them over the past few years to make them neat and tidy and really functional for our family!
The garage started out looking like this…such a wreck!

We had the space painted and used a combination of my favorite IKEA BOAXEL system + the Gladiator track system to organize all of our gear.

My most favorite part is that we can now park both cars in the garage! Yippee! Winters get cold here in Pennsylvania, so I was extra thankful for this feature over the past few months.

Related: Organized Garage Reveal!
Wall Paint Color: Behr Marquee Silver City
Shop Our Garage
Basement
Our basement also started out pretty badly. It is an unfinished space, but we use it for storage, DIY projects, and some activities like ping pong and hockey.
We started out with this…

…and after a few months of work, we had a neat and tidy basement!

Donnie’s workshop is in this space, and he wrote a whole detailed post about his favorite toolboxes and tool storage accessories.

We also tidied up our seasonal storage bins and created bins for our sentimental items– each family member has one bin for mementos.

Connor (age 10) is really into hockey, so he uses the far end of the basement as his practice space.

Related: Organized Basement Tour
Shop Our Basement
And now onto the upstairs!
Boys’ Bedroom
The boys’ bedroom was the very first room I decorated when we moved into our house because I wanted them to feel at home in their new space.
I had a nautical theme in mind– white beds with blue and white striped comforters and anchors and ship decor all around…

…but Connor and Caleb had different ideas! They totally nixed my white bed plan from the very beginning, instead leaning toward a more masculine wood look.
And when I tried to steer them toward nautical bedding? They kept pointing to all of the plaid options instead and telling me, “I like THAT one!” When they insisted that bear pillows be incorporated somehow, I completely gave up on “nautical” altogether and went in an “adventure” direction instead. 🙂

We did a fun blue racing stripe around the walls and tied it in with blue roman shades (which both look nice and keep the sun out in the mornings).
They use these cute lamps over their beds all the time for reading or just hanging out, and the “Adventure Awaits” sign went with our theme perfectly.

I also found this poster of a compass patent that I framed and hung up, along with a small mirror, a “C”, and some arrows.

Finally, with two boys sharing one small closet, I really needed to maximize every inch, so we again ripped out the wire shelving and installed IKEA’s BOAXEL system instead. Each boy has his own row of clothes with dress clothes on the left, sweatshirts and sweaters in the middle, and long sleeved t-shirts on the right.

Related: Shared Boys’ Bedroom Reveal
Wall Paint Color: Behr Marquee Silver City
Stripe Paint Color: Benjamin Moore Hale Navy
Shop the Boys’ Bedroom
Laundry Room
No pretty “afters” here…yet! Other than set up our washer and dryer and organize the shelf with some bins, we haven’t done anything to the laundry room since we moved in.
It is on my list to tackle this year though, and I have some BIG plans for it!

Since it is very small, I’m thinking about getting a stackable washer and dryer to maximize space (If you have a stacked washer and dryer, I’d love to hear from you– love it? Hate it? Tips?), then putting in a unit with a lower cabinet to hold laundry essentials and also a spot where I can store our laundry baskets.
I’d love to rip out the wire shelf and put in a wall cabinet as well, and I would need a bar to be able to hang out hockey gear that has gone through the wash.
I love that our laundry room is on the upper level of the house, and I can’t wait to make it both more functional and more beautiful!
Playroom
We’ve organized the playroom, but I haven’t done much to it decor-wise yet. It’s not very high on the priority list because Caleb (age 7) is really the only one who spends much time in here, and he has given me strict instructions: “Don’t paint the white walls!” For some reason, he likes them!

The boys love to share a room right now, but eventually I think they’ll each want their own space, and when that happens, we’ll probably move one of them in here.
Until then, this KALLAX unit is working nicely to hold their toys and books, and the boys still get a kick out of the framed comic books that we’re using as art.

Caleb LOVES to do art projects and be creative, so I created a little art station out of this rolling cart and a magazine rack. These wires and clips have worked well for us to display all of the boys’ favorite creations.

It took a few tries, but we finally came up with a way to keep our LEGO collection organized! You can read my whole philosophy behind LEGO organization here, but basically we’re using two TROFAST units to store LEGO pieces, only separating out the figures. Completed LEGO sets are displayed in the closet, where we’ve installed several shelves for that purpose. (Again, using the IKEA BOAXEL system.) I showed our system for organizing LEGO instruction manuals in this post.

Related: How We Declutter and Organize the Playroom
Shop Our Playroom
Guest Bedroom
The guest room is the most recent room I’ve completed in our house! My parents and sister live an hour and a half from us, so this room actually gets used by them quite a bit.
At first, we just used pieces from our old house so they would have a place to sleep and set their things…

…but then we decided it was time for a change! Bit by bit, I began switching things out in this space until we had this:

I added the basics like a light fixture, roman shades, and curtains.
I found this beautiful duvet that set the feel for the whole space. This quilt and sham set helped too.
Since I wasn’t working with a huge space, this pretty-but-narrow headboard was a great addition. And after realizing that we’d like nightstands with drawers in our own master bedroom, the guest room inherited the round side tables we were formerly using.

The “Orchard” sign was a gift from my sweet friend Jackie, and I found the beautiful mirrors at Hobby Lobby.
Related: Guest Bedroom Reveal
Wall Color: Behr Marquee Silver City
Shop the Guest Bedroom
Guest Bathroom
Our guest bathroom was like the rest of the house… pretty bare! We just put up our old shower curtain and pretty much called it a day for the first year or so.

But it too got a refresh eventually! I painted the walls, and Donnie helped me take down the standard bathroom mirror and replace it with two wood framed mirrors.

We added floating shelves above the toilet to add some “pretty” to the space. (Yes, bathrooms need “pretty” too! 🙂 )

And one swap I make in almost every bathroom we’ve ever had is to remove the towel bar and replace it with hooks. It makes hanging towels so much simpler (especially because the boys are the primary occupants of this bathroom)!

Related: Guest Bathroom Refresh and Organization
Wall Paint Color: Behr Chain Reaction
Shop the Guest Bathroom
My Office
We’ve reached my most favorite room in the house– my office! This is the room that 100% sold me on the model of house we chose (a Ryan Homes Palermo). It is above the garage and therefore, it is pretty big (21’8″ x 13’7″), so I have tons of room to create and plan and take pictures and work out and basically do allllllllllllll the things!
It took a while to create the haven I had envisioned, though. For a while, my office looked like this:

But after working on it bit by bit over a span of several months, we got there in the end! I stenciled the back wall, which was a labor of love, but SO worth it. And Donnie helped me create a storage unit using pieces from the IKEA BESTA system + custom trim work.

I created a little reading nook in the corner and found the perfect piece to hold my extra throw pillows and printer + supplies.
I wanted a large work surface, so I snagged this unfinished small dining table and whitewashed it. I will sometimes move it to the middle of the room if we’re filming video and I want to have the pretty stenciled wall in the background.

The little nook holds my desk and another chair + ottoman where I sit to work most days.
And I wanted a “closet” that didn’t really look like a boxy closet, so we created the corner storage unit using pieces from IKEA’s PAX system, again adding our own trim to make it look more built in.

Related: Organized Office Tour!
Main Wall Paint Color: Behr Marquee Silver City
Nook and Stenciled Wall Paint Color: Sherwin Williams Rainwashed, color matched in Behr Marquee paint
Stenciled Wall Secondary Paint Color: Behr Marquee Cameo White
Shop My Office
Master Bedroom
The master bedroom is the room I’m working on currently! Up until recently, it looked a lot like this:

I added bamboo shades and curtains, and painted the walls. I’m currently waiting on some additional pieces to arrive, and I have some projects on the to-do list for this space!

Related: Our Master Bedroom Plan
Wall Paint Color: Sherwin Williams Sea Salt, color matched in Behr Marquee paint
Shop Our Master Bedroom
Master Bathroom
Our master bathroom was another space that fit into the “bare and boring” category…

It got a little refresh with some paint and the same wood-framed mirrors that we used in our guest bathroom.

I also organized every drawer and cabinet in this space to make our mornings run more smoothly!
Related: Master Bathroom Organization Details
Wall Paint Color: Sherwin Williams Rainwashed, color matched in Behr Marquee Paint
Shop Our Master Bathroom
Master Closet
And last but not least– our master closet! Our closet was one of the first projects we did after we moved in because I love to be organized, and the wire shelving in this space was just not cutting it!

We ripped out the wire shelves and put in a system from EasyClosets, and we are still loving it more than two years later! Everything has a spot and stays neat and tidy without too much effort.


Related: Organized Master Closet Reveal
Wall Paint Color: Behr Marquee Silver City
Shop Our Master Closet
Whew! If you are still here, you win a virtual trophy from me! That was a lot of info!
Most of the time I feel like progress is going so slowly, but then I look back at posts like this one and realize that all of those tiny little bits of progress really add up! We still have a bunch of projects on our list, but I’m thrilled with how far we’ve come in the past two and a half years!
Are you working on any fun house projects lately? I’d love to hear about them in the comments below!
Have a great day!

This post contains affiliate links. For more information, see my disclosures here.
Your home is truly lovely. Love your creative use of Ikea furniture.Love the splashes of aqua!
Thank you so much for your sweet words, Bonnie! Have a wonderful weekend!
~Abby =)
Wow I didn’t know I were a pennsylvania girl like me!!! Your house is gorgeous! We are three years in and still unpacking!! This summer “organize the garage” is on our list. Ikea here we come.
Yay! So fun to “meet” another Pennsylvania girl! Have fun with your garage project!
~Abby =)
What a beautiful and sensibly built home you have there! I am from Singapore and homes here don’t like yours! But I really like the craftsman style you pointed out in this post and i wonder if i can pull it off in my home. Thank you for sharing the before-and-after photographs of your home! May God bless you to touch more lives through your passion.
Thank you so much, Angela! You are the sweetest! Have fun with your home projects!
~Abby =)
I absolutely love what you have done so far with your house. I have a couple of questions, though. I have a difficult time replacing something that is either fairly new or there is nothing wrong with it. Do you donate your items or sell them? The other question I have is how do you decide where to place things and colors to choose? I can never seem to choose items and colors which just puts me in a perpetual place of chaos.
I typically donate things because most items are not worth the hassle it takes to sell them. As far as color choices, I tried different things for years until I figured out the design style that I truly loved, and now I know just to choose items that fit within that style. Creating a Pinterest board of spaces that appeal to you and noting what you love about each one can help you figure out your style and make choices for your own home!
~Abby =)
Thank you for the information. Can’t wait to see what else you do in your house.
Thanks so much, Karen! Have a great week!
~Abby =)
Thank you for sharing these!! We’re also about 2.5 years in and have made less progress (needed a new A/C). If you took all the stuff in your before basement, and added it to your before garage … that’s our garage :/ But we’ve got projects on a list and seeing all your before & afters really makes me feel better about how slow it is. Thanks for being real!
So glad it was helpful for you, Kris! It really is SUCH a process, isn’t it? 🙂 Cheering you on!!
~Abby =)
Hi Abby! I love your decorating style! I have a question regarding the Silver City paint. Do you always use the half strength formula or is it only the sunroom that is done in half strength?
Thank you, Kathy! I only used half strength in our sunroom and in our mudroom. Everywhere else that has Silver City (kitchen, living room, hallways, stairwell, boys’ room, my office, guest room) is at full strength. I hope this helps!
~Abby =)
Wow, you have a beautiful home. So warm and lovely!
Thanks so much, Stapha! Have a great week! <3
~Abby =)
Hi Abby,
I really like the color scheme you have with the aqua and gray. I am working on a master bed and bath remodel and was trying for the same color scheme you just posted yesterday. I have had so many swatches in shades of aqua blue & mint green on my walls for months now and just couldn’t get any of them to work. So, in my bathroom I just went with Passive Gray from Sherwin Williams and I love it. I’m using the same gray in the master bedroom but I really think I want an accent wall in an aqua shade like you posted in your dining room (Rainwashed). In your post yesterday the walls look such a pretty shade of aqua blue but when I selected the link for Sherwin Williams it comes up green. My question is yours truly an aqua shade in your house or is it more mint green like their website shows?
In my house, Rainwashed definitely looks aqua, not green like on the site. Best of luck with your painting project!
~Abby =)
I love your home! It is looking great! The guest bedroom is beautiful also. Please inform me when our turn comes around to visit with you and your lovely family. I’m glad the boys talked you out of the white nautical scene for their bedroom. I love the bears and outdoor theme. The kitchen is gorgeous, but so is the rest of the house. I kept up with you through this whole blog and will keep doing the same. You and your home are warm and lovely! Regina xo
Thanks so much, Regina! Hope you’re having a great week!
~Abby =)
This is by far the best Ryan Homes makeover blog I’ve ever read. We also moved into our new Ryan Homes house in September 2016 (Rome model), and have been trying to furnish and decorate our home but not anywhere close to where you are. I’ve looked around for tips to customize community builder homes and haven’t really found good ones until I came across your site. I love love love what you have done with your home! I’m taking notes with hopes that one day our home will look as beautiful as yours!!
Aw, you are too sweet… thank you! I’m so glad it has been helpful for you. It certainly is a process to really make it your own, isn’t it? Wishing you all the best… I’m sure your home will be beautiful! Have a wonderful weekend!
~Abby =)
Abby, you did a fantastic work! Your house looks amazing. Love your style, the decor and the furniture in you house, really nice and stylish!
I want to change my bathroom too, but don’t even know where to start. There are so many things to do, ha! Hope, I’ll make something gorgeous as you did! Thank you for the inspiring 🙂
You are too sweet! Thank you, Amy! Have an awesome weekend! <3
~Abby =)
I love how organized and structured you have your home! Thank you for sharing with us your beautiful home 🙂 #homegoals
Aw, thanks so much, Janett! You are too sweet. Have an awesome weekend!<3
~Abby =)
Abby, everything is so beautiful but I think your office is my favorite! It means so much to have that special place just for you. 🙂 I feel the same way about my home office too.
Aw, thank you, Alix! It’s definitely my happy place! 🙂 Hope you’re having an awesome week!
~Abby =)
You’ve certainly taken a place Jane box (like most new homes) and added your personal touch and loads of character. Thanks for sharing! It goes to show, what really makes a house a home, it’s the personal touches and love that does into the design….it’s not the four walls itself.
Aw, thanks so much, Tamara! You’re too sweet. Hope you have a great week!
~Abby =)
Hi Abby, I’m new to your blog and just found this post. You did a great job with all the renovations! I have a fondness for aqua and use it often in my decor with a neutral base. I also don’t like towel racks and replace them with hooks. I think the towels look better that way.
Well I’m pinning and following you!
Have a wonderful weekend
Aw, thanks so much, Rachelle! I appreciate it so much. Hope you have a wonderful week! <3
~Abby =)
I LOVE your sense of style! What a gorgeous home! Thanks for sharing your pics and ideas with all of us…….I know I appreciate it! 🙂
You are too sweet! Thanks so much, Darlene. Hope you have a wonderful weekend! <3
~Abby =)
you have such a lovely home! I am glad I stumbled across your blog – lots of fun ideas!
You are so sweet, Kris! Thank you! Hope you have a wonderful weekend!
Quick question, was the bathroom mirror glued on? Mine has clips but wondering if it might be glued in some areas. When I press on the mirror it does move.
Ours was not glued on. We just popped the clips off, and the mirror came right down! 🙂 Hope you’re having a great week, Kim!
Hello, what a lovely home. We are 1 Year and some change into our Palermo, and I’m still trying to organize, the little things we’ve done hs really made the house pop a little better, you have inspired me to keep the process going and also let me know that it does take time. Thank you for taking me on a makeover tour of your home, it’s absolutely gorgeous.
Aw, thanks so much, Renee! It really is SUCH a process, isn’t it? I definitely underestimated the time it would take to really make it our own but we are LOVING it! 🙂 Hope you’re having a great Monday!
~Abby =)
Abby, I love the before and after’s! WOW! You could be an interior decorator!
I love the colors you used, the decorations and organization. Everything looks perfect.
I really like the “you are fearfully and wonderfully made” framed pic for the guest room!
You are wonderfully talented and you make things so beautiful.Thank you for sharing!
You are too sweet. Thank you so much for your kind words, Katie! Hope you have a great week! <3
~Abby =)
I absolutely adore your home!It is is spacious, but cozy!Is there any way you can give me a few tips on organizing the study room?
Thank you so much, Nayomi! I use this same process to organize just about every space in the house: https://justagirlandherblog.com/how-to-organize-every-space-in-your-house/ . Have a great week!
Hi, there!
I’ve lived in my Ryan Homes house for 10 years and looks nothing like yours, it’s beautiful! I have a question, how did you take down the builder grade mirrors in the bathroom?
Thank you!
Hi, Naki! We just pried off the silver clips that were holding the mirror. Ours wasn’t glued to the wall or anything, so once the clips were removed, it came right down!