How to Make a DIY Wood Sign with a Cricut Machine
Learn how to make a DIY wood sign with a Cricut Explore Air 2 cutting machine! It’s easier than you think!

Every time I go to decorate a room, I always seem to get stuck on wall art. I don’t know if I’m exceptionally picky or if I’m just not looking in the right places or what, but filling the walls is always hard for me.
I feel like I search high and low, all over the internet and in local stores, but still, I can never seem to find a piece that is the *exact* size, shape, and color combination that I’m looking for.
So most of the time, I end up DIY-ing it. And since I’m not exactly what you would call a naturally gifted artist, I typically have help from my trusty cutting machine!
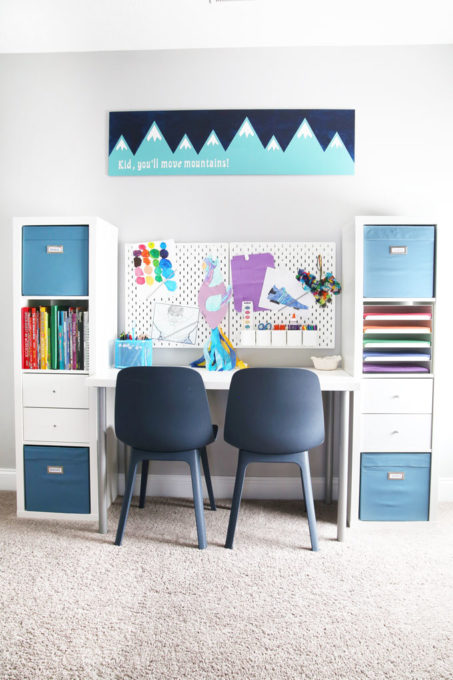
This exact scenario played out when I went to decorate my boys’ new “tween hangout room.” I needed a piece for above their little craft station, and since I couldn’t find anything that met all of my desired specifications, I decided to create a little DIY wood sign myself.
Creating a DIY Wood Sign with a Cricut Explore Air 2 Cutting Machine
This post contains affiliate links. For more information, see my disclosures here.
Here’s how made my DIY wood sign:
Step 1- Gather your supplies.
Wood (I used plywood that was 52″ x 14.”)
Paint (I used Behr Marquee Cameo White, Martha Stewart Lagoon, and Martha Stewart Deep Sea Blue.)
Paint Brushes
Cricut or Other Cutting Machine (I used the Cricut Explore Air 2. If you don’t have a cutting machine, I give tips for creating this project without one at the end of the post.)
Adhesive Vinyl (We are just using the vinyl to create stencils, so you can use whatever vinyl you have around. Adhesive contact paper would also work.)
Step 2- Create your design.
[If you are a Cricut user and want to make this exact project, you can find the words and mountain shape I used here.]
To create my design, I went into Cricut Design Space and typed out my chosen quote, “Kid, you’ll move mountains!” from Oh, the Places You’ll Go! by Dr. Seuss.

I used a Cricut font called Baylac for my wording. For my project, I made the wording 23.5″ long x 2.375″ high, which made the font 141.34 pt.
I then chose my mountain design from the Cricut image library. I made the mountains 23.5″ wide x 11.29″ tall.

Step 3- Cut your design.
After I had created the pieces I wanted for my design in Cricut Design Space, I cut them on some extra vinyl I had on hand. My vinyl happened to be a glossy dark gray, but since we’re only using the vinyl as a stencil, any color will work!
I cut one copy of the wording and three copies of the mountain design.
Can you cut without a mat using the Cricut Explore Air 2?
Because I only had a 12″ x 12″ mat and my designs were longer than that, I sort of had to trick my Cricut into cutting them for me.
Because of the size of my designs, Cricut automatically chose a 12″ x 24″ mat…

…but since I didn’t have one, I simply loaded my vinyl straight into the machine without a mat, just making sure that both edges of the vinyl were under the rollers.

I think Cricut recommends that users always cut with a mat, but I didn’t use one for any of the pieces of this project, and it worked just fine.
So it is possible to cut vinyl on a Cricut Explore Air 2 without a mat.
(Working with a Cricut Joy? Get specific tips for creating a wood sign with vinyl using the Joy here.)
Step 3- Weed your designs.
If you’re new to vinyl projects, “weeding,” simply means removing the vinyl that you’re not going to use for your project.
So for the mountains, I started by removing all of the vinyl surrounding the mountains. Then I removed the vinyl in the center of the mountain and on the snow cap…

…and continued to weed until I only had my desired design remaining.

I also weeded my wording, using a weeder tool to help remove some of the smaller pieces of vinyl that can be tricky to grab with just my fingers.

Step 4- Prepare your piece of wood.
I was using some leftover plywood that Donnie had ripped down and stored in the basement. I had him cut it to my desired length. My board ended up being 52″ long x 14″ tall.

Since I ultimately wanted the wording on my sign to be white and I wanted the words to be in the lower left corner, I painted a block of white that was tall and wide enough to accommodate the quote I had chosen.

Step 5- Transfer the quote to the sign.
Once my white paint had dried completely, it was time to put down the quote on top of it.
I cut some transfer tape to the size of my wording, peeled off the backing of the transfer tape, and carefully laid the sticky part of the tape across my wording. I tried to keep the grid on the transfer tape as straight as possible so that it would be easier to line up my design on the board. I used my scraper tool to make sure the vinyl was securely adhered to the transfer tape.

Then I flipped over my design so that the wording was facing down, and I peeled off the backing from the vinyl, leaving just the vinyl wording and the transfer tape.

Next I lined up the wording exactly where I wanted it on my wood board (on the part I had painted white) and use the scraper tool to make sure the vinyl was going to adhere to the painted wood.

Then I carefully peeled off the transfer tape, starting in the upper left corner and peeling down toward the lower right corner.

Once I had removed the transfer tape, the vinyl was firmly on my board!

Step 6- Prevent paint seepage.
To make sure I got crisp, clean lines for my wording, I had to prevent other paint from seeping under the letters. To do this, I painted over the edges of the vinyl letters with the same color white that was under them.

Painting over the letters with the same color first seals the edges and keeps other colors from bleeding underneath them.
Step 7- Paint your top color.
Once the white paint over my vinyl letters was dry, I was ready to add some color. I wanted my mountains to be “Lagoon,” a bright teal color I had picked up at Michael’s.

Because the mountains were going to be covering the majority of my board, I just painted the entire thing teal. I ended up doing two coats of paint for total coverage.
Step 8- Peel off the letters.
While my second coat of teal paint was still wet, I began peeling up my vinyl letters. (I do it when it is still wet so that it doesn’t peel up the dried paint along with the vinyl.)

I used my weeder tool to help me pull up my letters without smudging the edges. In the rare case where I did smudge, I was able to just go in with a small paint brush and do some touch ups after everything had dried.
Once my vinyl letters were off, revealing the white wording I wanted, I let the DIY wood sign dry completely before moving on to the next step.
Step 9- Add the mountains.
Once my board was dry, it was time to add the mountains. I used the same transfer tape process to move the vinyl mountain pieces over to the board.
For the first set of mountains, I placed the mountain design with the three peaks as is. I lined up the mountains (on transfer tape) where I wanted them…

…used the scraper to adhere them to the board, and then removed the transfer tape.

You’ll notice that the mountains are overlapping the words. Don’t worry! We are only going to be painting the area above the mountains and the snowy peaks, so it doesn’t really matter what is happening with the bottoms of the mountains at this point.
Because I wanted the heights of the mountain peaks to be a little bit varied, before I transferred the second set of mountains, I simply used scissors to trim off the third peak. I then adhered the first two peaks to the board using transfer tape, making sure they weren’t at the same height as the first set of mountains that was already on the board.

I then placed the third peak separately, moving it down a bit to make the peaks seem more random.

Once my first two sets of mountains were placed, I only had room on the board for two more peaks. Using scissors, I trimmed off the first peak from my third set of mountains, only placing the second two peaks using transfer tape. Again, I made sure their height was slightly varied from the other two sets of mountains.

Step 10- Prevent paint seepage again.
Now that I had all of the mountains placed the way I wanted them, I needed to use my same method for preventing paint seepage.

I used my teal paint to paint over the top edge of the mountain peaks, as well as over the snow caps. I didn’t need to paint over any of the bottom edges of the mountains because that part of the board was going to stay the teal color.
Step 11- Paint the snow caps.
When my teal paint was dry, I used white paint to carefully paint inside the snow cap areas of the mountains, doing two coats.

Step 12- Paint the sky.
Then it was time to paint the sky! I chose a color called Deep Sea Blue and painted the entire area above the mountain peaks. I was very careful not to get any paint in the snow cap areas.

Again, I used two coats of paint for complete coverage.
Step 13- Remove remaining vinyl.
As soon as the final coat of paint was on, while it was still wet, I removed all of the vinyl mountains from the board, leaving only my desired painted areas behind.

There were a few little places where the vinyl pulled up a bit of paint, but I was able to go in with a small paintbrush and do touchups after everything had dried.
Step 14- Hang your masterpiece!
After the touchups were complete and the paint was dry, I simply added a small saw toothed picture hanger to the back of the sign and hung it in the boys’ hangout room.

I used two command strips on the bottom corners to further adhere the sign to the wall and keep it level.

It may be a little more work than just buying a sign off the rack, but I love that I can create the exact piece I want for my space! And, let’s be honest, the maker in me has a blast with these little projects too!
But how do I make this DIY wood sign if I don’t have a Cricut machine?
The simple angles of the mountains on this sign make it totally possible to create, even if you don’t have a cutting machine. You could use painter’s tape to create the mountains, doing the snow caps by hand or taping them off with small pieces of tape.
For the words, check out the sticker selection at your local craft store. You’ll want to look for sticker letters that are at least 2″ in height if you’re looking to make a sign that’s a similar size to mine.
Spell out the quote using the stickers, and then just paint over the edges to seal them like I did with my vinyl letters.
It may take a little extra patience to create a similar look without a cutting machine, but it’s not impossible!
I hope this tutorial for how to make a DIY wood sign was helpful for you! Let me know what creative project you’ve been working on lately in the comments below!
Thanks so much for following along! Have a great day!

This post contains affiliate links. For more information, see my disclosures here.
I am super new to Cricut and am still confused about how to do some of the steps in design space. Do you know of a more in-depth tutorial either online or preferably YouTube on slicing and bringing the text to the front etc. thank you so much I am looking forward to making a sign!!!
Check out Jennifer Maker on YouTube! (https://www.youtube.com/channel/UCAaLvz5xOyGDQ5Kun16D7zw) She has tons and tons of tutorials for Cricut!
I love this! I love the quote (great book!), the colors, everything!
Aw, thanks so much Andrea! Have a wonderful week! <3
~Abby =)