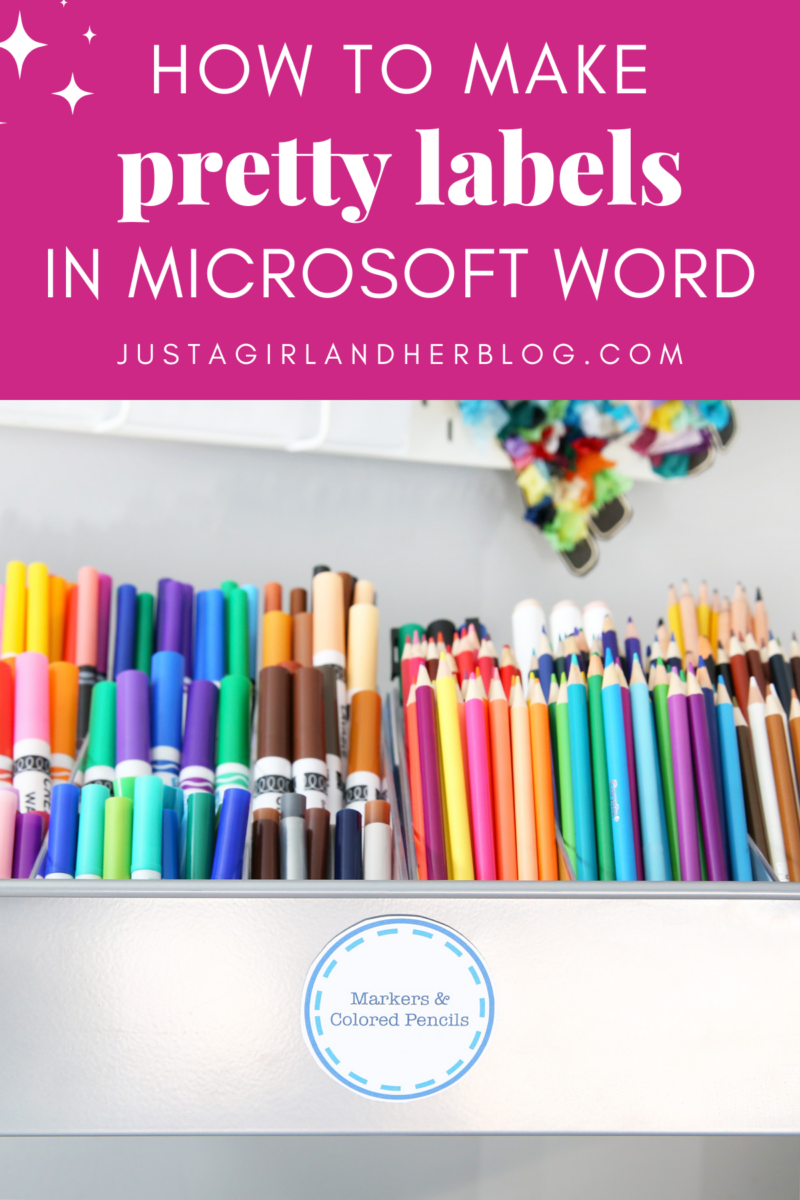
How to Make Pretty Labels in Microsoft Word + FREE Printable
Learn how to create pretty, custom labels in Microsoft Word that can be printed in just about any shape, size, or color scheme!
This post contains affiliate links. For more information, see my disclosures here.
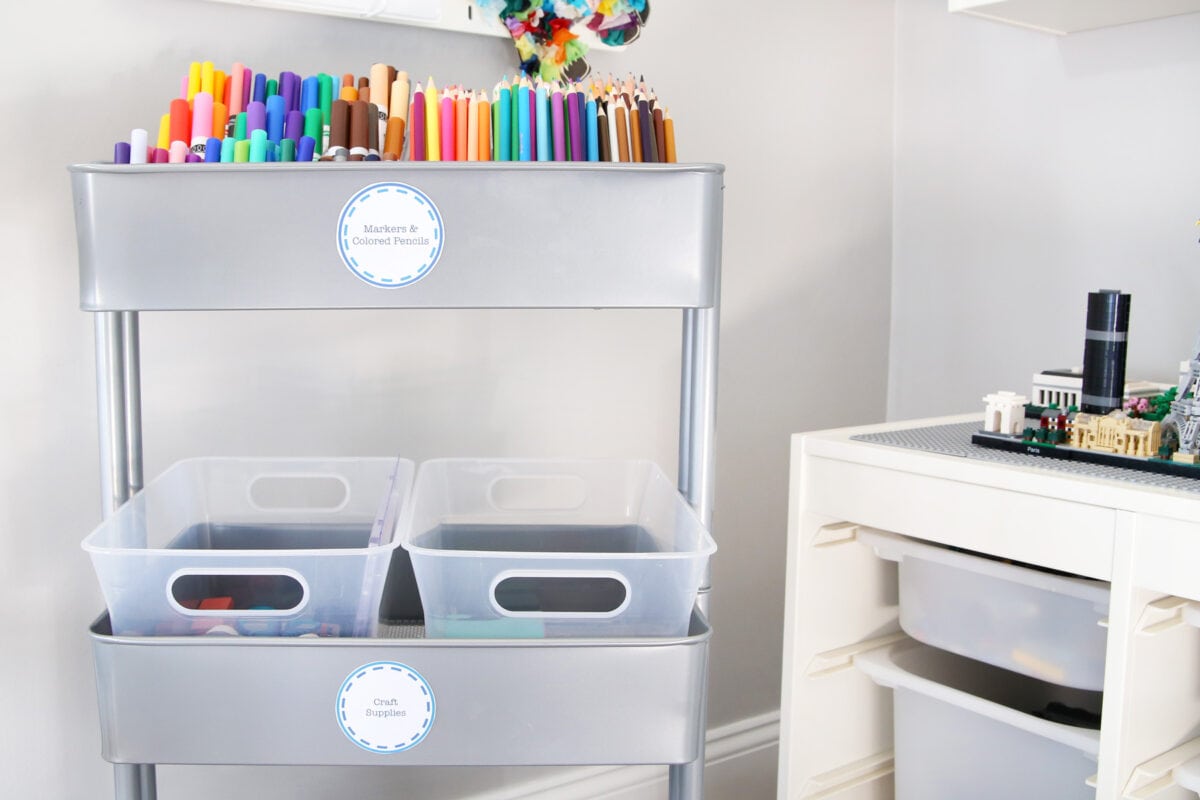
I must admit, I am just a teensy bit obsessed with labels. I put them on just about everything in our house. They’re perfect for getting organized, helping the boys find what they need, and adding a pretty touch to a basket or gift.
If I’m making labels with adhesive vinyl, I typically use my Cricut cutting machine. When it comes to creating pretty paper labels, though, I can’t help but head back to my old stand by, Microsoft Word, for all of my label-making needs.
Word is great because it’s super-simple to use. And almost everybody has it, so it’s really easy to email and share projects. I’m sure there are about a million ways to create pretty labels in Microsoft Word, but here is my tried-and-true method.
How to Make a Label in Word Step-by-Step
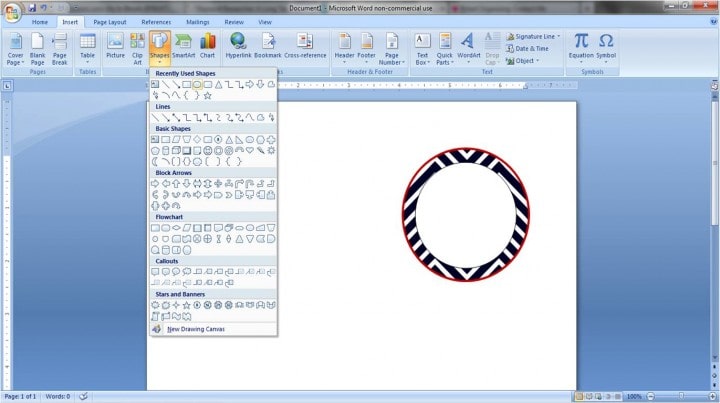
1. Choose your shape.
Beginning with a blank document, click on the “Insert” tab, select “Shapes,” and choose the desired shape for your label. I picked the circle.

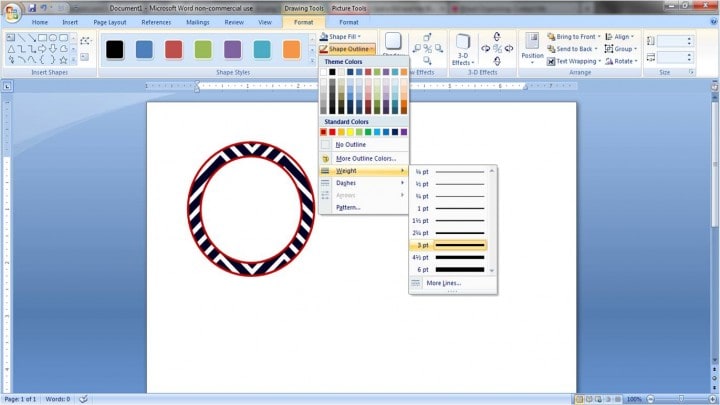
2. Adjust your outline and fill settings.
Once you’ve drawn your shape to your desired size (I chose 2.5″ x 2.5″.), you’ll want to make it look pretty! I usually like to make the outline of my shape a little thicker so that it is well defined when I print it out.
To do that, go to the “Format” tab, and under the “Shape Outline” drop down, you will see “Weight.” I chose 3 pt; you can make yours thinner or thicker depending on your preference.
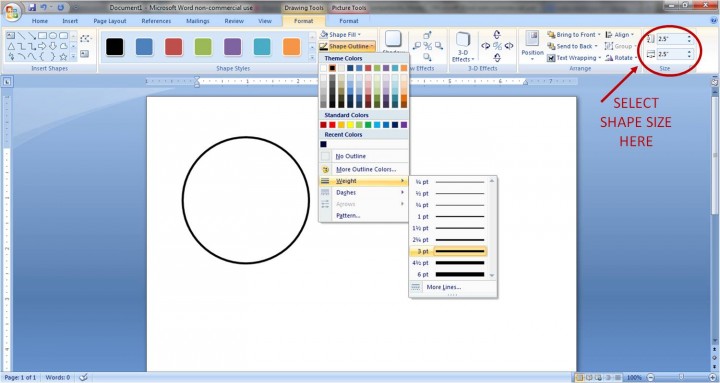
You can also change the color of your outline in the “Shape Outline” drop down. I picked dark red.
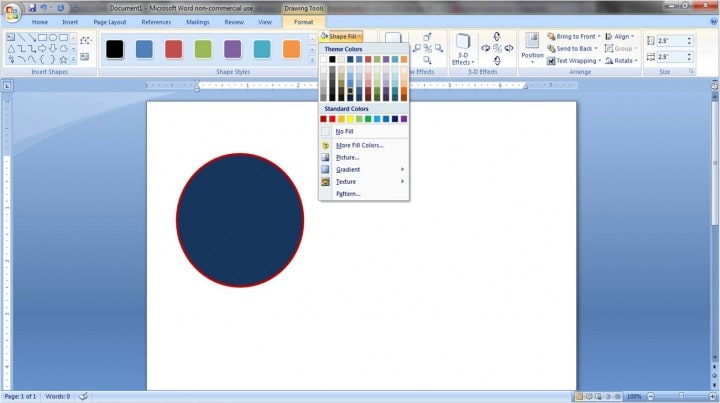
While we’re changing colors, let’s go ahead and change our fill color as well. Right above “Shape Outline,” you’ll see the “Shape Fill” option. You have a few choices here. You can fill your shape with a solid color.
Or you may want to put a design inside your shape. By choosing the “Picture” option from the “Shape Fill” drop down, you can use any picture file on your computer as your shape’s background.
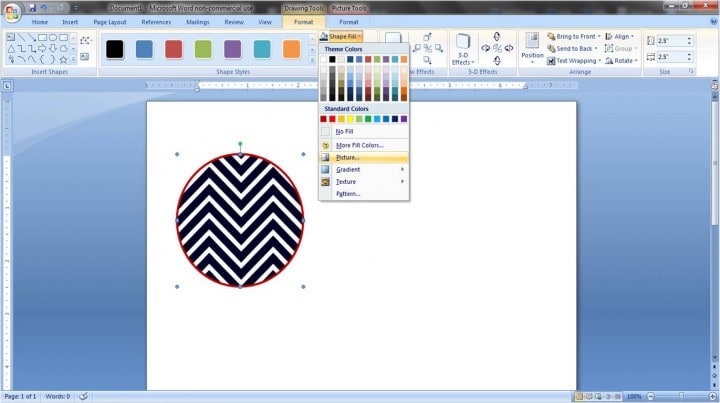
You can also play with the “Gradient” and “Texture” options until you find the background of your choice.
3. Add a layer, if desired.
I think it always looks nice to add a second layer to your label. You get to have a fun color or pattern in the background, but you also get a clean white surface for your wording. To add a layer, you’ll go through a similar process: choose your shape (“Insert” tab, “Shapes” button), and size it correctly. I did 2″ x 2″.
Then adjust your outline width and outline and fill colors. I went with the 3 pt dark red outline again, and I chose to keep the fill color white, but you could always pick a color.
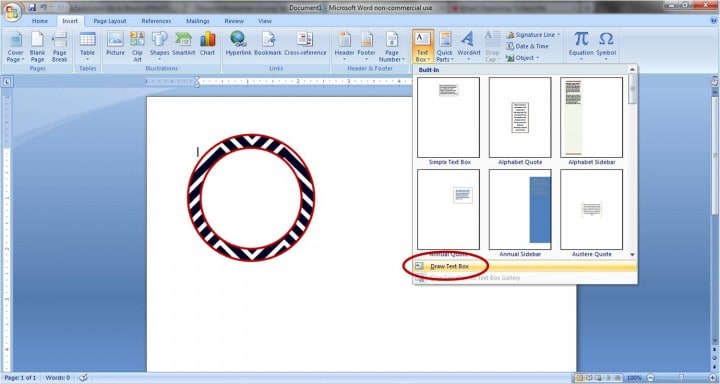
4. Add your text.
To do this, you’ll want to go to the “Insert” tab and select “Text Box.” Choose the “Draw Text Box” option at the bottom of the drop down menu.
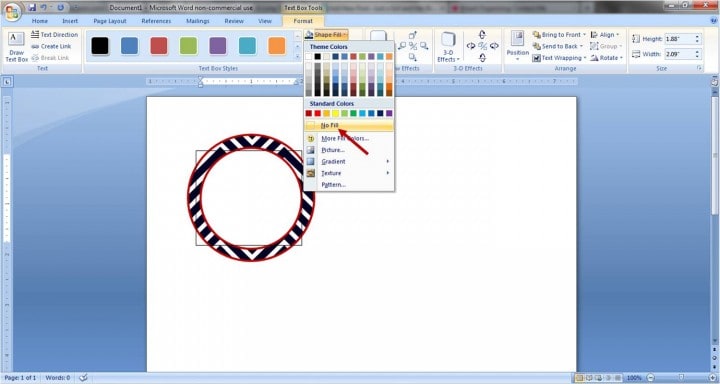
Draw your text box over your existing shape. Then, so the text box doesn’t block the beautiful label you’ve made, you’ll want to make it transparent. With the text box selected, go to the “Text Box” tab, and under “Shape Fill” choose “No Fill.” You will also want to choose “No Fill” for the “Shape Outline.”
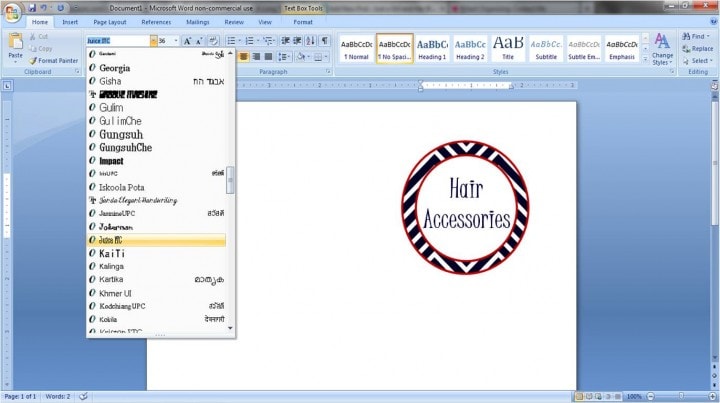
Once your text box is transparent, you’re ready to type. Add your words, and change the size, font, and alignment like you would in a regular Word document. You can also play with color! I used a 36 pt font called “Juice ITC” in dark blue.
5. “Group” your label.
The last thing I like to do when I get the label the way I want it is to group it together. This allows me to move it around the page as one unit rather than trying to move each piece individually.
To use the group feature, hold down the “Ctrl” key on a Windows computer or “Command” on Mac and click on each element of your label so they are all selected.

Next you’ll want to right click on your selection and under “Grouping” choose “Group.”
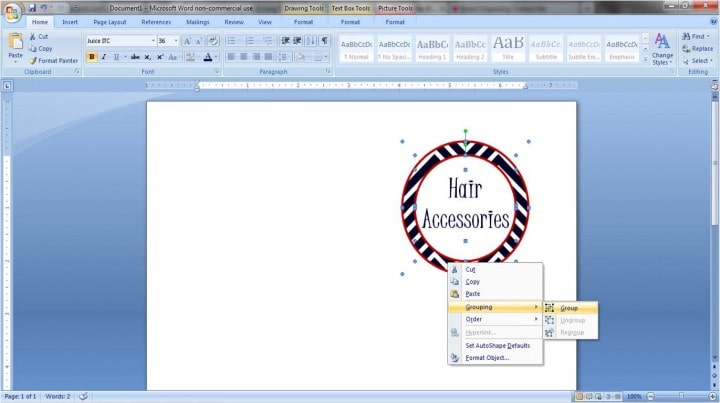
TA-DA! Your label is now one cohesive unit! You can move it around the page, copy and paste it, change the text, go crazy with it!
Now for all you overachievers out there…
Making Labels in Microsoft Word: The Bonus Round
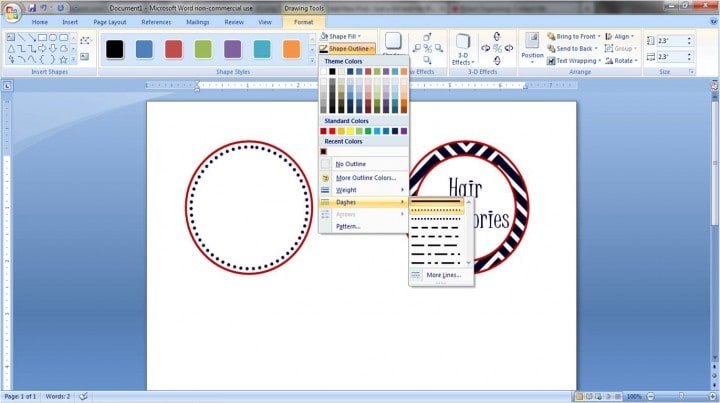
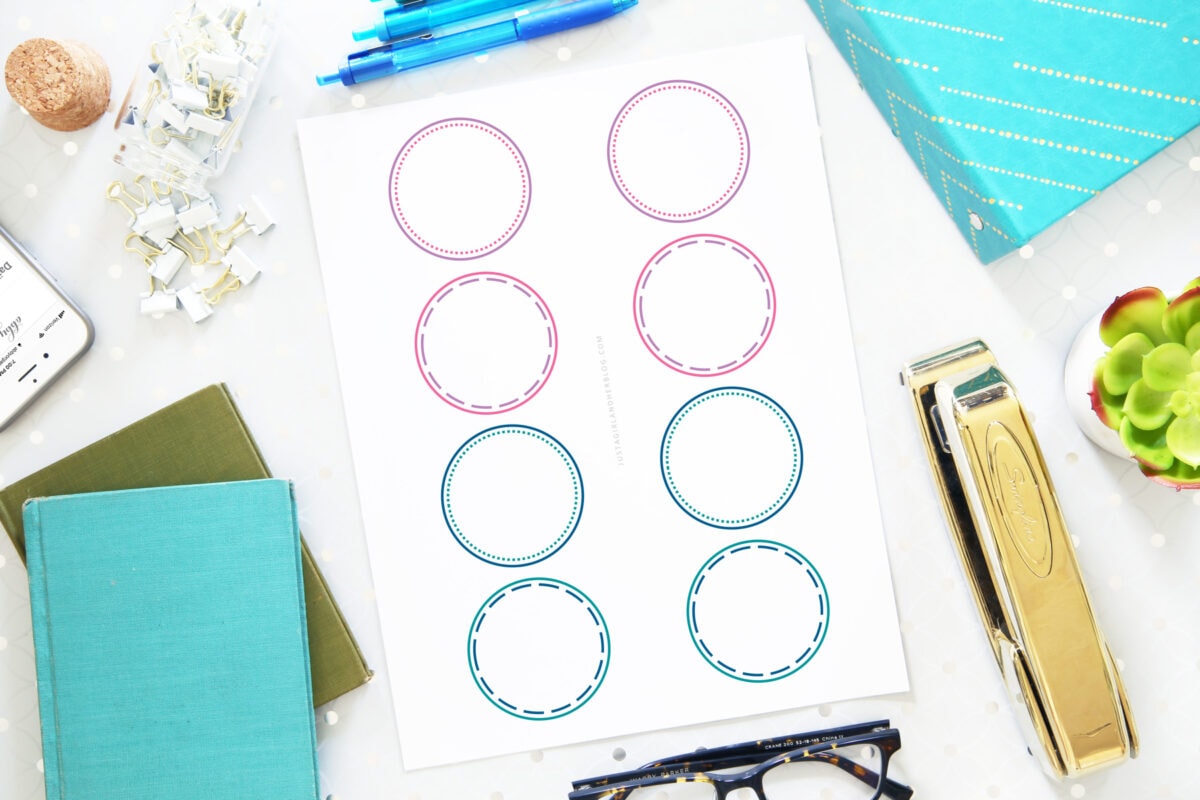
Another fun thing to play with is the outline style. I’ll start out with the same white circle with a dark red outline, but instead of using a colored background, I’ll add interest with the second layer.
For the “Shape Outline” of the inner circle, go down to “Dashes.” You will be able to choose dots (as I did), squares, dashed lines, etc. Just another cute dimension to add to your labels!
Though fancy programs and machines can be really great, it is possible to make pretty labels just using Microsoft Word. In my opinion, it is the simplest program to navigate, and it still gives beautiful, fully-custom results.
How to Print Labels From Word
After you’ve created your cute labels, what’s next? I typically print mine out (with my home ink jet printer) on white card stock so that they’re sturdy, and then cut them out by hand.
If my labels are going to be in a higher traffic area, I’ll laminate them to protect them a little bit more. Laminated or not, I typically just attach my labels with tape or velcro dots.
My Favorite Laminator
I have used this laminator for years, and it is always my go-to when I want to make my labels or other printables a little sturdier.

If you want to use a label that is more like a sticker, Avery has many templates for their stickers. You would simply head to their website, find the template that matches the stickers that you purchased (you can search by the number on the pack), download the template, and create your design within the guides they provide.
My Favorite Labeling Supplies
And just for fun, I’ve included a page of simple printable labels to get you started. Happy labeling!
Making Labels in Microsoft Word: Frequently Asked Questions
Want to save this post to revisit later? Be sure to pin the image below so you can find it easily!
What is your favorite way to make labels?
This post contains affiliate links. For more information, see my disclosures here.
Nice tutorial! I think Microsoft Word gets underestimated. It has quite a few image editing tools available to it. I didn’t realize you can fill a shape with a picture! Very nice!
Thank you for the very helpful information. I’ve been using the Avery label
Program. I love it, but it’s inconsistent when printing. I’m wondering how I can make my company name curve with the top of my circle label.
Thanks!
Hilary
Hi, Hilary! I’ve used the WordArt feature in the past to curve my wording. Have a great day!
~Abby =)
This is a great tutorial. I’m using this for my daughters Baptism favor tags and was curious if you knew a way to add a picture like a cross inside the label? I’ve tried clip art and the picture doesn’t look right when I insert it. Was wondering if you knew any tricks.
Thanks Nicole
Hi, Nicole! This post has some tips for helping ClipArt blend in more naturally with wording and graphics: https://justagirlandherblog.com/bunting-banner-in-word-clip-art-tips-and-tricks/ . I hope this helps!
~Abby =)
loved this but how do I copy and paste the whole thing iv added a txt box and for some reason the background image copies but not the txt box
Hi, Sharon! It’s hard to say without being able to see your computer, but have you selected the text box and clicked on Shape Format > Arrange > Wrap Text > In Front of Text ? If “In Front of Text” is not selected, the text box will not group with the other shapes. I hope this helps!
~Abby =)
Cute! I use Publisher for a lot of my labels and such but Word…this is a great option for those that don’t have any photo editing tools. Thanks for sharing! I’d love to have you link this to Titus 2 Tuesday this week on Cornerstone Confessions.. I hope to see you there.
Kathy
Thanks, Kathy! I used Publisher on my old computer and loved it, but when my new computer didn’t have it {and I was too cheap to buy it ;)} I learned to do most of the stuff in Word. Thanks so much for inviting me to your party– I linked up!!
~Abby =)
Just curious… how did you make the shape on the top that says How to make pretty labels in microsoft word? I am always looking for new shapes. Is there anyway to download more shapes to word like the one you used?
Hi, Ashley! Thank you so much for checking out my blog! That shape is actually from picmonkey.com. If you go to picmonkey.com and choose the “Design” option, you’ll get a blank canvas. Click the “Overlays” button on the left side of the screen. (It is a picture of a butterfly.) About halfway down the Overlays list, choose “Labels.” The shape is the second one from the left in the second row. Draw it the size you want and make it the color you’d like. Then choose “Save.” It will save as a picture file. Then in Word, go to “Insert” then “Picture” and choose “From File.” Pick the file you just saved from PicMonkey and you can add words on top of it, etc. Hope this helps! Have a wonderful week!
~Abby =)
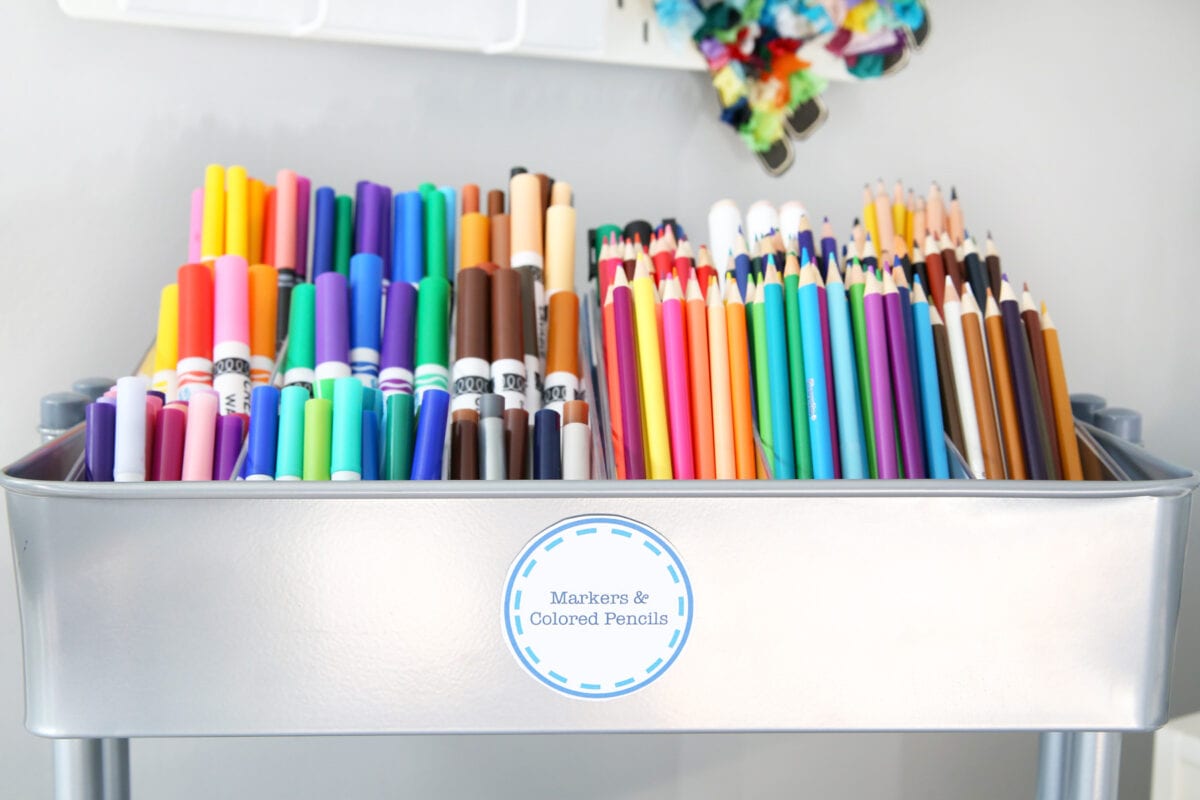
I am really LOVING these pretty labels! I need assistance on how you created the crayons label. I am needing some for my classroom. Thank you!
Thanks so much for all the good tips on creating labels. 🙂 I just wanted to mention that, I too, wanted the shape you posted for ”how to make pretty labels”. I went to picmonkey and they want you to do a free trial and then charge a fee. So, I went to fotor and created the same shape completely free. 😀
This is great – what a helpful tutorial. Following from the CC Blog – hope you can follow back 😉 https://www.facebook.com/HappyAndBlessedHome
Monica
https://happyandblessedhome.com
PS I do a Friday Linky party if you want to link up!
https://happyandblessedhome.com/category/family-fun/
Thanks, Monica! I’m your newest follower and will be keeping an eye out for your link party! Thanks for visiting the blog!
~Abby =)
Thank you so much for posting about this. I’m always making printables over at seasonofahomemaker.blogspot.com and always need to find ways to “jazz” them up. Thank you again.
I found you from crafty confessions.
Just stopped by your blog and the first two things I saw were Bible verses and Harry Potter. I think we’re soul mates!!!!! LOVE! (Also you have the best name ever. 😉 Thank you so much for popping over to my blog from Crafty Confessions!
~Abby =)
Very Cute! There are so many things you can do on powerpoint and word that most people don’t know about! I’d love if you would share this at Tell Me Tuesdays Today https://mothersniche.com/free-printablelinkparty/
Thanks so much for the invite Kristina! I linked up! Happy Tuesday!
~Abby =)
This is fabulous! Thanks so much for the great ideas!
Thanks, Krista! Thank you for stopping by the blog!
~Abby =)
AGH! How creative! I would love to own a Silhouette one day too, but for now I just use my regular old labelmaker. I blogged about how much I love it last month!
Oh my god I love you!! I need to do stuff like this for work all day long and I didn’t know about the grouping feature!!! I also didn’t know you could fill a shape with a picture!! This is going to save me so much time!! Thank you!
Yay! I’m glad I could help! Thanks for stopping by the blog!
~Abby =)
Great tutorial! I use powerpoint for picture collages in a pinch too.
Thanks, Shannah! {Gorgeous name, btw!} PowerPoint is a great program, too. I find it’s harder to get images exactly where I want them sometimes, but I LOVE that when you right click you have the option to “Save as Picture.” Use that all the time. Thanks for stopping by the blog!
~Abby =)
thanks so much for this tutorial!!!! i had NO IDEA the possibilities!!
xoxo
Thanks, Ashley! I’m so glad it was helpful! Thank you for reading!!
~Abby =)
I didn’t know you could create things like this on Microsoft Word!
I’m glad the tutorial was helpful! Thanks for reading!!
~Abby =)
Fun! I didn’t realize you could do so much with Word!
Thanks, Jessi! I didn’t either until I started playing around with it! Now I couldn’t do without it! 🙂 I’m so flattered that you stopped by– thanks for reading!
~Abby =)
These are fab – will definitely be pinching some of your ideas x
Pinch away! 🙂 Thanks for visiting the blog, Alice!
~Abby =)
Wow, I didn’t realize you could do so much with word! These look fantastic! I would love for you to come by and link this or another project at my brand new link party, starting this morning!! Hope to see you! https://domesticsuperhero.com/2013/03/07/domestic-superhero-sharing-thursday-1
Thanks so much for the invite, Allyson! I just linked up! Congrats on your new party!!!
~Abby =)
This is super helpful! I had no idea that word could have such great ways to make labels!
Thank you, Aimee! And thanks for connecting on facebook!!
~Abby =)
OMG {screams like a fan girl} this is fantastic. I’ve used shapes for flow charts and such but never thought of making my own labels (der). No more searching the internet for free printables, I’ll just make my own. Thank you, thank you, thank you.
Yay! I’m so glad this was helpful, Heather! Thanks so much for stopping by the blog! Have a great weekend!
~Abby =)
THANK YOU!!! This is amazing and I am so thankful for this! I never thought I had a program to make something cute and personalized like this. The options are endless! Thanks for the easy project!!! You rock.
Thanks, Carly! It makes me so happy to know this is something people can use and love! Thank you for reading!
~Abby =)
I feel so cool! I just followed your tutorial and made one! Thank you so much for sharing this 🙂
Yay! That’s great, Robyn! You made my day! {And I’m sure you ARE so cool. :)} Have a great day!
~Abby =)
GREAT tutorial Abby!! I sure love the printable!
Thanks for sharing this at The DIY Dreamer.. From Dream To Reality! Can’t wait to see what you link up tomorrow evening 🙂
Thank you, Christine! I love your blog, and I’m so flattered that you popped over here! Hope you’re having a great Monday!
~Abby =)
Great tutorial. A lot of “duh, how did I not think/know that!” moments when I read it. 🙂 My only question, Where is everyone getting that fun shape you used for the title of this post?
That would be picmonkey.com. It’s a great site for photo editing (and so easy to use!). You have to pay for the “Royal” features, but I just use the free version and it works well for me! Thanks for stopping by the blog, Jenny!
~Abby =)
This was sooo helpful! Thank you!! I’m jumping on the computer now to try it out!!
You are most welcome, Kate! Thanks for reading!!
~Abby =)
Wow, you have no idea how happy I am that I clicked on Toni’s link to your blog. this tutorial is awesome. I could have used it a month ago as I was killing myself trying to make labels through photoshop for my little man’s bday party. Thank you!
Thanks, Colleen! Glad I could help! Just clicked over to your blog and saw your adorable Prince C! I have two little boy C’s myself, one of whom is also four! What a fun age for boys! Thanks so much for reading!
~Abby =)
This is so much fun, thanks for sharing! Do you print this on paper and laminate the labels?
Thanks, Marianne! It depends on the project. When I made labels for my kids’ toy bins, I printed them on card stock and used my laminator. If the label will be more temporary, as with party decor or something like that, the card stock seems to hold up fine by itself. Thanks for reading!
~Abby =)
I clicked over from A Bowl Full of Lemons and I must say that this is genius! I’m with you and don’t want to fork over any money for those fancy machines! Thank you so much for sharing such a great idea!
Thank you, Stacy! I am pretty much the cheapest person on the planet, so if there is a way to do it for free, I’ll find it! 😉 I’m so glad you stopped by!
~Abby =)
I LOVE this… It never occurred to me that things like this could be created in Word!! 🙂
Thank you, Heidi!
~Abby =)
THANK YOU so much for this. Found you thru A Bowl Full of Lemons. I can’t afford a machine, & am sadly, pretty clueless as to what you can do on a computer. You made this so easy to understand.
Thank you, Barbara! I’m so glad it was helpful! Thank you for stopping by the blog!
~Abby =)
Just found this on Pinterest. What a great tutorial. Thank you. I have an older version but was still able to do a quick search and find all of the steps. I will definitely be using this again and again.
That’s great, Patti! Thank you so much for reading!
~Abby =)
I never knew how to do this! Thanks for the tips.
Visiting from A Bowl Full of Lemons
Thanks for stopping over from A Bowl Full of Lemons! I’m glad the tutorial was helpful!!
~Abby =)
This is kind of a duh…why didn’t I think of that! But I didn’t, so thank you for sharing!
Lol, thanks Ali! I almost didn’t post it because I thought everyone would say, “Um, everybody knows that already.” So glad I did! 😉 Thanks for stopping by!
~Abby =)
Hi Abby,
Greetings from Sydney Australia!
I popped over from a bowl full of lemons.
I showed this tutorial to my boss and she did a happy dance as we need to make easter “specials” labels for our shop. And this is perfect!
We were wondering where you got the chevron picture/texture from? As she has decided it is eggs-actly what she wants. 🙂
Thank you very much,
Melanie
Hi there! I loved this tutorial and can’t wait to make some labels! Quick question — once you’re ready to print the labels, will the designs automatically line up with the label paper or do you have to do some configuring with the printer settings? I know you can buy certain sizes (I have the round ones in mind, specifically)… so as long as it matches up in inches on Word, it will print out correctly? THANKS 🙂
Hi, Robin! There are two ways you could do it. You could print them out on card stock, cut them out, and use tape. Or if you want to use the label paper, I would recommend downloading a blank label template from the company’s website and using that as your guide when you make your shapes. I’ve used the templates at avery.com a bunch of times, and they are simple to download and use. Hope this helps!
~Abby =)
I just started with the organizing and labeling and THANK YOU! This is exactly what I was looking for…I didn’t think it would be so complicated to find those beautiful labels online and save, customize, print etc. Now my creativity can do it’s thing! You have no idea how much you’ve helped me…the step by step directions are awesome 🙂
Thanks, Kristi! I know what you mean…I love being able to create my own look with these. I’m so glad it was helpful! Have a great weekend!!
~Abby =)
Abby, Thank you so much for creating this tutorial! It was so easy to follow. I have a Mac so I had to find a few things on my own but the end result is the same. Thanks again!
You are most welcome, Jennifer! I’m glad you could play around with it and figure it out on the Mac. I’m not cool enough for one of those yet, lol. Hope you’re having a great weekend!
~Abby =)
I found you through Pinterest. This is awesome! I have been using my circle cutter and stickers to get this same look for the tops of jars. This is so much easier and faster. Great way to make little cards to go along with gifts! Can’t wait to play with it some more.
Thanks, Wendy! I’m glad it could be of help! Enjoy labeling and tagging! 🙂
~Abby =)
In the first photo of this
Post there is a red shape that has the words “how to make pretty labels” inside it. Where do you get that shape? Can you get it on word somewhere? I have used word a lot for labels but I’d really like to find that shape. Thanks in advance!!!
Hi, Charise! That shape is actually from picmonkey.com, which is a photo-editing site. It is fantastic! I use it for almost all my title pictures on the blog. Hope that helps! Thanks for stopping by the blog!
~Abby =)
Could you tell me the name of the shape by chance?
Their shapes aren’t named. If you are under “Edit a Photo,” choose “Overlays.” Then under “Labels” and “Basic” it is the second one from the left in the second row.
~Abby =)
Thank you so much!
Just wanted to give an extra helpful hint. I use Microsoft Word for Mac and instead of using the ctrl button and clicking each individual object, you can push and hold ctrl then push and hold a, and it will select all objects on the page. You can then ‘group’ all the objects together without having to worry about missing one! Hope this helps!! 🙂
Ooooh that is a GREAT tip! Yet another reason I need a Mac! 😉 Thanks so much for sharing your wisdom–I love learning new tips!
~Abby =)
First, what a great tutorial. And here is extra tip for windows word to make grouping easier. (I just discovered today while using your tutorial) Click on selection pane (located on the drawing tools ribbon), and a box will open up that lists all the text boxes, shapes, etc on the page. Select the ones you want and then right click and hit group.
I see some great labels in my Girl Scouts future.
Thank you.
Ooh that is a great tip! I’m wondering if you have a newer version of Word than me because I don’t have a selection pane option, but when I upgrade, I will definitely be using that fun little trick! Thanks so much for sharing, Dawn! Happy labeling!
~Abby =)
Thanks Abby for a great tutorial. I now wont look so computer stupid around my teens….. who are always rolling their eyes when I ask “how do I do that? ”
I do have 1 question. I just read Dawns comment which by pressing control A bundles it all, but how do I “group” it or save it as a label so I can duplicate these without copy and pasting each step?
.
Hi, Lorrie! Once you have all of your pieces selected, you can right click and choose “group.” Then you will be able to copy and paste the entire label as a unit. I hope this helps! Have a great day!
I’ve read ALL the comments through this one looking to see if someone had shared that tip yet!!! You beat ,e to it- I LOVE the hot keys on Word!
Gotta love those hot keys! Thanks so much for reading, Nicole!!
~Abby =)
Love the tutorial. I’m here from Pinterest.
I was wondering about the red shape at the top of the page too (I saw your answer about picmonkey- thanks!) so when I couldn’t find that shape in Word I played around with the “double brackets” shape. I put two on the page making sure they were the same size by getting the first one the size I wanted, then doing a copy/paste so the second was identical, then I just turned the second one onto its side and lined up the corners. It’s not 100% exactly the same as the red one, but it’s pretty close. Once it’s filled in with color it looks great.
I think I’ll be adding this trick to my post-it notes when I print on them to make labels so they are cute, easy, CHEAP & practical. So that will make them PERFECT!
Thank you!!
Great tip about the brackets! Thanks so much, Kay! I’m so glad you stopped by my blog. Have a wonderful week!
~Abby =)
Dear Just a Girl…
Thank you for encouraging me, helping me reach my goals and have fun!
Wow, thanks, Amelia! So glad I could help! Thank you so much for stopping by. Have a wonderful day!
~Abby =)
This is AMAZING!! Thanks so much!!!! I can’t wait to try it out!!!
You are most welcome! Have fun with it! 🙂
~Abby =)
I’m a public school teacher and after 5 years of the same theme, I wanted to change it and didn’t want to spend the amount of money I did the first time! So I have been all over Pinterest looking for cheap, cute ideas. Pinned this weeks ago and SO thrilled, going to work on my new labels today!
Yay! So glad I could help! I’m a former teacher too…I learned all of my tricks in Word from making handouts! 🙂 Have fun making your labels!
~Abby =)
Thanks so much for the tutorial just found you on Pinterest! I enjoyed making labels, but making multiples of a design was quite a hassle. Now, thanks to you i know that I was missing the “grouping” step. Can’t wait to get started, thanks again~
Yay! So glad I could help, Sheryl! Happy label-making! 🙂 Have a wonderful week!
~Abby =)
Thank you for posting this. I’ve done this so many times on a document but I didn’t even think of making labels. I’m going to be busy during this summer break!
Have fun label-making, Bettina! I actually figured out a lot of the Word stuff when I was teaching and making handouts all the time. I have so much respect for you teachers–it’s a tough {in a good way} gig! Enjoy your summer!
~Abby =)
I have one question….I have followed your directions step-by-step, but can’t get the pattern to be thick like yours. Mine are small and fine. What can I do to change this? I can’t wait to start using this in my classroom!! No more envy over cute labels…I can do them too!!
I emailed you, Felicia! Let me know if you have any questions! Happy labeling!
~Abby =)
OMGoodness!! The grouping trick has just changed my life! I am so tired of accidentally moving text box’s and this has put an end to it!!! I made a bunting banner from your tutorial yesterday and now I am making some labels. Thank you SO MUCH for your tips! 🙂
Aww, yay! You just made my day, Cassaundra! I’m so glad the tutorial helped! Have fun making labels, and enjoy the rest of your week!
~Abby =)
Hey! I am a teacher who has been following Pinterest for a while…I look at all the labels and such teachers use to jazz up their room. This morning I started thinking, there has got to be an easy way to do this. Started piddling, then found this blog. I am so pumped that you shared this and how easy this is. Can wait to start! Thanks!
Thanks so much, Lee! I actually learned the ins and outs of Word while I was a teacher and started fiddling around with stuff to make worksheets! I have so much respect for those of you who teach and do it so well! Thank you for popping over to my blog. Have fun labeling!
~Abby =)
It was really easy!! Thanx a lot!! 🙂 Its my baby girl 1st Birthday!! Customize by mommy!!
Yay! I’m so glad it was helpful! I’m sure your daughter’s first birthday party will be adorable! Have a wonderful 4th, Tania!
~Abby =)
Hi Abby,
What is the trick to perfectly center your inner circle in the outer circle? Do you just eyeball it? I can’t seem to get it to look right.
I’m super excited about this even though they aren’t perfect, I’m making all sorts of labels for my daughters first birthday. 🙂
Hi Sadie! When I am grouping the images together, I hold down “Ctrl” and click each image and when I do I can see if the little boxes that appear when I select an image are lined up. If they’re off a little bit, I unclick one and move the other one around and then check it again until the boxes are aligned. I’m sure your daughter’s birthday is going to be super cute! Have a wonderful weekend!
~Abby =)
Hi! I love these tips! and really want to try it out…but
What version of Word do you have?
When I click insert, there’s no “shapes” option??
Hi Sandi! I am using Word 2007 and I have a PC. If you let me know what version you have, I can try to figure out how to access the shapes feature. Or if you search for “insert shapes” in the help screen (which can be found by pressing F1), it can probably direct you too. Have a great week!
~Abby =)
Thank you so much for this tutorial! I would love to learn how to do printables and just don’t know where to start. This was a big help to me.
Yay! So glad I could help, Ronda! Happy labeling!
~Abby =)
I’ve been wanting to know how to do this for a while. So glad I took the time to find it. Your tutorial is super easy! Thank you!
Yay! So glad it worked for you! Thanks for stopping by, Gigi!
~Abby =)
This is simply amazing….I’m a school teacher who loves to bring an at-home comfort to my students so I’m always looking for cuteness but it gets expensive..thank you!!! I love the red parenthesis label and read one of your readers tips any other simpler way of creating that parenthesis Label??;)
Thanks, Elizabeth! I used to teach, too, and have so much respect for teachers–it’s a tough job! The red parenthesis label is actually an “overlay” from picmonkey.com, a photo editing site. If you go to the site and choose “Edit a Photo,” select a photo to edit, then choose the “Overlays” option on the left side of the screen (it’s a picture of a heart and two callouts), you will see it under the “Labels” section. It’s the second one from the left in the second row. Hope this helps!
~Abby =)
Thank you for this easy to follow tutorial. I always wondered how people made these. I pinned this. On this ago but now that summer is here I had the time to follow. Question though….when I layer and the. Add text box like instructions say and then group the new layered (no fill shape) disappears so it is the shape with picture and then the text. So the text is on to of the picture. I’m thinking you have to arrange front to back etc but never get that right and no matter how I change it it doesn’t make a difference, any suggestions?
Thanks
Lorri
Thanks, Lorri! Without seeing your project, it’s hard to know exactly what’s happening. I’ve had something similar to what you’ve described happen when I haven’t selected all of my layers. The layer I forgot to select moves to the back. So maybe double check that you’re selecting everything. Hope this helps!
~Abby =)
I’m so glad that I found this!! I too am a teacher and I have been wanting to make new labels. I had no idea how easy it was to do! One question! How did you get your zigzag lines to be so thick? I have been playing around for awhile and I can’t figure it out! I’m a bit obsessed with chevron! Thank you!
Thank you so much for the tutorial. I’ve been all over the web looking for ideas for a label for a church project…needs to be FREE, of course. Thank you for simplifying it for me. Now I just need to try to do it!
Yay! So glad I could help, Jolynn! If you have any questions when you try it, feel free to ask away! Have a great weekend!
~Abby =)
Thank you so much for this tutorial. I have been looking for something to help me make a calendar and I found a great printable but it only includes 5 days of the week. This is so awesome because now I can make my own. Thank You Thank You Thank You!
Yay! So glad I could help! Happy creating!
~Abby =)
what do you suggest for cutting them out? That’s my biggest problem, like having to cut out a perfect circle. Do you have any tricks or tips for that?
Hi, Chailey! I usually just cut mine out with scissors. I find that if I make my border a little thicker, it’s not as noticeable if my circle isn’t perfect. You could also try a punch. (Search “circle punch” on amazon or other sales site in the size you’re looking for.) One other thing you could do would just be to pick a more angular shape. Squares and hexagons still look nice, but the straight lines and angles are more forgiving. Hope this helps!
~Abby =)
THANK YOU FOR SHARING!! I have been trying to create my own bottle cap images and some tut’s I seen on you tube are confusing and make me wonder “Hmmm, did they really upload this with out editing or at least stop to look at the video will look like”?? lol, I love that you are detailed and give great tips.
Yay!! I’m so glad I could help, Julie! I haven’t attempted a video tutorial yet, but if I do, I’ll make sure to edit it well before posting! 😉 Hope you have a wonderful weekend!
~Abby =)
THANK YOU SO MUCH!!! <3 Now I can create instead of surfing the net for printables that match my style. Like a previous poster. I also am just starting to get organized and this tutorial is going to help me so much! 🙂 Have a wonderful week!!
Yay!! So glad I could help! Happy labeling, Amber!
~Abby =)
Super simple…great tutorial! Pinning!!
Cindy @ Crazylou
Thanks for the pin love, Cindy!
~Abby =)
hi abby! came across your blog! managed to make a few pretty labels for a fren’s birthday! didn’t know microsoft word can make wonders.. thanks a bunch! 🙂
Thanks, Rina! I’m so glad the tutorial was helpful! Hope you had a wonderful weekend!
~Abby =)
Muy bueno!!!!!!!!!!!!!!!!!!
Searching for how to’s and came across this post — so thankful I did! Thank you so much for sharing your knowledge– Your generosity is truly appreciated!! 🙂 I opened up Word and walked through your instructions without difficulty and made some very pretty things — I feel oh-so-accomplished! Thanks again!
Yay! I’m so glad I could help! Congrats on your beautiful creations! 🙂 Hope you’re having a wonderful Wednesday, Miss Ali!
~Abby =)
Thanks for the tutorial – its amazing!!!!
Thank you, Charmaine! So glad it was helpful! Have a wonderful week!
~Abby =)
OH MY GOD! The Group step just changed my life!! haha I never knew you could do that! I have use Pages on my Mac at home and Microsoft Word on my work computer and I was able to easily figure it out on both! Thank you, thank you, thank you!
Yes! Thank goodness for the grouping feature! I’m so glad the tutorial was helpful! Hope you’re having a wonderful day, Robyn!
~Abby =)
I love these! (I just did a chevron monogram! How easy!!) And all of these years I have been using the fancy programs, ie illustrator, indesign, etc. but had NO idea good ol word could do this. I always import my images for stuff like this.
I always, always have a problem getting my round labels to match up within the circle gridlines even though I download that particular template. For instance if I had a border, it’s always off. How do you do it?
I hear ya on that one. The templates are difficult. A lot of times I just print mine on cardstock and cut them out by hand or use a punch if I have one big enough. If I use a template, I’ll print a “fast draft” on regular paper first, then hold it up to the light with the template behind it to see if I need to nudge the labels one way or another. (Very scientific, I know! 😉 Thanks so much for stopping by, Duffy! Hope you’re having a wonderful day!
~Abby =)
I have enjoyed your tutorial for making pretty labels it was very easy to follow. I work in the office of an elementary school and to spruce up the office I’ve been placing labels on everything. The teachers have noticed and want to know how they can make labels for their classrooms. I’ve told them about your blog and they are excited to get started. Thank you for sharing.
Tammy! You just made my day! You are so sweet! I’m glad the post was helpful. Thank you so much for sharing it! Have a wonderful week!
~Abby =)
This is such an amazing idea! Thank you soooo much! I was contemplating about paying for it to get done, but now I can do it on my own!
Yay! So glad it was helpful! Happy labeling!
~Abby =)
Abbey, thank you for this easy to understand and well designed guide…I learned some helpful things that I didn’t know. Also, you have created a very appealling site…I’ll have to stop back later. I may have missed it but:
1) How do you print/cut the round labels as peel and stick?
2) I’d like to use these tips for peel and stick labels for spices, jars etc using Avery (8160), any tips? Centering is my challenge!!!
Thank you, Leslie! It can be hard to get them perfectly centered. If you go to avery.com, you can download a template for the stickers you have. (Type 8160 in the search box.) Once you download it, you will see guides that help line everything up. I usually print mine out on scrap paper first and hold it up to the light with the labels behind it to see if it matches up or if I need to make adjustments. Hope this helps!
~Abby =)
Hi Abby – I just found your site today and have already gotten busy making tags for my son’s upcoming 4th birthday! I have spent a fortune purchasing products like these, so to be able to use my own creativity to make them is life-changing!! Just one question, when using a pattern to fill a shape is there a way to make the pattern bolder? I love the chevron you used here but the one in Word is pretty thin, as are the stripes, etc.
Thanks again!
Jodi
Yay! Hope you’re having fun making the tags! As far as filling the shape, I would do a google image search for the type of pattern you want (blue polka dots or green stripes, for example) then find one that is the thickness you want, save it as a picture, and use that as your “Shape Fill.” Does that make sense? I made my chevron background in Photoshop Elements, and I’ll email you that one in case that’s what you’re looking for. Let me know if you have questions. I’m happy to help!
~Abby =)
thank you so much.
You are most welcome, Sarai! Have a wonderful week!
~Abby =)
This is awesome! Thanks from a graduate student! 😀
Thank you so much, Chanel! Hope you’re having a great week!
~Abby =)
Hi thanks so much for your label tutorial….I was able to do everything except the last step – grouping….for some reason i’m not able to group the text box…can you tell me what i’m doing wrong…when I click on the box all corners light up and then I press the ctrl bottom but nothing happens. the text box is not fixed it moves around….I would appreciate your help thanks so much…Enza
Hi, Enza! That happens to me when I’m working in a .docx document rather than a .doc document. Try doing “Save As” and choose “Word 97-2003 Document” (some versions say -2004 I think). Once it’s saved that way, you should be able to group them. Hope this helps!
~Abby =)
excellent tutorial! I made labels for my sister-in-law’s baby shower favors; they came out great! thank-you so much for sharing!!
Yay! I’m sure your SIL’s shower was beautiful! I’m so glad it was helpful! Have a wonderful week!
~Abby =)
That is SO helpful! Thank you!!!!
So glad I could help, Donna!
~Abby =)
I was really hoping that you had explained how to make the blue “flour” one that is shown in your first photo. As in how to make a square with the corners rounded like that.
Opps – forget that last comment! I am blind and did not see that it is a shape there. I have looked for it sooooo many times! lol
Lol! So glad you found it, Michelle! Happy labeling!
~Abby =)
Thank you so much! We are moving to a new house next month and I ma looking forward to using your tutorial to make labels for the kids bins in their new toy room as well as my new kitchen (which is 3 times bigger than my current one!).
Thanks from an obsessive organizer 🙂
Ooh so jealous of your 3 times bigger kitchen!! 😉 Congrats on the new house! Happy organizing!
~Abby =)
Thank you so much for this tutorial. This just comes right in time. I was about to hire someone to do the labels for my business but then I stumbled upon this. I will link this to my next blog post as well.
Yay! I’m so glad I could help! Happy labeling!
~Abby =)
Thank you so much! Your blog helped me and brightened my day! God bless you!!!
You are so sweet, Miss Megan! Thank you so much! Enjoy the rest of your week!
~Abby =)
https://justagirlandherblog.com/wp-content/uploads/2013/03/How-to-Make-Pretty-Labels-in-Microsoft-Word.jpg
All of your how-tos use squares or circles which are easy to find in “shapes”, but how do you make a four-sided bracket pretty shape like the one you use on your blog header that is red and filled with the words “how to make pretty labels”? love your blog by the way and I never read blogs.
Thank you so much, Virginia! You are so sweet! I should put the answer to this in the post because people ask all the time! I actually used picmonkey.com to put that graphic over my title photo. If you go to the site, choose “Edit a picture.” Open any picture and click the “Overlays” button. (It is a picture of a butterfly.) About halfway down the Overlays list, choose “Labels.” The shape is the second one from the left in the second row. Hope this helps! Happy labeling!
~Abby =)
How do you get that red shape that says “How to make pretty labels in Microsoft word”? I can’t seem to find it in the shapes….Thanks.
I should put the answer to this in the post because people ask all the time! I actually used picmonkey.com to put that graphic over my title photo. If you go to the site, choose “Edit a picture.” Open any picture and click the “Overlays” button. (It is a picture of a butterfly.) About halfway down the Overlays list, choose “Labels.” The shape is the second one from the left in the second row. Hope this helps! Happy labeling!
~Abby =)
I tried your suggestions about grouping but it still doesn’t work. 🙁
That is so odd! I’ve never had a problem with that step before. What kind of computer do you have and what version of Word? Here’s one other way to try grouping: Under the ‘HOME’ tab, way over to the right choose ‘select,’ then ‘select object,’ then using your mouse drag the dashed line around all the objects you want to group. Then “group” them. I wish I could see your screen to help troubleshoot better! It’s so hard trying to figure it out from afar! Hope you have a wonderful weekend!
~Abby =)
Really helpful and clear. My question is do you know a way you can do the same, ie take a pattern from a picture and fill a letter ? So if I want to do a logo for DoinDubai, can I use something like that to fill the d letter maybe ?
Many thanks Monica
Thanks, Monica! You can fill a letter with a picture. Here’s a really simple tutorial on how to do it: https://www.createblog.com/all-other-tutorials/14189-put-an-imagepattern-inside-of-text-using-microsoft-word/ Have fun creating your logo!
~Abby =)
Such a great tutorial! Thanks for sharing! I have always wanted to make my own fun party invitations, but did not want to invest the time or money with something like Photoshop or Illustrator – such a happy medium 🙂 I linked to your tutorial in my most recent post on http://www.ciaoannie.com to share the love. Thanks again!
Thank you so much, Anne! I’m so glad the tutorial was useful! And thanks for the link love, too– I’m honored! Have a great day!
~Abby =)
Thank you so much for all the information. I am having trouble making the red sticker. I went to the website you provided, upload a picture and found the sticker, but I do not know how to get the sticker to Word.
Hi Lori! Are you referring to the one in picmonkey? Some of the options have changed since I answered the above comments. If you choose the “Design” option at picmonkey.com, you’ll get a blank canvas. Select the overlay as you did before and make it the color you’d like. Then choose “Save.” It will save as a picture file. Then in Word, go to “Insert” then “Picture” and choose “From File.” Pick the file you just saved from picmonkey and you can add words on top of it, etc. If this isn’t what you meant at all, let me know and I’ll try to answer your other question! Hope you have a wonderful weekend!
~Abby =)
Thank you so much….That answered my question. Have a great weekend too!!!
Ok may be a dumb question but I have no clue about labels.After you have a design what next?Do you buy sticky back paper to print them on?I have some free labels i have saved but don’t know what to buy to print them on.I have a inject printer.So how do you get a sticky backed label?
Hi, Pat! It’s not dumb at all! I’ve done lots of different things. I’ve printed my labels on white card stock and attached them with tape. I have printed on white card stock, laminated them, and then used a velcro dot to attach to something. If you’re wanting to use the labels that come with a sticky back, you can download a template from avery.com, and it will give you guides to show you where you need to put your design for it to print on the labels. (Look at your package of labels; it will have a number on it. Type that number into the search box at avery.com or the site of the company that makes your labels, and the template should come up for you.) I hope this helps! Have a wonderful week!
~Abby =)
OMG just what I was looking for
I’m so glad the tutorial was helpful, Angie! Have a wonderful week!
~Abby =)
Thank you for this. I am not very tech-savvy and this is super easy!
Thanks, Ida! I’m so glad it was helpful! Have a great night!
~Abby =)
Thank you so much!! I spent hours trying to figure out how to make Valentine labels and could not figure it out. You saved the day!
Yay! So glad I could help! Happy labeling! 😀
~Abby =)
Thanks for sharing this. I never take full advantage of Microsoft word and I really should.
You are most welcome, Erlene! I’m glad it was helpful! Happy Valentine’s Day– have a wonderful weekend!
~Abby =)
Hi, Thanks a lot for this tutorial, and for sharing this, it really help me with my son’s birthday party.
I never take full advantage of Microsoft word and I really should.
I found you in Pinterest and I will to follow you
Have a nice day!!! 🙂
Yay! I’m so glad it was helpful! Thanks so much for stopping by my blog, Monica! Have a wonderful week!
~Abby =)
Hi, thanks again for sharing it!! How can you do the form label in fucsia color for “How to Make Pretty Labels in Microsoft Word”, I love that form!!!! Thanks in advance!!! Regards
Hi, Monica! Thank you so much for checking out my blog! That shape is actually from picmonkey.com. If you go to picmonkey.com and choose the “Design” option, you’ll get a blank canvas. Click the “Overlays” button on the left side of the screen. (It is a picture of a butterfly.) About halfway down the Overlays list, choose “Labels.” The shape is the second one from the left in the second row. Draw it the size you want and make it the color you’d like. Then choose “Save.” It will save as a picture file. Then in Word, go to “Insert” then “Picture” and choose “From File.” Pick the file you just saved from PicMonkey and you can add words on top of it, etc. Hope this helps! Have a wonderful week!
~Abby =)
Wow, thanks a lot for your help, sure that help a lot!!!! You are a genius so generous for sharing this tips 😉 Have a terrific week!!!
🙂 (sorry because my english it is not so good, I’m write you from Uruguay-South America) 🙂
Thank you so much for your sweet words, Monica! I think your English is great– I understood perfectly! Thanks for visiting my blog! Have a wonderful weekend!
~Abby =)
thank you thank you thank you for taking the time to write this for label/computer/microsoft word dummies like myself lol. I spent an hour yesterday trying to find free templates/make my own/etc and stumbled across this. Really appreciate the step by step instructions and screen shots! thanks again.
Yay! I’m so glad it was helpful, Katie! Happy labeling!
~Abby =)
I was panicking when given a simple task of designing labels at work and YOU SAVED ME LIFE. Thank you so much for your thorough and clear walk through! THANK YOU!!!!!!
Yay! So glad I could help! Happy labeling, Clarice!
~Abby =)
This is THE most brilliant tutorial I have ever seen! THANK YOU!!
Thank you so much, Caddie! Hope you’re having a wonderful week!
~Abby =)
This is great! I was wondering – do you know if this similar concept can be done using “pages” on a Mac? Thanks!
Thank you, Tina! I don’t know much about “Pages” at all, but if it has the “Shapes” option and “Text Box” option, I’m sure you could do something similar. Hope you have a wonderful week!
~Abby =)
OMG! This is amazing… how the heck did I NOT know about this?!
Thank you x1million
Lol! So glad I could help, JohAnna! Thanks so much for stopping by!
~Abby =)
This was amazing and so helpful! I love planning parties and always try to use fun food titles at them…and being able to make them like this is wonderful. Thank you very much for your tutorial!
Question: when I attempt to group my label is sometimes eliminates my “second circle” and text…any thoughts?
Just love being able to do these AND add pictures that are easily downloaded. Thanks!
Hi there!
Great website and thank you for posting! Amazing I can do these things in Word! 🙂
Any tips on how to make grouping work? I find that when I click on it, it eliminates my “inner” text box. Thank you!
Thanks so much, Fiona! I apologize for the delay in my reply! It’s hard to know for sure without seeing your computer, but when I’ve had one of my layers disappear before, it has been because I haven’t selected them all. If you’re having trouble getting them all when you click individually, try this: Under the ‘HOME’ tab, way over to the right choose ‘select,’ then ‘select object,’ then using your mouse drag the dashed line around all the objects you want to group. Then ‘group’ them. That’s easier sometimes. Hope this helps!
~Abby =)
Thank you very much! 🙂
Thanks so much for stopping by, Fiona! Hope you had a wonderful weekend!
~Abby =)
Merci beaucoup, très bien expliqué, j’ai pu immédiatement faire mes étiquettes pour ma classe! Ça va être beau!
Thank you so much for this tutorial It was amazing. I made some cupcake picks for my daughters upcoming graduation.
Yay! I’m so glad it was helpful! Congrats on your daughter’s graduation– so exciting! Hope you’re having a wonderful weekend– Happy Mother’s Day!
~Abby =)
I keep seeing these super cute shapes you’re using as labels…like the one above where it says “how to make pretty labels in microsoft word” I’m super eager to know how you make those shapes! I’ve been trying and trying with now luck 🙁
Hi, Alma! That shape is actually from picmonkey.com. If you go to picmonkey.com and choose the “Design” option, you’ll get a blank canvas. Click the “Overlays” button on the left side of the screen. (It is a picture of a butterfly.) About halfway down the Overlays list, choose “Labels.” The shape is the second one from the left in the second row. Draw it the size you want and make it the color you’d like. Then choose “Save.” It will save as a picture file. Then in Word, go to “Insert” then “Picture” and choose “From File.” Pick the file you just saved from PicMonkey and you can add words on top of it, etc. Hope this helps!
~Abby =)
I was looking for making labels for my moms classroom. I search for a good half hour and i found this tutorial and I am glad I did now i am going to make labels for my graduation party, my art studio and my room. Thank you
Yay!! I’m so glad it was helpful! Happy labeling! Hope you’re having a wonderful weekend, Brittany!
~Abby =)
Hi Abby,
Thanks for saving me a ton of money. I was on the computer for the past two days looking for a company to generate labels for my bath and body line. Your presentation is on point. I am now able to generate my professional looking labels without breaking the bank.
Thanks a million,
Denise
Aw, yay! So glad the tutorial was helpful, Denise! Have a great week!
~Abby =)
thank you for this i was wondering how you make a spiderman label for bday party any ideas
Hi, Mary! I would do a Google image search for Spiderman and find a picture that you like, then follow the tutorial and integrate the Spiderman picture. Good luck with the party planning!
~Abby =)
I have to say a HUUUUGE thank you to you for this tutorial! I pinned this some time ago knowing it would be helpful for me in the future. I am hosting a bridal shower for my soon to be sister-in-law and just made the most perfect printables because of your post. So thank you!
Yay! So glad I could help, Leslie! I’m sure the shower was beautiful! Have a wonderful week!
~Abby =)
Life saver! Thank you so much for sharing your knowledge. I wanted to recreate labels for my classroom and create some for my new blog, and stumbled upon your post via Pinterest. Keep up the fabulous work!
Yay! So glad they are helpful! I actually learned to do this stuff when I was making things for my classroom, so I’m always happy when they work for teachers! 🙂
~Abby =)
Abby,
Thanks for the step by step label making tutorial!
After you create the label, do you print it on some kind of sticker paper?
Also, how do you make your labels with the special tape you have?
Thanks,
Gina
Hi, Gina! I do different things with the labels. A lot of times I’ll print them out on cardstock and laminate them with my laminator. (You can get a laminator for $20-30 on Amazon.) You can use sticker paper like this for any shape label: https://www.amazon.com/Avery-Sticker-Project-Inches-03383/dp/B0000C0CJQ/ref=sr_1_1?ie=UTF8&qid=1405898656&sr=8-1&keywords=sticker+paper. Or you can buy round labels (https://www.amazon.com/Avery-Permanent-Print-To-The-Edge-Labels-22807/dp/B005IMAKYG/ref=sr_1_1?ie=UTF8&qid=1405898710&sr=8-1&keywords=round+labels) and then download the template from Avery.com, design your label within their guides and print them off. Hope this helps!
~Abby =)
Hello Abby,
Thank you so much for the helpful information about creating labels in Word. I had no idea so many options existed; I attempted to create my own label with the shapes field, and I decided to check the internet for tips, and I found your blog page. Your instructions and pictures make it easy to create labels, and I prefer this method because I am able to change all parts of my label whenever I want to.
Keep up the good work, and thank you for sharing.
Aver
I would like to say thank you! I absolutely loved the idea and it was SOOOO easy to do!
Thank you so much for these great tutorials! I have a question… How do you make the double brace label like the one in your picture labeled “How to Make Pretty Labels”??
Hi, Tyler! That shape is actually from picmonkey.com. If you go to picmonkey.com and choose the “Design” option, you’ll get a blank canvas. Click the “Overlays” button on the left side of the screen. (It is a picture of a butterfly.) About halfway down the Overlays list, choose “Labels.” The shape is the second one from the left in the second row. Draw it the size you want and make it the color you’d like. Then choose “Save.” It will save as a picture file. Then in Word, go to “Insert” then “Picture” and choose “From File.” Pick the file you just saved from PicMonkey and you can add words on top of it, etc. Hope this helps!
~Abby =)
Hi Abby,
I’m new to the diy and I love your ideas, thank you so much for sharing them. Can you tell me where I an bet the black and white zig-zag type of design you have inserted inside of the circle from and how or where to get them?
Thanks,
Nallely
Hi, Nallely! Just do a Google image for “black and white chevron,” right click the one you like and save it as a picture, then choose your saved file when you’re picking the background. I hope this makes sense!
~Abby =)
HI I just subscribed! WOW this was JUST what I was looking for! Quick question as I’m sure you’ve been bombarded, Is there any way when filling in the shape with an actual picture, to easily adapt the size of the picture inside the shape? For example….I found a picture of a piece of lace. I want the lace pattern to fill up the shape, and not just show the piece of lace. Does that make sense?!
Hi, Erika! It’s hard to know exactly without being able to see your computer, but the easiest thing to do would probably be to do a Google image search for “lace background,” choose one you like and save it as a picture, then choose that picture to fill your shape. If you’re set on the lace in the picture you already have, crop it down so just the lace is showing, and then save it as a picture. (If you’re on a Mac, you can just right click and save as picture. If you’r on a PC, you can crop it down in Word, copy and paste it into a PowerPoint file, then right click and save as picture.) If it’s just the lace showing on the file you’ve chosen, it should fill up the whole shape. I hope this helps!
~Abby =)
Thanks for the reply! Ok so when I did fill in the shape the actual piece of lace shows up just like the picture but so does the white background it was photographed on….I’m trying to get the lace to fill up the whole shape, like a pattern. So what I would need to do, would be to enlarge or ‘zoom in’ on the picture inside the shape I’ve made to fill in the whole shape. Does that make sense? Would that be a more complex issue that only photoshop or something could handle? I’m not sure if I’m making sense lol! But thanks again for this tutorial it’s really awesome!
Oh, my Word! I’ve been a humongous Word supporter since the day many years ago when I realized I could actually accomplish more quickly with Word than I could with Publisher. I create stuff every single day, I think! But this… your post has brought me to a whole new level of awesome. THANKS SO MUCH!!
Hooray for Word! 🙂 SO glad the post was helpful! Thanks for stopping by, Brandi!
~Abby =)
Thanks so much Abby! This is wonderful. I’m loving your blog. I do have a question though. When placing the smaller (blank) circle on top of the other one, what’s the best way to make sure the circle gets placed exactly in the center? I’m using a Mac and I’m having a hard time getting it aligned just right.
Great question, Karla! You will want to select both circles (hold down the command key and click on each one), then go to the Format tab. Toward the right side of your screen, you’ll see a drop down that says “Align.” Click “Align Center” and “Align Middle” and they should be perfect! Hope this helps!
~Abby =)
This is exactly what I needed! Thanks so much for your help!!
Hey, Thanks for all the great info. I am using it to make a newsletter for my students. I teach elementary PE. I was going to add that an easier way to select a group of objects may be to click and drag the mouse so that you make a box around the objects. As long as all the objects you want selected are completely inside the box it will select them all at onece. If you only get part of an object in the box it won’t be selected so you can still do this selection even if you have objects nearby.
Ooh thanks for the great tip, Caleb! Very helpful! Wonderful name, btw– my youngest is named Caleb! 🙂
~Abby =)
This is great, Abby. I need to create a collage.
Yay! So glad it was helpful! Have a wonderful week!
~Abby =)
Hi Abby, Thank you so much for this tutorial, and all the links to your other Word tutorials! This is going to help me so much with some of the stuff I want to do for my blog! Also, I just subscribed to your newsletter; I can’t wait to start reading all your new posts!
Yay! So glad it was helpful! Happy labeling! 🙂
~Abby =)
WOW!!! This was so helpful. I never knew you could do so many things with Microsoft Word! Thanks so much for sharing with us.
Prissy
Thank you so much for this tutorial. I’ve been trying to make so many different ornaments and things with my little kiddos photos and have had the worst time finding a tutorial until now. You’ve saved me so much headache…how did I not notice the “picture” option before? 🙂 Just in time for Christmas…their grandparents and I thank you!
I found this on pinterest, like most good things in my life, and tried this morning. I made some super cute labels for a recipe swap I’m hosting in a few weeks…and I can hardly believe it. I am generally so technologically challenged and have a hard time picking things up but I did! And now I’m wandering through my house looking for things to label. Because now I’m awesome. At label creating. Thanks to you!!!
can i ask what version of word are y using. the one i have now doesn’t have all the options yours shows.
thanks
I just wanted to thank you for your blog.
I was looking for less expesive ways to do Christmas this year and I found out how to make labels for my homemade gifts. Thank you so much!
I am going to explore your blog now and see if there is anything else nifty I could use.
Merry Christmas!
Abby,
Thank you for your amazing passion and hard work. You have inspired me to start my on blog with the focus on teaching resources and classroom organizing to start. I bought your new blogger book and am all most done. It has been so helpful. My goal is to have it up and running by the end of February. Thank you!
Congrats on the new blog, Kim! Be sure to let me know when it’s up so I can check it out! Have a wonderful weekend!
~Abby =)
Thank you for this! Actually, I have a cricut but don’t use it all that much. Probably haven’t touched it for a year now. So please don’t feel like you’re missing out on much. Making something in Word and handcutting is so much quicker when making only one or two of something, especially since I only have a couple of cartridges. Not only is the unit expensive, but I can’t find it in me to keep buying more cartridges with only a couple shapes included that I need. It’s quite frustrating. I’d say, save your money and stick with Word!
Thank you for this AMAZING tutorial!!!! I can’t believe I can FINALLY do this stuff on my own! Thanks so much for your time and effort!! Awesome blog! 🙂
Thanks hate word only cause I don’t understand it, Thanks for the help!
trying to group and doesn’t allow me to. I hold the control key down and point and only get arrow at the out corners of box. I click and then right click and doesn’t give me the grouping option.
I really love your blog! You have a easy way of explaining things that is so nice. I have a question that I was hoping you could help me with. I want to make a circle label. But I also want to wrap some text around the inside edge of the circle. How do I do that? Any help would be greatly appreciated. Thanks so much,
Sincerely,
Bonnie Russell
Please help ! I have followed your directions to a T — watched your video over and over …. read the instructions repeatedly but I cannot seem to group my images together. I have tried holding down the Control key on my laptop … also the Shift key and no key at all … just staying on the format page. Nothing seems to work. Can you please help. Many thanks
Thanks Abby this was just what I needed . Very clear tutorial Fantastic!!
Hello,
The tutuorial was very helpful, however I am trying to “group” my label and for some reason I am having difficulty. I use a mac, I am doing what you said but when I got to “grouping” the “group” button is not highlighted therefore not allowing me to group. Is the process different for mac?
Thanks, Cynthia
Thank you so much for your tutorial. I have went thru so many different ones and could not figure out how to do it since I’m using the 2013 version but your tutorial was so easy to follow. You’re a lifesaver!! Thanks again so much 🙂
Thanks so much for this tutorial! I was going to pay someone money to create cute labels for a birthday party I am hosting, but when I saw your post I realized I could just make them myself!
I love this tutorial but once we print them out how will they stick to the surface
Hi, Caroline! I usually laminate mine if they’re in a higher traffic area and then just attach them with tape! You could also use templates from Avery.com if you wanted to print right onto sticker paper. I hope this helps! Have a wonderful day!
~Abby =)
Thank you so very much for sharing.
Abby, I’m a big fan Of your blog. Thanks for this post! I, too, am too cheap to buy software I don’t HAVE to have! Lol I had no idea I could do This in Microsoft word.
Trying now! THANKS!
OMG!!!! This helped me a lot!!!! I thought this was really hard! But it wasn’t!!! Thank you for this tips and tricks. I really appreciate it. Now I know how to make my own labels.
This is really helpful. A+ for author on curating this guide but I believe doing this on professional level wouldn’t be a good option.
Adobe Illustrator is a good option when you want something extremely professional and you want it to go perfect on large level printing. But it does requires some special skills and Illustrator is not so easy tool to learn and make your designs around.
Anyhow, this has been really helpful.
Thank you.
This is fantastic!!! Thank you so much for taking the time to do a step-by step post. Mine turned out super cute!
You are amazing!!! Thank you so much for this!!
So glad it was helpful for you, Jennifer!
~Abby =)
Love this!! Have a quick question.. How would you make duplicates?
so not computer savvy, but I am so glad you posted this !! Thank you! 🙂
Hi, Valerie! After I “group” my label I just copy and paste to make duplicates. You can press control C for copy and control V for paste (Command C and Command V on a Mac). Hope this helps!
~Abby =)
When I did that it just copied the very first box that I made.. im so not computer savvy!!
Hey! This is probably long overdue and maybe someone already mentioned it in the long comment list. Just wanted tEllis you that for the grouping part you can click on select or select all and right click to group I stead of clicking on each and every element. I found that out after many tedious clicks so I thought I’d share it. Thanks for the great tutorials.
Thank you so much!!! I’m making my mum a present, which is a jar with small wooden hearts, each of wich has a reason my family and I love her. You helped make the jar itself beautiful.
Aw, that sounds beautiful, Ana! So glad the tutorial was helpful!
~Abby =)
Thank You!! Thank You!! I discovered your blog after searching extensively for cute label templates online. Your tutorial was so easy to follow and incredibly helpful. I genuinely appreciate the time and effort you put into creating and sharing your suggestions and knowledge of making labels, invitations and an array of other things that I have yet to find. I just made my own labels (thanks to you) and I cannot wait to see what else is on your blog.
Aw, thanks so much, Julie! So glad they’ve been helpful for you! Thanks for stopping by! <3
~Abby =)
This has been so helpful. I’ve just started my business and I was wondering if I could create my own product labels and stumbled across your blog post. Thanks for this and I definetly be back for more.
So glad it was helpful for you! Have a great weekend!
~Abby =)
Thank you so much for this post and your quick, concise instructions. You just helped me out tremendously! I don’t think I’ll be buying any labels from anyone for a while.
Bless you!
So glad it was helpful for you, Nola!
~Abby =)
Hi. I’m having issues with grouping the text with the rest of my label. Any suggestions?
Hmmm…it’s hard to know without seeing it, but my best guess is that maybe the text wrapping on the text box hasn’t been set to “in front of text.” If it’s set to “in line with text or something else, it won’t group. I hope this helps! Have a great week!
~Abby =)
How did you make the “CRAYONS” label above? I’ve been trying different things but can’t get it.
Hi, Amy! The crayons label is a rectangle shape with a red outline, no fill. And then the inner orange dashed line is a rectangle as well; under the outline dropdown there is an option to choose dashes, and then I just made it a heavier “weight” to get the dashes to be bigger. The “Crayons” word is just a text box with the word typed inside, and then I changed the color of each letter individually. I hope this helps!
~Abby =)
Great post! I’m starting a business and need to get craft-y-er lol. The information is awesome, thanks!
Awesome! Glad it was helpful!
~Abby =)
I am far away in Congo, in Central Africa, and you can’t imagine how this well written tutorial is going to change my life!!!
Thanks a lot for this fabulous work and fantastic blog.
I just wanted to thank you! I have spent well over a week looking for a template for a specific sized circle to make into a label… with no luck at all. I have also in the middle of all that gone to Word numerous times, since I KNEW there had to be a way to make them myself. I finally Goggled how to make circle labels in Word (or something along those lines) and it led me here! No joke… 5 minutes later I had my base labels made and I was just filling in words! So THANK YOU SO MUCH!!!
Yay! Love to hear that! So glad it was helpful for you, Alexa!
~Abby =)
Thank you – this was very helpful!
So glad! Have a great day!
~Abby =)
I really just saved my life!!! Thanks so much!!!
So glad it was helpful for you, Ashley! Have a wonderful day! <3
~Abby =)
I have not been able to ‘group’ my label. I get the ‘arrow with the plus’ sign – I click, but then when I right click I get a message telling me to make a selection. What am I doing wrong?
Hmmm…it’s hard to know without being able to see your computer. I haven’t had that message before. Are all of your pieces set to “In Front of Text” for the text wrapping? If they’re not, it may not let you group them.
~Abby =)
Thank you so much for this tutorial!!
So glad it was helpful for you, Jeannie! Have an awesome Monday! <3
~Abby =)
Thanks for your lovely blog. I appreciate the help wit,h making my own labels
So glad it was helpful for you! Have a great day! <3
~Abby =)
OMG I’m so glad I found your site!!! It helped me a lot making labels for my business! you are awesome
So glad it was helpful for you, Krystal! <3
~Abby =)
Thank you so much for sharing! I made my own labels for my etsy business.
So glad it was helpful for you, Peggy!
~Abby =)
I just used this tutorial to make Twirl Tryout Labels! Putting some “TWIX candy with the label, and can make it with the school colors. Love the written tutorial. I am a written word tutorial type of person, than a video, so I really appreciate your “recipe” in doing the layers, shapes, etc! I’m excited to see what I can create next!
Gail Pickens-Barger
yoga with gaileee
Yay! So glad it was helpful for you, Gail! Have a wonderful weekend! <3
~Abby =)
Abby, I can’t even tell how much this tutorial helped me. I’m a novice using Word for anything but documents. Thank you so much! Through this tutorial, you’ve opened up so many possibilities for me!!!
Yay! I’m so glad it was helpful for you, Lauren! Love to hear that! Have a great week! <3
~Abby =)
I am new to label/sticker design. Really interested in learning and selling on etsy. I have a mac computer, do you suggest Word for all designs? And, how do you save graphics into your picture bank? I really want to do a lot of layering…
Hi, Kristen! I use Word a lot just because it’s what I’m most familiar with. For my more detailed design projects, I typically use Adobe Illustrator, which is much more powerful but also has a steeper learning curve. I just save graphics to my computer and pull them from there. Just be sure you have the correct licenses to be using the graphics legally, particularly if you’re going to be selling them. Have a great weekend!
~Abby =)
To whom it may concern ,
I would like to purchase Blank Labels, I would be glad when you email me with the quote on
Label Size: 4″ wide (across web) x 1-1/3″ high
Material: – (White High Gloss)
Adhesive: Permanent acrylic.
hand application
Presentation:- Rolls of approx 1,000 labels.
Corners:straight
Quantity:150,000 and 800,000
without shipping cost .Awaiting to hear from you soon ..
Regards ,
Mr.Kevin Davidson
Company:Kevin & co
45 Greenwood RD #2,
Andover, MA 01810
Tel:339 337 6094
Email: kevindavidsonn@aol.com
We don’t sell labels. This is just a post on how to make your own. Sorry about that!
~Abby =)
This is so helpful! I just made some cute tags for homemade granola gifts in less than an hour thanks to this tutorial. I have never known how to do this and now I do!
Yay! So glad it was helpful for you, Karen! Love to hear that! Hope you have an awesome week!
~Abby =)
how do you draw the bracket shape the pink one
That was an overlay I put on the image using picmonkey.com. Have a great day!
~Abby =)
Abby!
This was awesome! I just made labels for a birthday gift basket I’m putting together.
Awesome! So glad it was helpful for you! Have a wonderful week! <3
~Abby =)
Great tutorial! I made some super cute recipe cards to add to food gifts. Thank you!
Yay! So glad it was helpful for you, Marian! Have an awesome week!
~Abby =)
Thank you for sharing this tutorial. It has changed my world knowing I can print my own beautiful labels.
So glad it was helpful for you, Sally! Have a wonderful week! <3
~Abby =)
Hi! My name’s Abby too! I wanna say an enormous THANK YOUUUUUU for this tutorial! I used to have to do labels the complicated way, where I insert labels with the mail function, and have to set the page size, label size, label margins, blah blah. It’s very complicated and technical, and takes ages to do. (And I’m pretty advanced with computers too).
Today I just stumbled upon this guide whilst googling a guide to create labels. I was surprised to find that I can set label sizes just by inserting auto shapes, then adjusting the size! This is a thousand times simpler and faster! My mind is absolutely blown! You’ve saved me a ton of time and headache struggling with the mail labels! Thank you a million times!
So glad it was helpful for you, Abby! Love to hear that. Hope you’re having a great week! <3