Create Your Own Graphics in Microsoft Word
After my posts about creating monograms, labels, and banners in Word, I have received quite a few questions asking if it was possible to make other graphics as well. It is! Today I’m going to show you a couple examples of how to create your own graphics and let you in on my little graphic-making secret. 😉 Let’s get started!
Make Your Own Backgrounds
Have you ever searched and searched for a background graphic to use only to become frustrated that nothing is “just right”? I have definitely been there, so I started creating my own simple backgrounds. I actually make a lot of them in Photoshop Elements, but the same thing can easily be accomplished in Word as well.
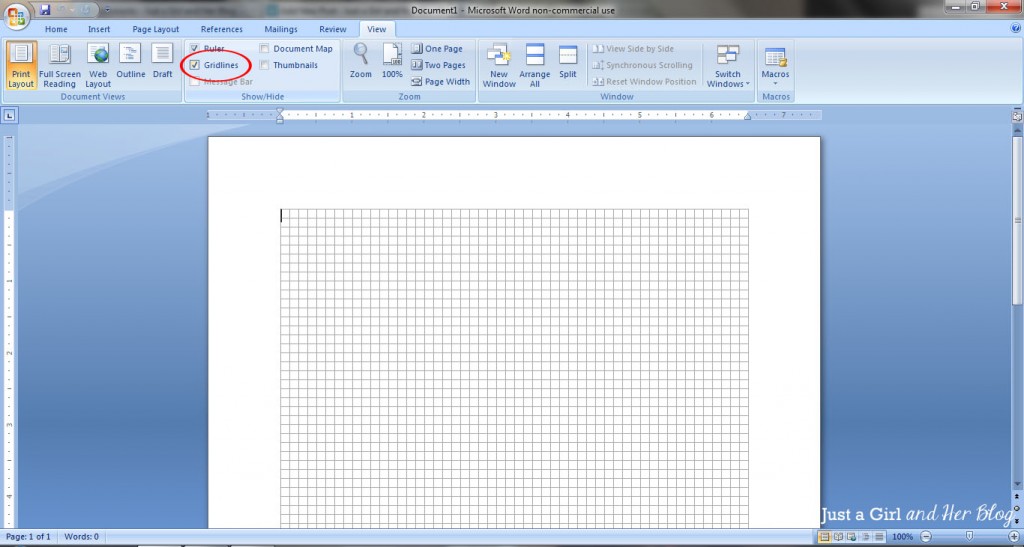
1. Use Gridlines
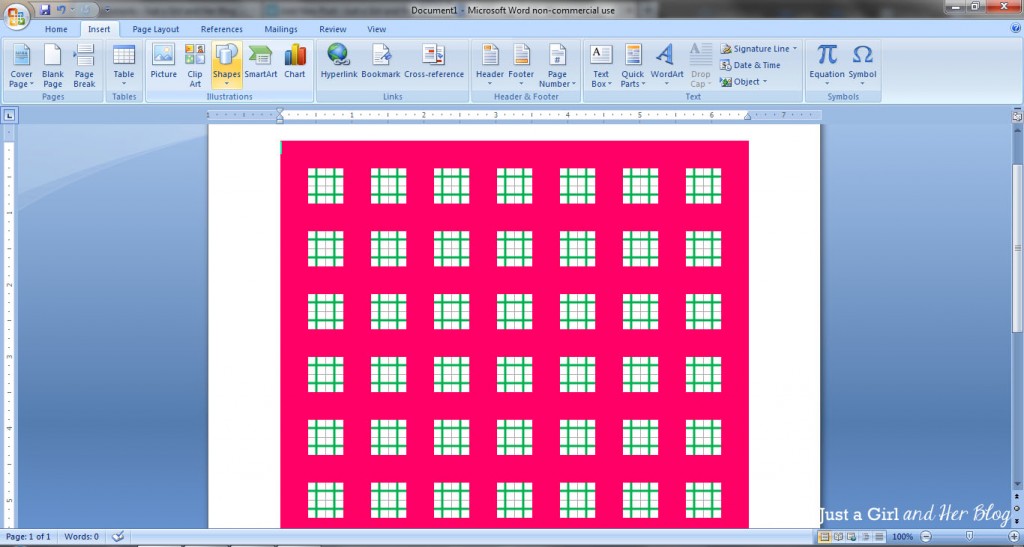
The first thing I do is, under the “View” tab at the top of the screen, check the “Gridlines” box. This way you’ll have a guide to help you make sure your patterns are straight and evenly spaced.
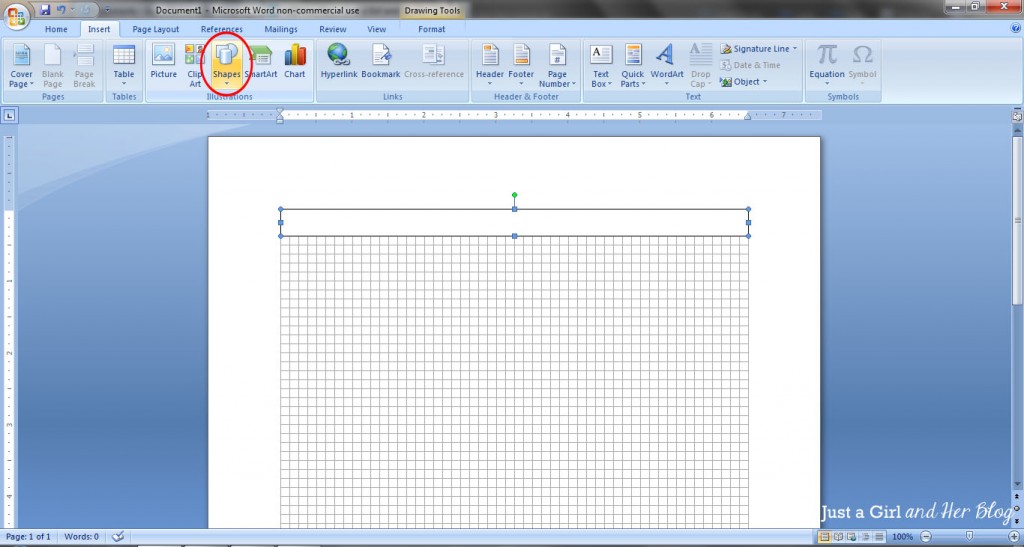
2. Start with a Shape
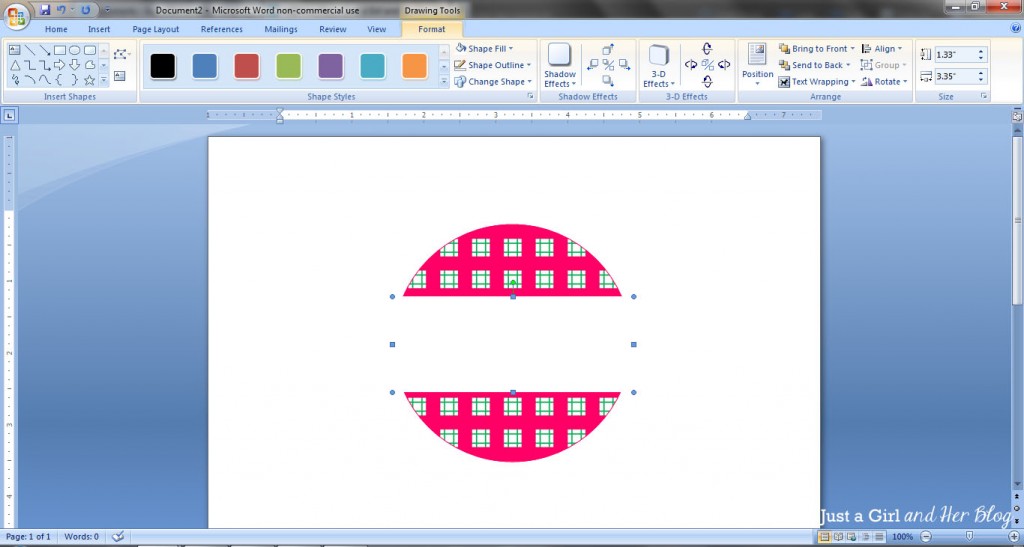
Let’s say I want to make a plaid pattern. I will go to the “Insert” tab, click on “Shape” and choose a rectangle to begin my pattern. I made my rectangle two boxes high and ran it the full width of the gridlines.
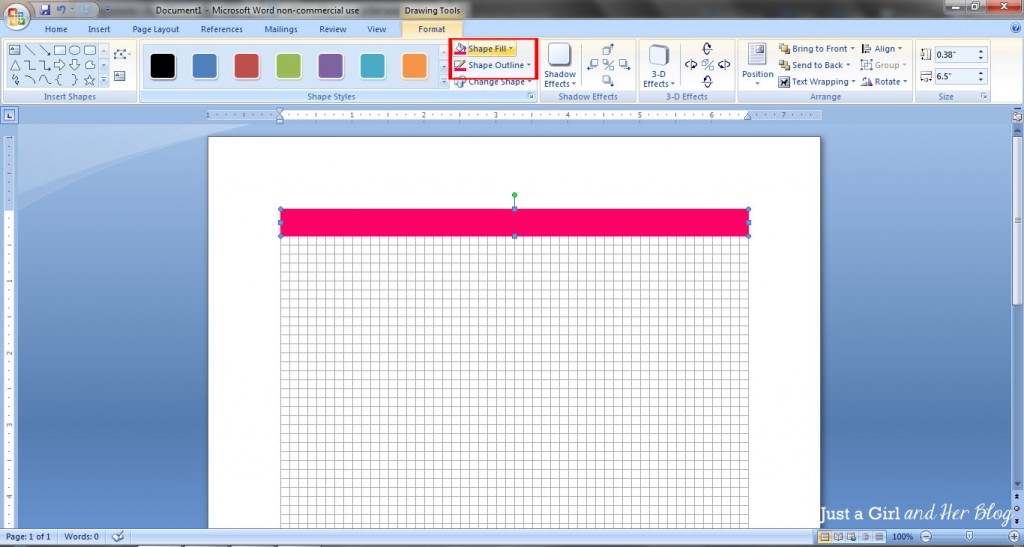
3. Pick your colors.
I can then go to my “Drawing Tools” toolbar to change the outline and fill colors of my shape. I chose pink. {Because who doesn’t love pink in the spring?!}
4. Continue Adding Shapes.
Continue this same process with each shape until you have the pattern you want. {Shortcut: You can copy and paste the shape if you’re using the same one over and over.} I used a combination of vertical and horizontal rectangles and the “Line” shape to make my pattern.
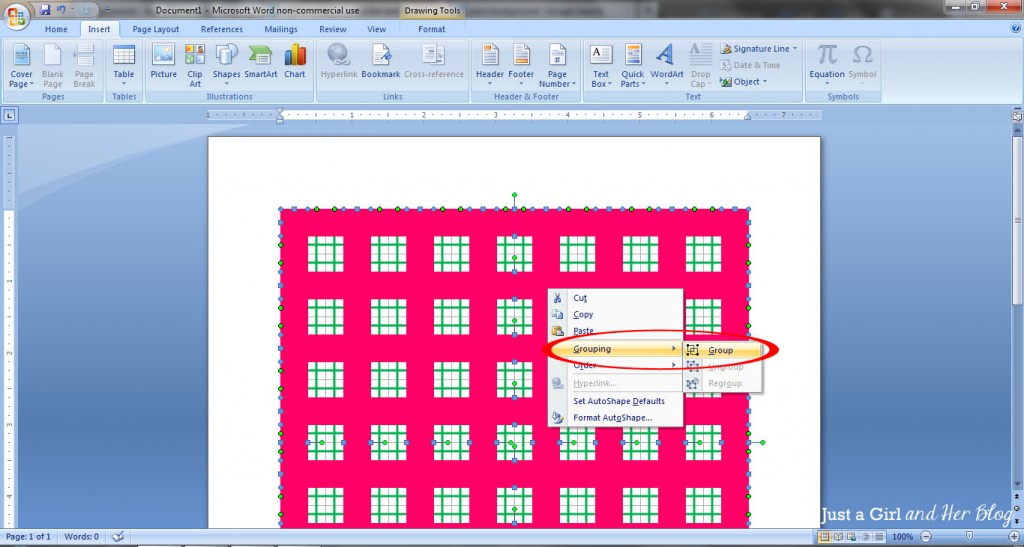
5. Group Your Shapes.
Next, like we did in the labels and bunting banner tutorials, I am going to “group” my pattern. To do this. I select each shape by holding down the “Ctrl” key and clicking each shape individually. I then right click and select “Grouping” and then “Group.”
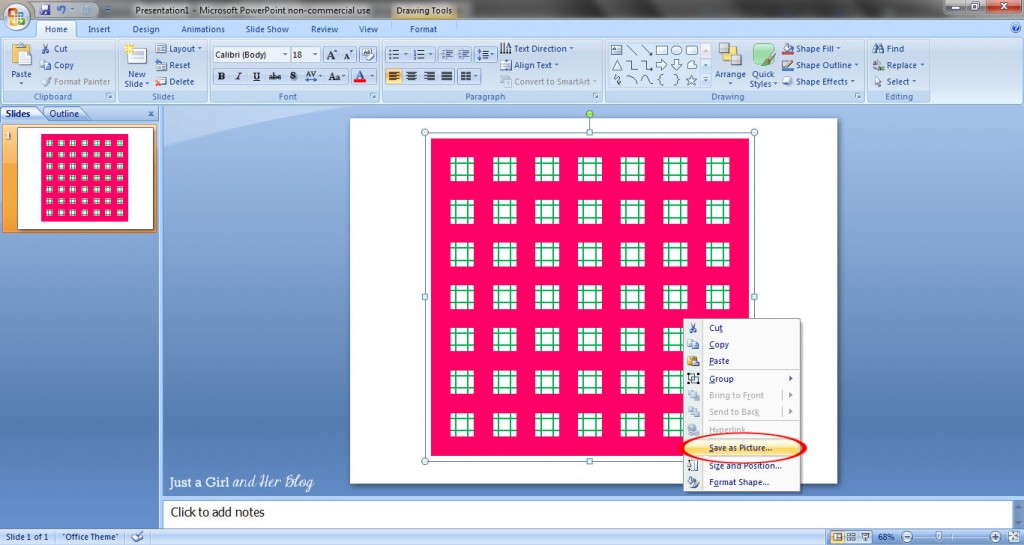
6. Save As Picture in PowerPoint.
Here comes my little secret when it comes to making graphics. In order to use this as a graphic, we need to save it as a .jpg or other picture file. While Microsoft Word doesn’t let you do this, PowerPoint does. So the next thing you’ll do is right click your shape and select “Copy.” Then paste it into a PowerPoint presentation and right click it. Select “Save as Picture…” I usually save it as a .jpg file as opposed to .png or .tif, but you can test them out and see what works best for you.
Use Your Background to Create a Graphic
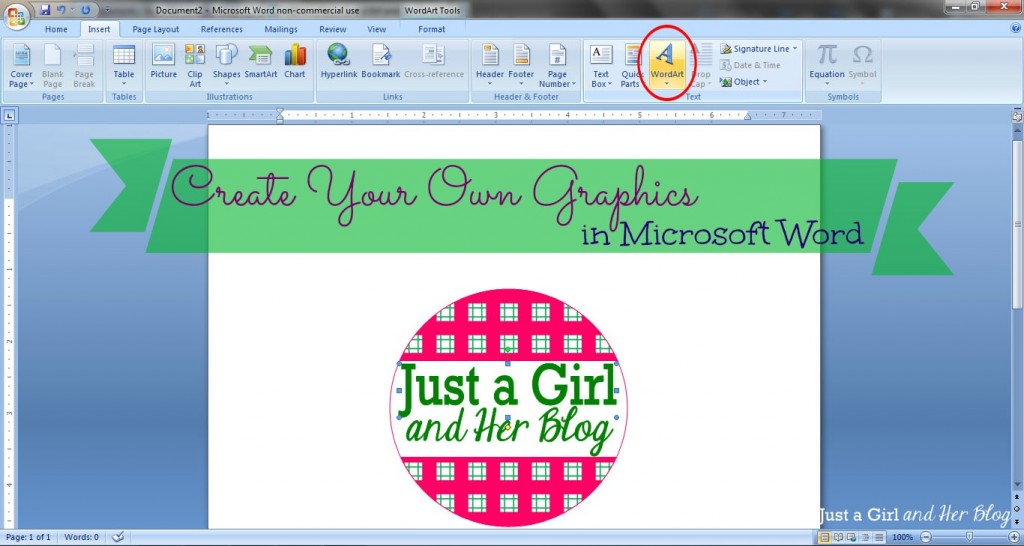
You can now use your graphic as a background in Word or another program or to fill a shape, like we did in the bunting banner tutorial. I used my background to create a graphic for my blog in Word.
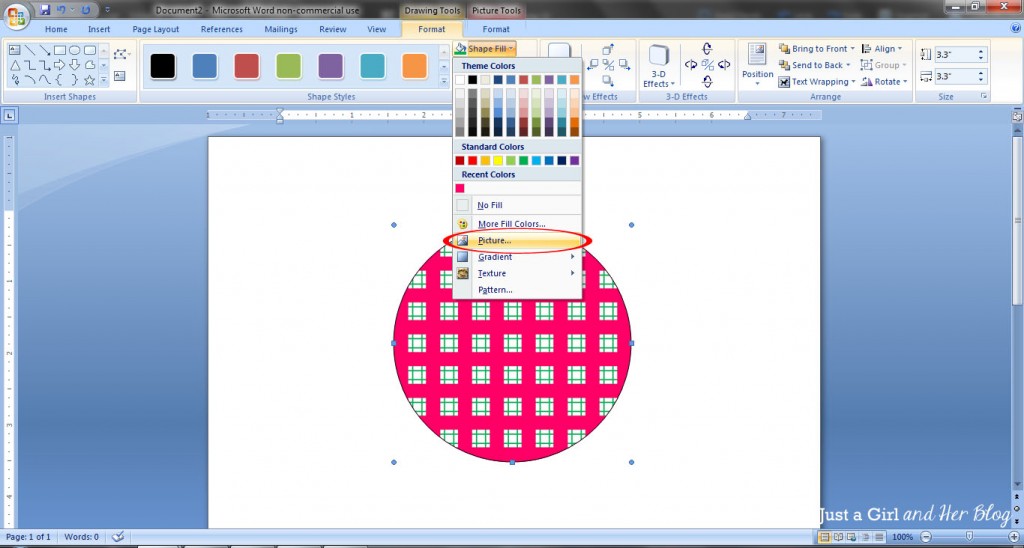
I drew a shape, then under the “Drawing Tools” tab, I clicked the “Shape Fill” drop down and selected “Picture.” I picked the pattern .jpg that I just created.
Next, I drew a white rectangle as a background for my blog name.
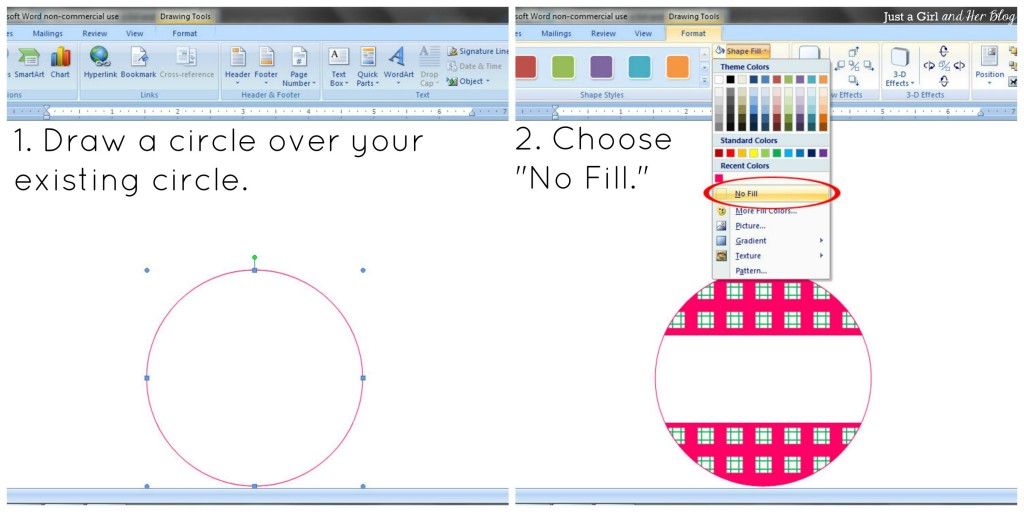
I wanted to make sure the circle was defined, so I drew another circle of the same size and put it directly over my existing circle. I chose “No Fill” as the fill color so that I could have a well defined outline while still seeing my patterned circle.
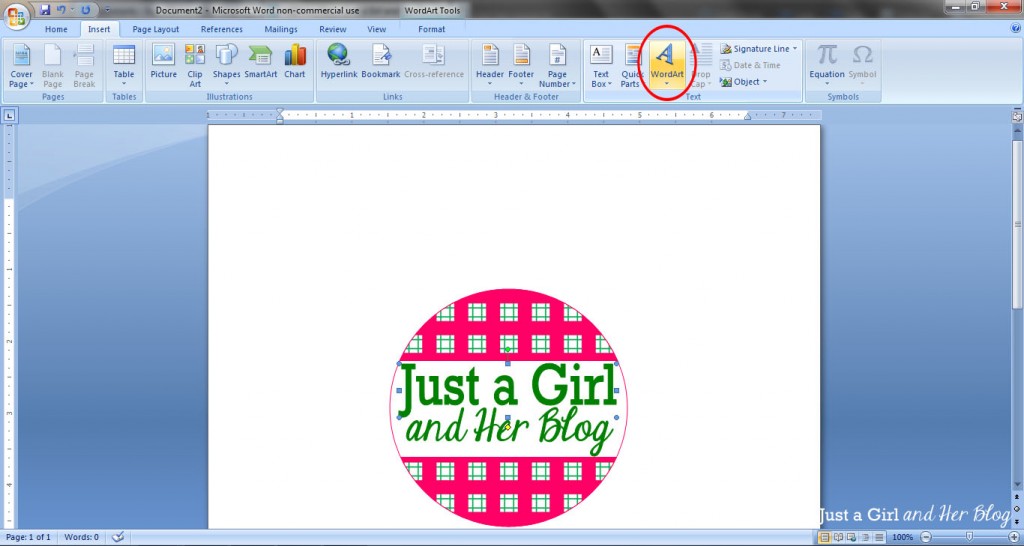
I then went under the “Insert” tab and used the “Word Art” feature to add my blog name. {For more details on how to format your Word Art, see my Bunting Banner Tutorial.}
Finally, you will want to follow steps five and six above to group the graphic and save it as a picture using PowerPoint. Then you can use it like you would use any other .jpg picture file!
If you’re just starting to experiment with graphic design and aren’t ready to invest in designing software, Microsoft Word has a surprising amount of options available and is SO easy to use! The possibilities are endless!
Do you have any design tips in Microsoft Word?

Linked Up Here:
Sharing with Domestic Superhero Thursday, House of Rose- Inspire Me Please
Wow. I can’t really imagine doing this in a word processing program, but you did excellent.
I don’t even have Word on my computer, though.
Keep up the great tuts!
Thanks, Michael! If you’re looking for an easy way to make graphics, I love picmonkey.com. It’s free {there is a fancier, paid “Royal” option, but the basic plan works just fine for me} and really easy to use! Hope your week is going well!
~Abby =)
Mind blown!! I am totally trying this – your steps are super clear and it seems very manageable…even for a non-tech minded person like me 🙂
Thanks, Veronica! Feel free to let me know if you have any questions! Have a wonderful week!
~Abby =)
Thanks Abby! I worked for many hours trying to create a figure for my dissertation in Word. After reading through your instructions, I was able to create a figure in minutes! You are a great teacher!
Oh, great! So glad it was helpful for you, Cindy! <3
~Abby =)
Great tutorial ~ Thank you! Pinned =)
Thank you! You’re so sweet!
~Abby =)
I love this! I only wish that I had Word 🙁 I was so excited but realized that I only have OpenOffice — and I can’t even find a gridline option…. oh well — I will go make a ribbon wreath to make me feel better 🙂
Ooh can’t wait to see your ribbon wreath–I know it will be gorgeous! If you’re looking for easy ways to make graphics and labels, another resource I love is picmonkey.com. It is really easy to navigate and it’s free! (There is a paid “Royal” option, but I’ve used the free stuff for a while now and have felt no need to upgrade. 🙂 Hope you’re having a great week!
~Abby =)
Great tutorial, Abby! Pinning this to my blogging tips board.
Thanks, Bethany! You’re the best!! 🙂
~Abby =)
Really good tutorial Abby! 🙂
Thanks, Ingrid! Have a great day!
~Abby =)
Wow Abby, you are very talented with graphic design, who knew you could do all that in Word? I am impressed!
Krista @thehappyhousie
Thanks, Krista! And I just checked out your thrifty bedroom decor tips–awesome! Have a great day!
~Abby =)
I never knew you could do this in Word! Thanks for the great tutorial so I pinnedit to my blog board on Pinterest. Stopping by from Inspire Me Please Weekend Blog Hop.
Thanks so much for popping over and pinning, Carrie! You’re so sweet! Hope you’re having a great weekend!
~Abby =)
Abby, I am trying to create a word doc with boxes for yes and no answers, . I cant even do that, You do great work.
Great tutorial!!! This is so helpful! Thanks for sharing this at my link party! Hope to see you back!
Thanks so much! Have a great weekend!
~Abby =)
Thanks so much for a well-done tutorial! I’m just starting a blog, so this will come in very handy!
So glad it was helpful, Kristi! Good luck with your blog!
~Abby =)
I love finding design hacks in the simple {wo}man’s word processor. In fact, I have used Word to create text boxes of color, that I save as a picture and then use as backgrounds in my collages in Pixlr. Eventually, I’ll invest in PSE or something of the like, but for now, I’m making do with my Word, Powerpoint, Pixlr, and iPhoto…and I’m doing just fine and dandy. Thanks for sharing these tricks with us! Never thought about creating a background in Powerpoint…genius.
Thanks, Lauren! I hear ya–I’m always trying to find ways around needing expensive programs and equipment! I’m testing out the new plug-in you recommended, so hopefully you’ll be seeing this in your email. Thank you again for all of your help–you’re the best!!
~Abby =)
Hi Abby, Thanks for the kind words you left about my kitchen post. I’m so happy to have found your tutorial posts on creating graphics! My blog is need of a lot of fine tuning so these will be so helpful!
Thank you, Tammy! Your kitchen is amazing! I look forward to reading more of your blog! Thanks so much for stopping by!
~Abby =)
wow! i always use photoshop for designing and the way you did it in Word! its so creative <3
Thanks, Jack! I use Photoshop some too, but Word is great if you don’t have a specific design program! Thank you so much for stopping by the blog! Have a great day!
~Abby =)
I JUST FOUND YOU BLOG ABOUT TWO DAYS AGO AND I ABSOULTELY LOVE THIS BLOG!
I just found this tutorial! Wow! That’s great – I had no idea you could do it in Word!
Thanks, Bethany! Happy creating!
~Abby =)
I absolutely love this tutorial! So glad I came across your blogs. I am in the process of coming up with ideas for a blog makeover. I don’t know much about photoshop and want to get my design complete soon! Thank you again!
Yay! So glad I could help, Anecia! Good luck with your blog makeover! Have a wonderful weekend!
~Abby =)
Hi
I am wanting to make the monthly stickers that are used for babies and you put on their clothing each month, hopefully you get what I mean 🙂 lol
I know what I want to do but not quite sure how to do design I have had a go on photoshop and its extremely complicated when I have no idea what I am doing is it possible to be able to do good ones on Microsoft word or what other programs would you recommend.
Thanks
Eliza
Hi, Eliza! It would totally be possible in Word. You could follow my labels tutorial here: https://justagirlandherblog.com/make-labels-in-microsoft-word/ and just make them bigger than the labels that I made. Another option would be the “Design” option at picmonkey.com. Even if you’ve never used PicMonkey before, it’s pretty easy to figure out. Hope this helps!
~Abby =)
This is not as easy as you make it out to be….you really need some knowledge of microsoft word…I got totally lost when you mentioned:
4. Continue Adding Shapes.
Continue this same process with each shape until you have the pattern you want. {Shortcut: You can copy and paste the shape if you’re using the same one over and over.} I used a combination of vertical and horizontal rectangles and the “Line” shape to make my pattern.
I stopped there because I was already frustrated…now I have to calm down…lol…I probably will keep trying but I know without having any knowledge or not having EVER used word this will take me some time…
Hi, Will! I’m sorry the tutorial was frustrating. In step number 4, I just meant that you would just repeat steps 2 & 3 (drawing the rectangles and adding color) until you had your plaid pattern. If you’re just starting out with Word, I would recommend trying my labels tutorial first (found here: https://justagirlandherblog.com/make-labels-in-microsoft-word/), as it gives you the most basic skills you need to create designs, and once you feel like you have mastered those steps, give the graphics tutorial another go. I am always willing to answer questions and try to break things down even further if you’d like, so just let me know. My email address is justagirlandherblog {at} gmail {dot} com. Hope you have a wonderful weekend and a fantastic holiday!
~Abby =)
Thanks for the tutorial. I just got done looking at your label tutorial and I’m having a blast on Word! I’m not sure if anyone has already asked in the comments, so my apologies, but is there a way I could make a polka dot pattern with this same tutorial?
Thanks so much, Ophelia! You definitely can make polka dots too. Just use the circle shape and place it in the polka dot pattern using the grid like I did with the rectangles on the grid. The copy and paste feature will come in handy for this. Make one circle, copy and paste until you create a row of circles, then you can copy and paste the whole row and just offset them to make the pattern. I hope that makes sense! Have a wonderful week!
~Abby =)
Thank you so much. That is awesome! I was able to create my logo in no time. Amazingly simple. x
Yay! So glad the tutorial was helpful! Thanks so much for stopping by, Fi!
~Abby =)
Hello, I am trying to recreated what you did here. I am stuck on the portion (step 4)
I am not understanding the “combination of vertical and horizontal rectangles and the “Line” shape to make my pattern.”
Please HELP!! 🙂
I just sent you an email with screen shots of where I am stuck at.
Thanks for your help:)
I’m trying to find a customized cross where I can insert by own Bible verse in the cross. Any ideas?
Hi, Danyne! I would do a Google image search for a cross that would work, save the image as a picture, then insert the picture into a Word document. From there, you can use WordArt or a text box to type the verse over it. I hope this helps!
~Abby =)
This was so wonderful and helpful, thank you! I’m starting a blog soon and have been googling my butt off and came across you and you are a ray of sunshine help! I couldnt get the grouping to work so I just captured my work in a screenshot, cropped it then saved it from PP and viola! it worked! Thank you so much for all the great advice and I did get your ebook too…so informative can’t wait to get started!
It does help me a lot with my homework-create an advertising. I was very confused that these things available in MWord. You are incredible!!!
Hello Abby, thank you for this, it’s really helpful but I have an issue with designing graphics in word.
When I save the pictures I added texts to, the texts don’t show up.
I don’t know what i’m doing wrong.
I would appreciate a guide please.
Hi, Frances! It’s hard to tell exactly what’s going on without seeing your computer, but I’ve had that happen before when my text isn’t selected when I “group” the rest of the items. It could also have gotten put behind another layer. Try selecting your text box or WordArt, going to the “Format” toolbar, and picking “bring to front.” The video in this post may help as well: https://justagirlandherblog.com/video-how-to-make-pretty-labels-in-microsoft-word/ . Have a wonderful day!
~Abby =)
I’m so glad I came across your blog. I love learning new ways to use Ms. Word & Power Point. The instructions were just the way I love it Very Detailed. Do you have anything on Glitter Text?
Thank you so much for this! I was able to create my own banner for the first time and I know I will be using this a lot now. I have bookmarked this page for easy reference!
Just a quick note to say thank you! Your blog is amazing. I’m new to graphic design and you’re really helping me as I learn. Thank you so much!
Wow and wow again. Thank you Abby for this great tutorial. I have paid people to do very simple designs that do not even look as half as beautiful as these. I have learnt something huge in few minutes.
Everything I have gotten from your blog has been great. Especially the printables. I was wondering if there is any way to print the instructions for making labels in word and the one for graphics? It would be most helpful if I could follow along with the steps while I am making labels or doing graphics. Thank you
Hi, Linda! Probably the easiest way to print the directions would be to highlight everything, and then copy and paste it into a Word document. I hope this helps! Have a wonderful day!
~Abby =)
Abby, do you use also use Word for creating Pinterest pins? Just curious. I have had PicMonkey for a year and love it except when trying to easily/quickly make an appropriate, vertical pin. I try to customize but everything gets distorted. i’ve watched videos, looked for tutorials,etc..ugh
Hi there! I used PicMonkey to create my Pinterest images for a long time, but I currently make them in Photoshop because it’s easier to center everything and get exact spacing. I hope this helps! Have a great day!
~Abby =)
Very helpful Abby! I learnt so much in a very short time. I had a look around the rest of your blog. I’m inspired by your commitment to making your blog a success and helping others through it. God bless you 🙂
You are too kind! Thank you so much for your sweet words! ~Abby =)
Thank you Abby! I’ve been needing to make graphics for my journalism class. As a homeschool girl I don’t know much about online graphic websites so I was a little hesitant to use one. I found this and now I’ll always use this technique! I think this will also help when I design covers for my books! Thank you again!
So glad it was helpful for you Kaytie! Have a great week! ~Abby =)
Thank a lot. I’ve been needing to make graphics for my Job. I found this and now I’ll always use this technique. You can’t beleave how usefull it was for me.
This is excellent work!!! thank you so much, appreciate it highly. WOW
So glad it was helpful for you, Desiree!
~Abby =)
What a great and helpful post! Thank you
Wow! You are a lifesaver…thank you so much for the info. I’m on my way to revamp my own website, http://www.youaretimeless.com and I will definitely be using this for my new logo!
Wow amazing. I never think that is possible on word. You did a brillient job. You are a great designer.
Thanks so much, Mueen! It really isn’t too hard once you know what you’re doing! 🙂 Have a great day!
~Abby =)
I usualy dont comment on blogs, but this really helped me so thank you.
So glad it was helpful for you! Have a great week!
~Abby =)
I just have to say that I absolutely love your logo. I am currently starting off blogging as a hobby but I hope to eventually hope to get my blog looking as professional as yours!
Aw, thank you so much, Caitlin! Wishing you all the best on your blogging journey! <3
~Abby =)
Wow, I tried it and it came out perfect. Thank you so so much, I have wanted to dive into graphics design, its so interesting doing such, and am glad I came across this blog of yours. once again thanks.
I will try and follow this blog to learn more from you.
So glad it was helpful for you! 🙂
~Abby =)
Amazing! Thank you. I’m going to play with this so that I can start putting up images with notes on my blog and on LinkedIn.
thanking you –
blessings,
Cynthia
So glad it will be helpful for you, Cynthia! Have a great weekend!
~Abby =)
Hello, I love this idea, but I have a question. I tried to follow the steps but every time I save the picture, it saves with a white square background behind my circle. Then when I go to insert the circle image somewhere, it comes with the square. Is there a way to save it so that only the circle logo itself gets saved?
Hmmm… I just tried it, and it didn’t do that for me, so I’m not sure what’s going on! Are you saving it as a .png? If you save it as a .png rather than a .jpg, the background should be transparent. Have a great weekend!