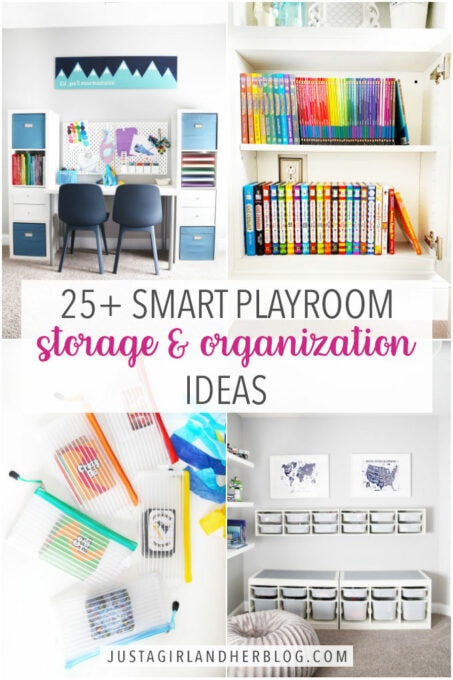
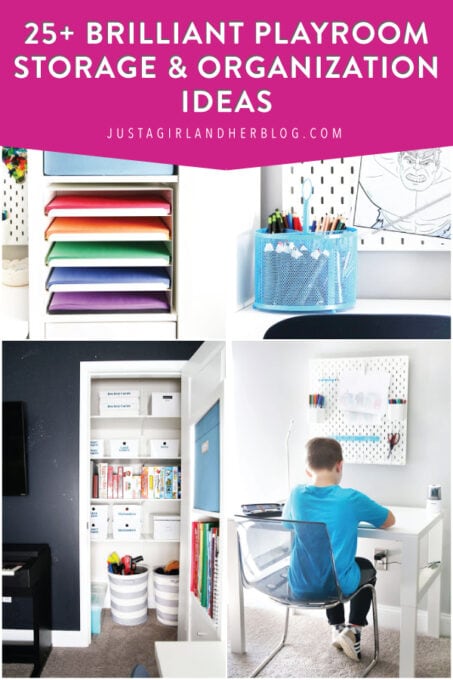
25+ Organized Playroom Storage Ideas
Don’t miss these organized playroom storage ideas that will help you create a tidy toy space for your kids and keep it that way!
Of alllll the spaces I try to keep organized in our house, the playroom is probably the most challenging. I swear new toys just appear overnight when we’re sleeping. My boys’ toy preferences always seem to be changing. There are big, awkwardly shaped items that need to be stored. And it can be like pulling teeth to get the kiddos to clean up!
But over the years as I’ve worked to make our toy area more neat, tidy, and easily accessible, I’ve learn some tips and tricks that have made this seemingly impossible task a lot simpler.
So today I wanted to share the toy organization strategies that have helped me to keep my sanity and that actually help keep our playroom looking neat most of the time!
Brilliant Toy Storage and Organization Strategies
This post contains affiliate links. For more information, see my disclosures here.
1. Less is more.
Believe it or not, my kids actually enjoy their playroom more and use it more frequently when there are less toys in it.
When we pared down their items to the toys that they actually love and play with often, it made them much easier to find. They didn’t have to search through a bunch of “meh” toys to find the ones they wanted. And their space felt more open and less cluttered.
Since the environment felt more comfortable and spacious, they naturally gravitated to that space more often. It was also a lot easier to clean up because there was plenty of room to store everything.
Though they might be drawn to ever new, shiny toy they see on the shelves (or on YouTube 😏), less is actually more when it comes to toys!
2. Declutter at least twice per year.
In order to maintain our “less is more” philosophy, we declutter toys often! With their interests changing quickly, I feel like the boys are always growing out of certain toys and moving on to more age appropriate items.
Right now at ages 9 & 12, we usually declutter their playroom right before Christmas and around the time school lets out. When they were younger, I did it more often– closer to 3-4 times per year.
Whenever things start building up and feeling cluttered in their space, I know it’s time for a good clean out. And when that happens, I always follow one important rule…
3. When decluttering, make the first pass alone.
Whenever it’s time for our biannual decluttering session, I always try to do a pass of the room while the boys are at school or practice or lessons.
During this pass, I throw away anything that is broken, gross, or unusable in some way. I also pull out anything that I am 100% sure they don’t use anymore to be put aside for donation.
Doing the first pass saves me time because I don’t have to deliberate with the boys about stuff that we all know needs to go. And it’s better for their short attention spans because they spend less time going through items to determine what to keep and what to let go.
I would never throw away something that is near and dear to them without their permission. But for things that have clearly seen better days, making that first pass alone is really helpful.
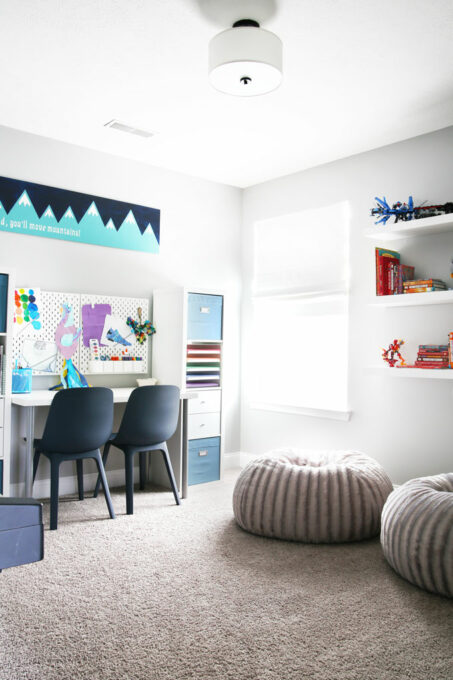
4. Create zones.
One strategy that has helped us keep our playroom neater is putting like items together in “zones.” Our zones have looked different depending on what the boys are most into at the moment, but the key is just to keep all items that go with the same activity in one spot.
For example, right now we have the arts and crafts zone…
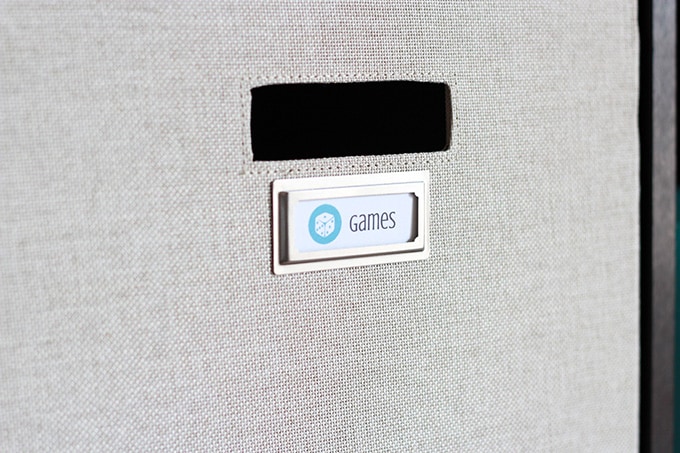
The game zone…
And the LEGO zone…
When they were younger, we had all of their big Imaginext sets in a zone together. We had a train zone at one point. They had a costume/dress up phase, etc.
Keeping like items together makes it easier to find what they need when they’re playing. AND it makes it easier for them to put things away when they’re done. (And we always want to make that as easy as possible, right?!)
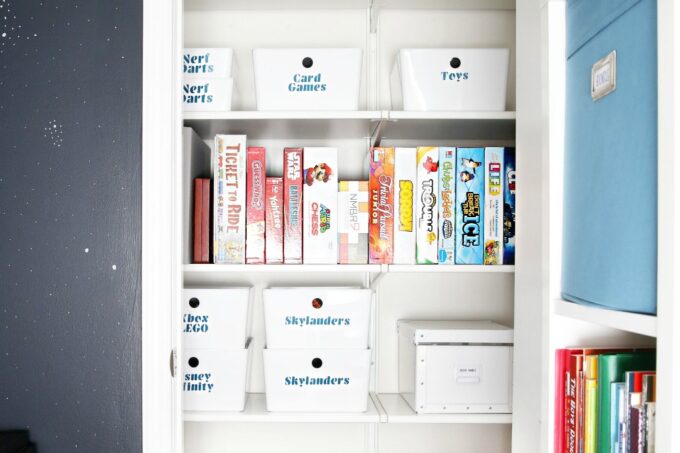
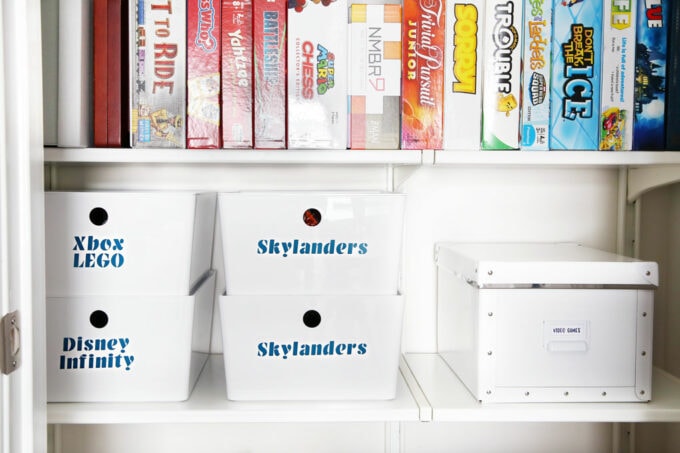
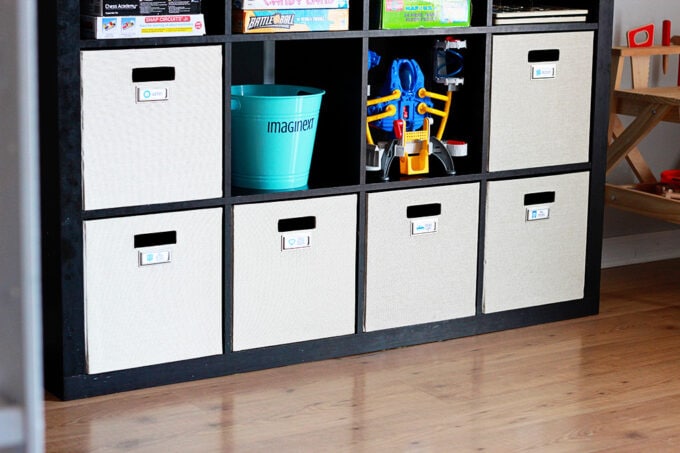
5. Label organized playroom storage bins!
I always say that labels are optional and are a personal preference thing. But I especially like labels in the playroom because they act as a cue for the kiddos, letting them know exactly what goes where.
Now that my boys are a little older and can both read, we mostly do worded labels. (I made the labels on these bins with my Cricut Explore cutting machine + adhesive vinyl.)
When they were younger, I was sure to include a picture on their labels so they knew where to put things even if they couldn’t read the word. (I just printed this label on plain computer paper, cut it out, and slipped it into an adhesive bookplate.)
Do my kids abide by the labels 100% of the time? Nope! But we started working on it at a young age, and the older they’ve gotten, the better they’ve become at following the labeling system. Mamas of really little ones, I promise that it gets easier!
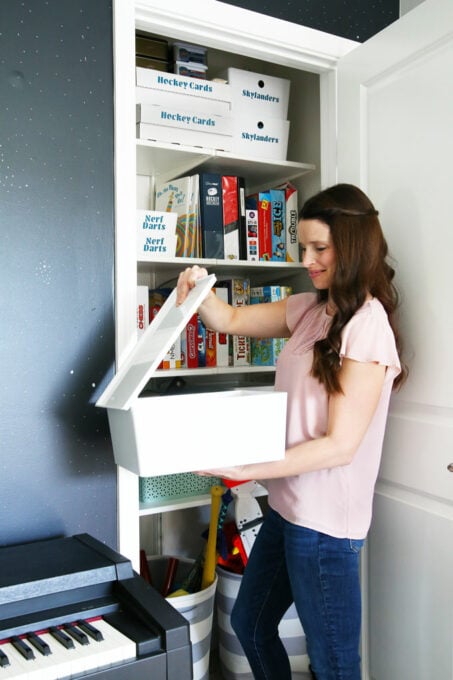
6. Maximize available closet space.
Right now our boys sleep in the same bedroom, and we use the second bedroom that would be theirs as the playroom. As such, we are fortunate to have a closet in their playroom space for extra storage!
One of the first things I did to this room was to tear out the single wire shelf and replace it with an inexpensive closet system from IKEA. (It was formerly called ALGOT, now called BOAXEL.)
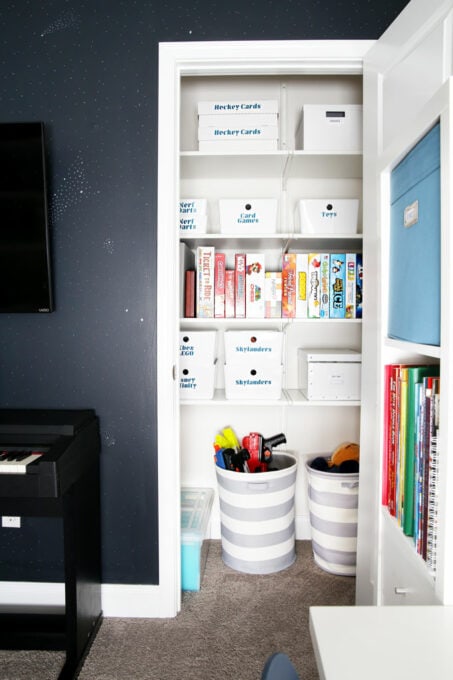
Adding more solid surface shelving really helped us to make the most of the space. We can store so much more in the closet, which means we can store less in the main part of the room, cutting down on clutter!
I have found that if we can keep the closet neat and organized with designated spots for their items, the rest of the room stays a lot tidier as well.
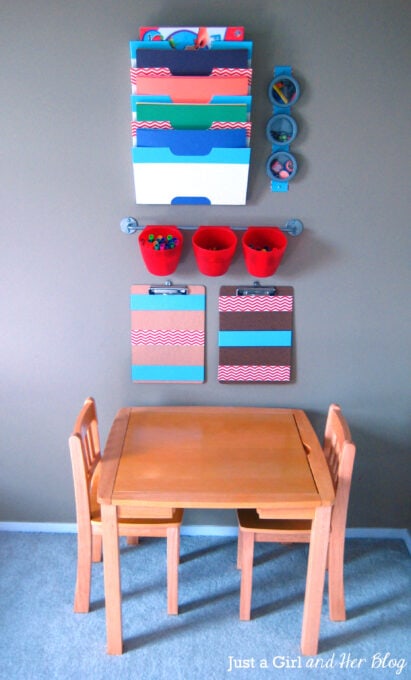
7. Maximize wall storage space.
In every space we’ve lived in, but particularly when we lived in our tiny townhouse, I’ve learned the importance of maximizing the vertical space! We can only put so much on the floor, but making the most of the walls helps us add storage that’s often much needed.
I only had a teeny corner for an art station in the townhouse, but we were able to work in storage for paper and coloring books, magnetic containers for smaller supplies like chalk and erasers, a rail with cups for markers and crayons, and clipboards to display finished creations. Yay for vertical wall storage!
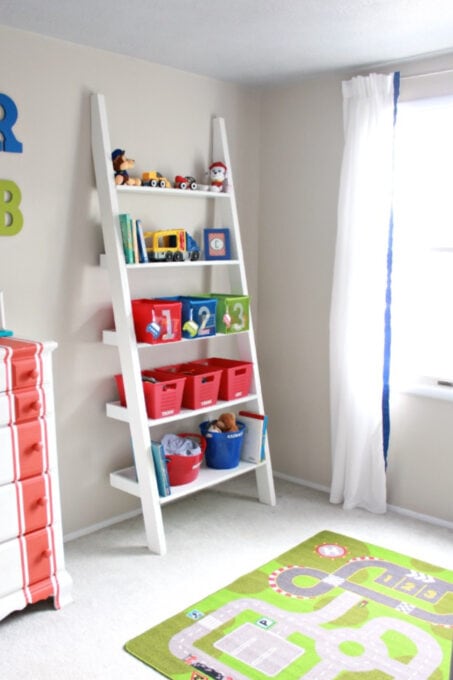
This ladder shelf that Donnie built also came in handy for maximizing wall space, storing larger toys near the bottom and smaller ones on the higher shelves. (You can find a similar shelf here.)
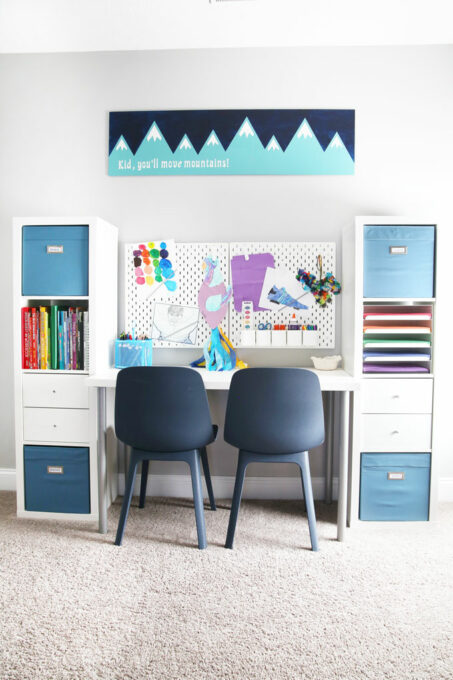
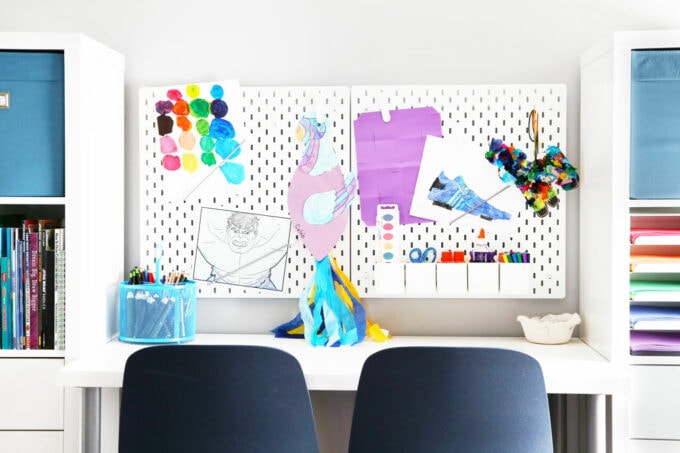
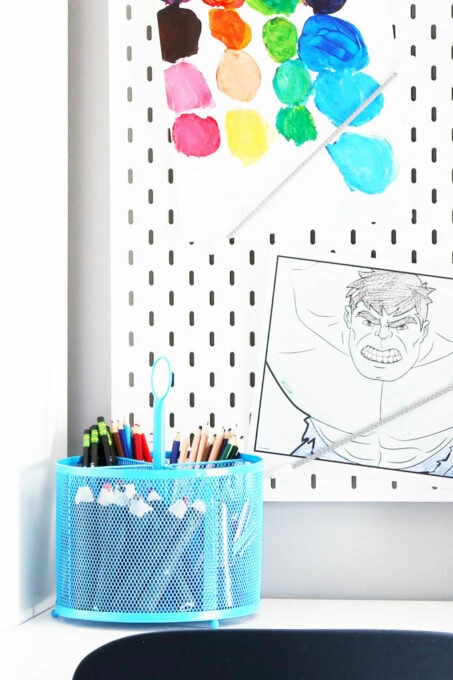
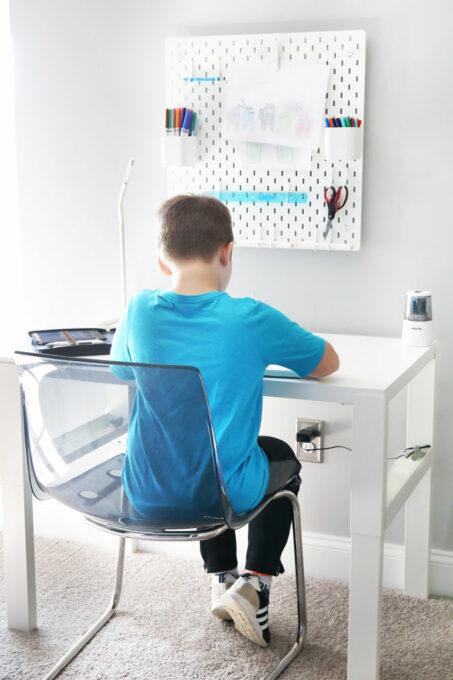
8. Utilize pegboards for organized playroom storage.
Speaking of maximizing wall storage, pegboards are one of my favorite ways to do so! There are so many different clips, cups, and accessories that make pegboards really versatile and helpful for storage.
In the boys’ current playroom, We use pegboards to display some of their art projects and to hold small craft supplies.
I’ve also seen pegboards used to create a Nerf gun storage wall, which I know my boys would love if we had the space!
9. Provide a display area for art.
If you have little creators like I do, it’s fun to give them somewhere to show off their creations! Pegboards work, like I showed above. We have also used these DIGNITET wires and clips from IKEA for an art display.
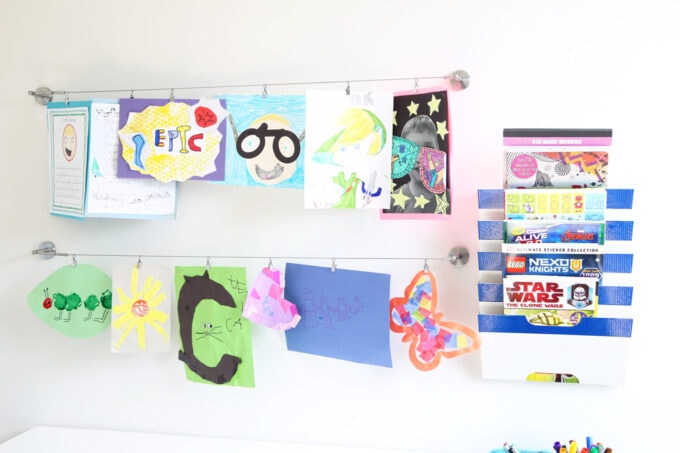
They are actually designed to hang curtains. But they’re great for art because they can be adjusted to whatever length you want. And the clips make it super easy to change up the pieces when the kids create something new.
10. Save cute art projects while eliminating paperwork.
This one might be a little controversial, but stick with me for a minute. I was struggling with alllllll the paperwork and art projects that my kids were bringing home and wanting to keep. I started with a file box system to try to keep it organized, but it started to overflow, and 3D pieces were getting crushed. It was a mess.
So I began taking pictures of their most special art pieces and projects and turning them into 6″ x 6″ Chatbooks instead, discarding the originals.
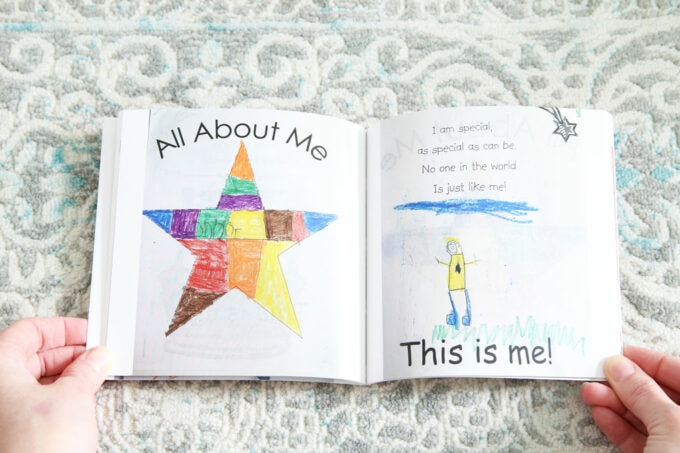
This system is much neater, takes up way less space, and we are more likely to look through small, easy-to-handle books rather than dig through folders filled with haphazard paperwork.
You can read more about my system for saving kids’ artwork in this way in this post.
11. Use a letter tray to make craft paper easily accessible.
Caleb, my crafty kid, was always coming into my office and stealing the printer paper for his art projects. So I finally grabbed a letter tray and organized his paper for him so he could easily grab whatever color he needed!
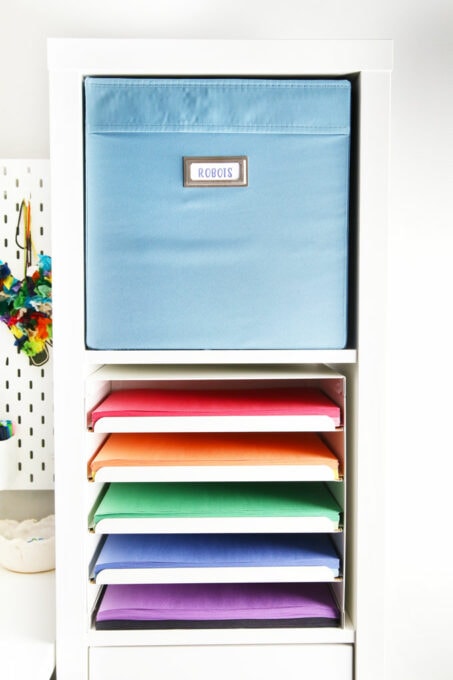
I especially love this letter tray because it fits into IKEA’s KALLAX cube unit perfectly!
12. Make coloring utensils easy to transport.
Even with a designated art station in their playroom, my kids inevitably end up needing markers and colored pencils for projects all around the house. Because of this, I always try to make sure they have some supplies that are easily portable.
I found this divided organizer in Target’s Dollar Spot, and it has been perfect to carry around with them wherever they may need it.
13. Bring in a rolling cart for organized playroom storage.
I love rolling carts for organization because they’re easily portable. In a small space in particular, they can be moved out of the way easily and arranged to meet your needs. We used this cart for art supplies for a while, and it was a great solution for us.
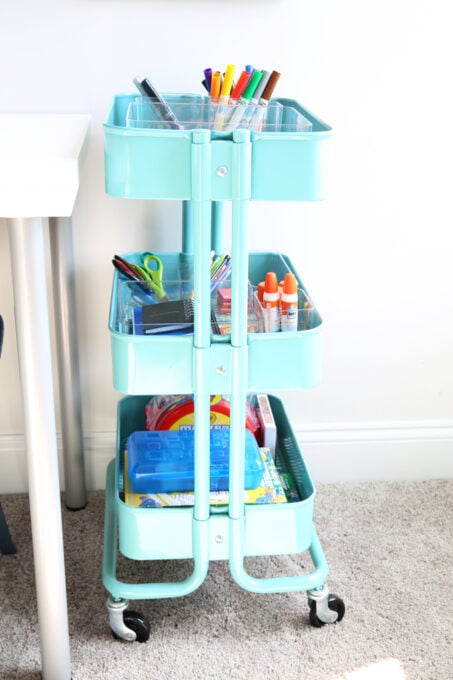
See this post for more ideas for using rolling carts effectively.
14. Go magnetic.
Speaking of rolling carts, additional storage can be added to them by placing magnetic cups, bins, or hooks on the sides!
Magnetic strips are another fun and practical way to add some storage to a playroom space. In our last house, we used magnetic strips to hold some of our kids’ die-cast trains.
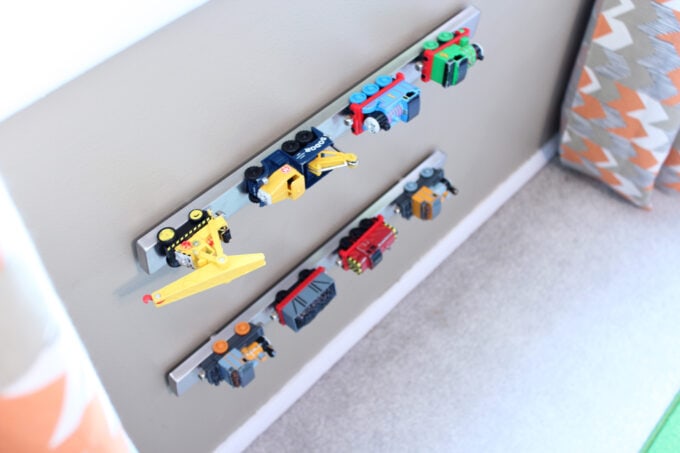
(Note: I’ve seen pictures of these used for Matchbox cars, but that didn’t work for us at all. Most current Matchbox cars are made out of plastic, not metal, so we would have had to add a magnet to the bottom of them to store them on the strips. The die-cast trains worked really well, though!)
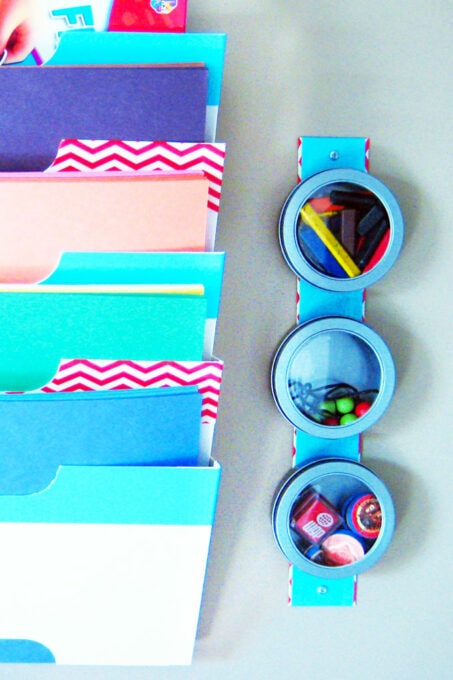
I also used a magnetic strip + magnetic containers to hold small craft supplies in their art nook.
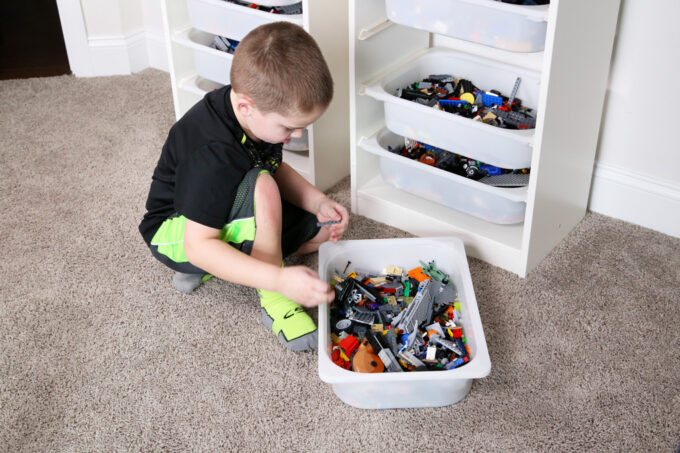
15. Separate toys into categories using cubes.
Cube units are my favorite for toys. Unlike a toy box where everything is just thrown into one messy pile, cube units help to separate toys, games, and books by type so that everything stays tidier.
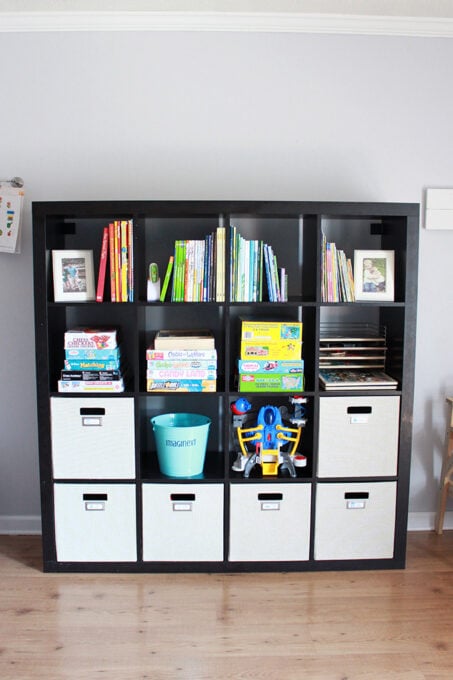
We have used IKEA’s KALLAX unit in a bunch of different sizes to store toys, pretty much since our boys began accumulating them! (Just be sure to anchor the unit to the wall so it doesn’t fall and hurt someone by accident.)
16. Use unlidded bins when possible for organized playroom storage.
One of my top rules for organization in our house is “Make things easy to put away.” The less steps my boys have to go through to put something back where it goes, the more likely they’ll be to clean it up!
For toys especially, I really like unlidded bins because they eliminate the need to have to open a latch, take off the lid, put the toy inside, put the lid back on, re-latch it, and put it away.
When I tried to use lidded bins for their general toys, they would just stick the toy on top of the lid, rather than taking the time to put it inside. With unlidded bins, they can just throw the toy into the open top and be done with it! Easy!
Unlidded bins are almost always my first choice for storing toys, but there are a few exceptions…
17. Use lidded bins to keep sets together.
I will use lidded bins if there is a set of something that I want to keep together. In the case of something like Qixels or K’nex, I want to deter them from dumping pieces of other toys in with this set that goes together, so the lid can help with that.
When they want to play with Qixels, for example, they take out the entire bin, play with them, then put everything back at once and put it away. This keeps the set together without mixing in other pieces that don’t belong.

Lidded bins are also helpful for more fragile toys, like drones, which could get smashed and broken if just thrown in with a bunch of other stuff.
18. Keep toys stored off of the floor when possible.
When my boys were older toddlers/early elementary school, they really loved the big plastic Imaginext sets that came with coordinating figures. I loved these for creative play, but storage was tough.
First I tried to just store them on the floor because they were so big, but they instantly made our space feel cluttered, which I really hated. I ended up finding these light-but-open storage shelves that were perfect for keeping larger toys off the floor, allowing our room to still feel tidy. (They come in the raw wood color. I whitewashed ours.)
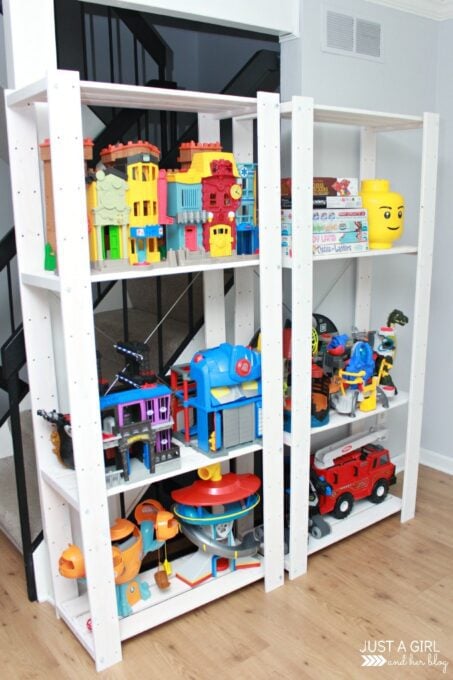
As with the cube units, be sure to attach these storage pieces to the wall so they don’t accidentally fall and hurt someone.
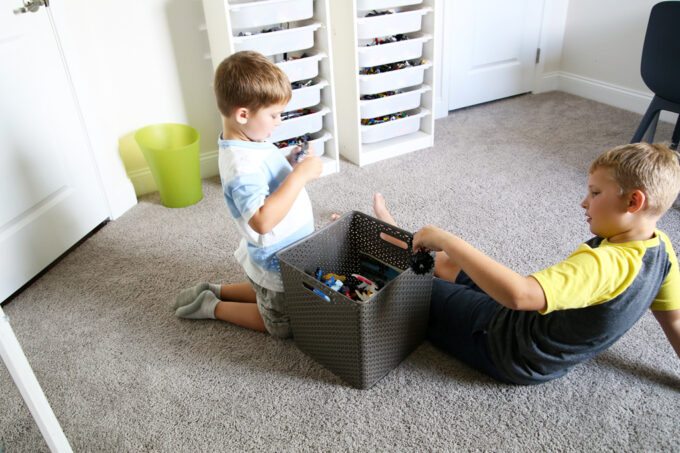
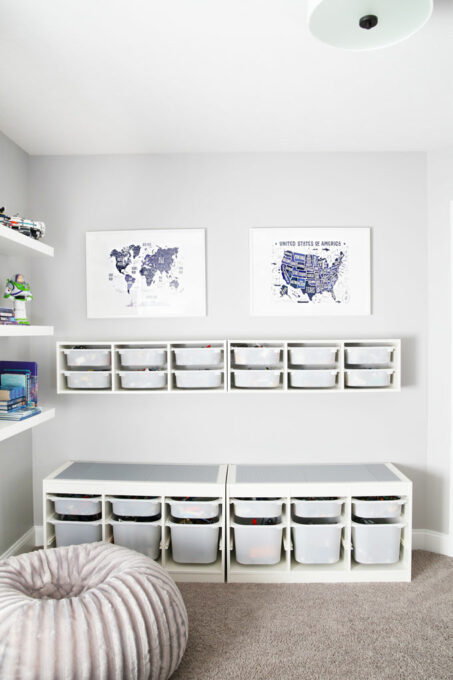
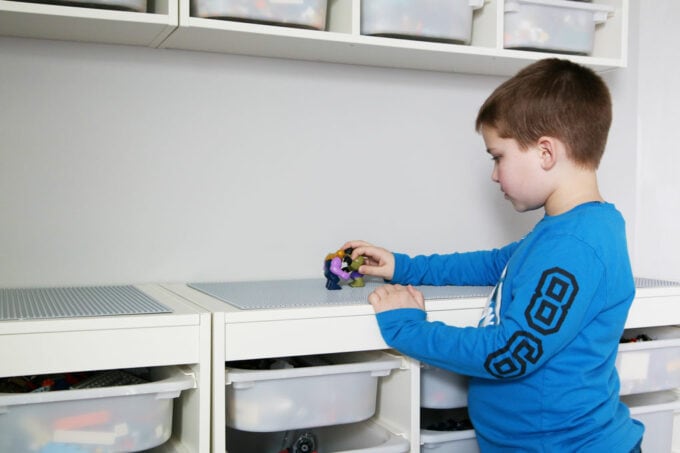
19. Use IKEA’s TROFAST system to keep LEGOs organized.
I may be just a bit obsessed with IKEA’s storage when it comes to toys, but it is just so practical and affordable! Their TROFAST system is absolutely perfect for LEGO storage. We’ve used TROFAST in many different sizes and configurations to store the boys’ collection.
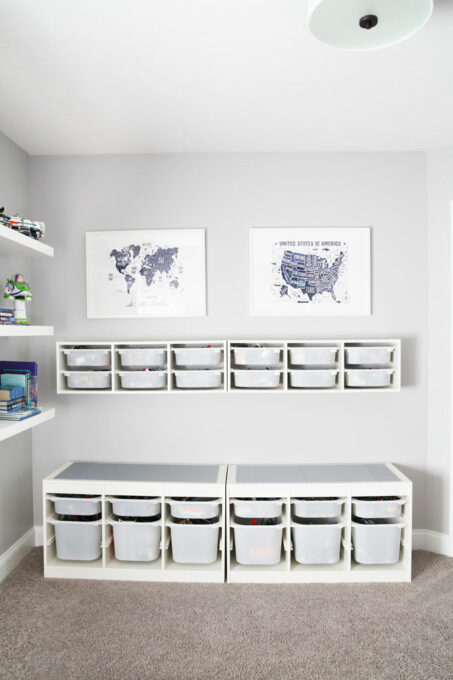
This is our current setup, and the combination of the larger floor units + the smaller wall units has worked really well for us.
20. Organize LEGOs based on how your child(ren) plays with them.
You can read alllllll about my philosophy for LEGO organization in this post. (And I do have lots of thoughts! 😂) But my #1 rule when it comes to LEGOs is that they should be stored based on the way your particular child(ren) plays with them.
I initially tried to keep our LEGOs organized by set, But my boys wanted to free build, so the sets were always getting mixed up, making me frustrated.
I LOVED the way it looked to organize the pieces by color. But cleanup took forever because they had to sort everything back out into color. (Remember the “Make it easy to put away” rule? Sorting by color was the complete opposite of that for us!)
For my kids, who are free builders after they build a set with the instructions once, it made the most sense to just let all of the pieces stay mixed up in bins. (We do have a separate bin for the “guys” because they will sometimes just play with those.)
If your kid likes to rebuild the sets over and over, storing by set may make the most sense for you. If your child likes to color coordinate his or her creations, sorting by color might be your best bet. Pay attention to how your kiddo uses the LEGO pieces and store them accordingly.
21. Organize LEGO manuals using hanging folders and a file box.
Along with the LEGO pieces come the many, many LEGO manuals! I was all for getting rid of the books once the boys were done with the initial build of their sets, but that idea was vetoed by both my kids and my husband. 😏
Since it was important to them that we keep the manuals, I wanted to make sure we did it in an organized way!
The strategy that has worked best for us is to use a file box with hanging folders…
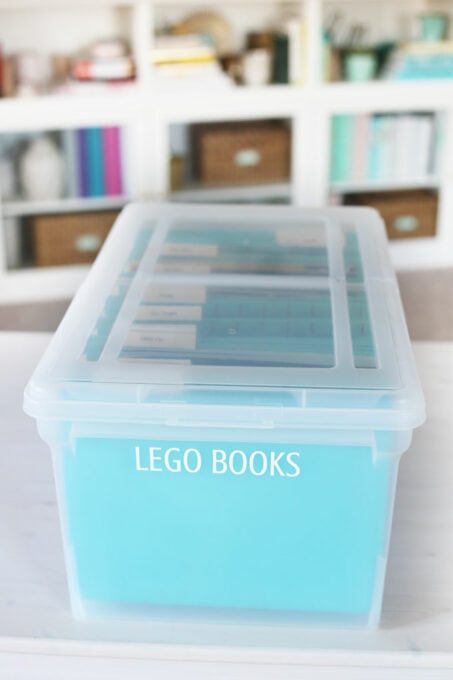
The hanging folders are divided by category. So all superhero books are in one folder. All Harry Potter books are in another folder. All LEGO City books are in a third folder, etc. The folders are then arranged alphabetically within the file box so they are easy to locate.
You can read more about our strategy for organizing LEGO manuals in this post.
22. Designate a display area for finished LEGO projects.
LEGO sets take a long time to complete. So my boys usually want to display them for a while before they break them apart!
When they were younger and building LEGO sets all the time, we actually used the closet in their playroom as the LEGO display area. When the shelves were full, they had to decide which sets to break down to make room for any new builds.
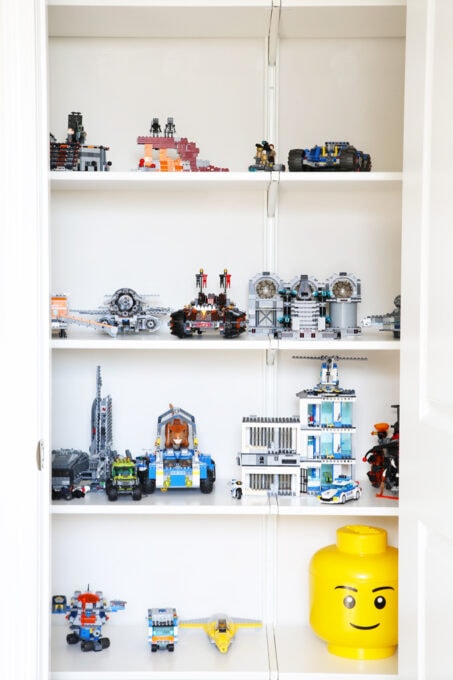
Now that they’re older and are building less, we use the closet to store other items. They have one high shelf where they display their most recent LEGO creations, and that has been enough for this phase.
23. Give a surface an added purpose.
My final LEGO tip is to give the kids a dedicated building surface if possible. We were using the TROFAST units anyway, so I attached some baseplates to the top of the floor units to give the boys space to build.
(You can get the details on how we created this DIY LEGO table in this post.)
Giving them a designated spot for building LEGO sets has helped to keep them in this area rather than taking up every single flat surface in my house!
24. Utilize tall bins for Nerf guns for organized playroom storage.
I am a fan of the pegboard Nerf gun wall idea, but since we didn’t have space for that, these tall bins were my next best option.
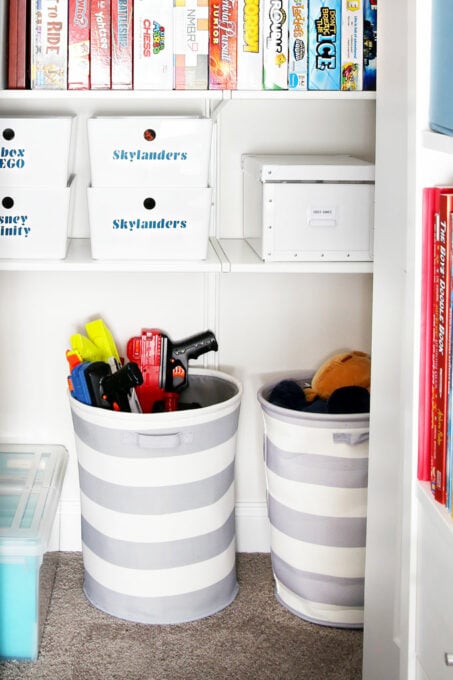
They’re tall enough and sturdy enough to hold the boys’ Nerf gun collection without falling over. And I’m not constantly tripping over Nerf guns that don’t have a designated home to be stored in.
25. Store board games vertically.
I was very skeptical of this idea when I first tried it, but I am now completely sold! We started “filing” our board games vertically rather than stacking them over a year ago, and this system is still working perfectly for us.
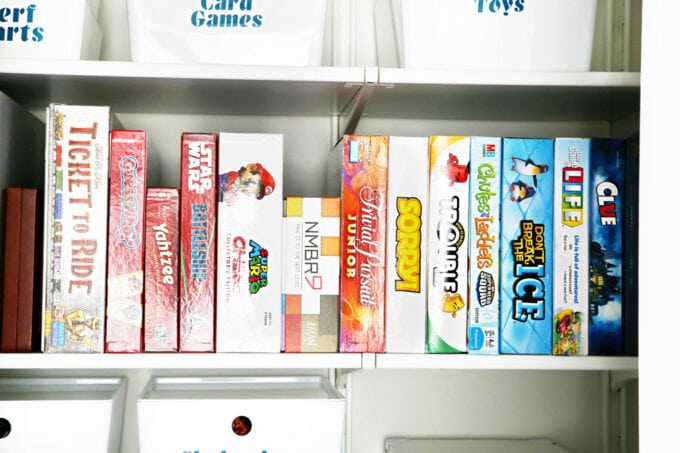
I was even prepared to use rubber bands to hold the boxes together or bookends to keep them in place, but we haven’t needed either. They have stayed standing neatly on their own. And they don’t fall apart and spill pieces everywhere.
For some of our older game boxes that had weaker sides, I transferred them into these document boxes, which fit really well. You could also use these large rubber bands to hold boxes together if needed.
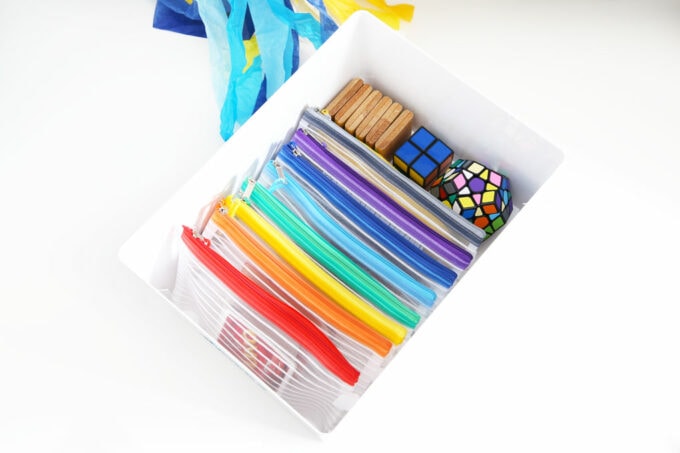
26. Store cards in zipper pouches.
Our card boxes were always getting ripped up. And they were so tight that it was hard for the boys to get the cards in and out without bending them. Moving to these zipper pouches has made using our playing cards so much easier.
(And I must admit, I don’t hate that they color coordinate either! 😂)
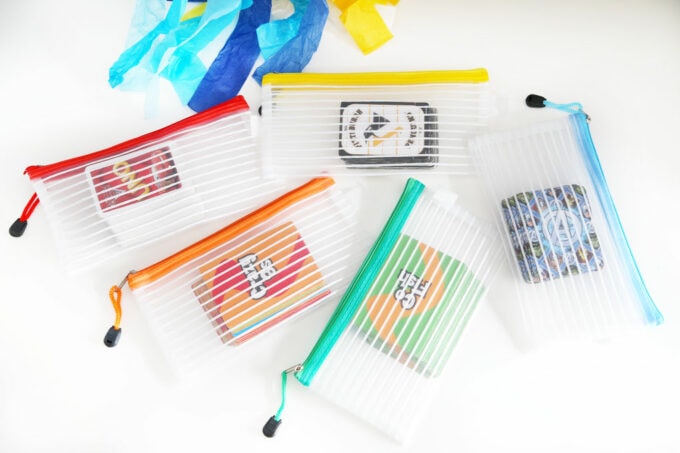
We keep the card pouches in one of these plastic storage bins so they’re easy to grab whenever we need them.
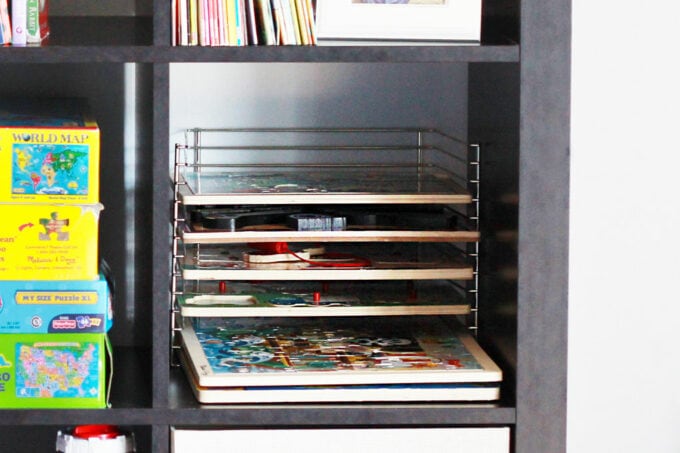
27. Use a puzzle organizer.
When my boys were little, they really loved wooden puzzles. They were great, but storage was tricky. I eventually found this wire puzzle organizer, and it was great for keeping them neat and tidy.
28. Tweak systems that aren’t working.
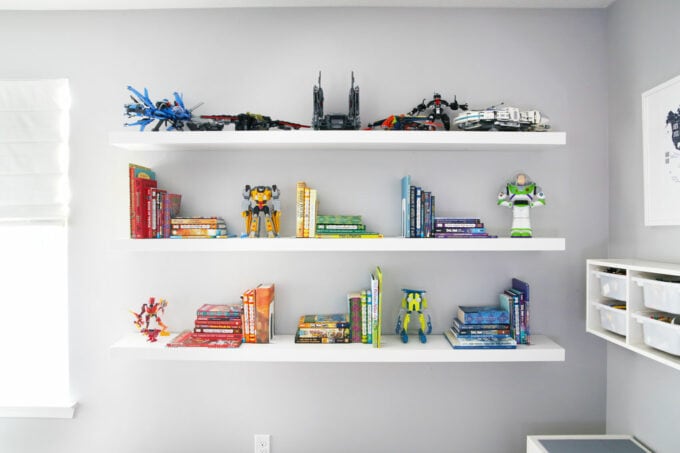
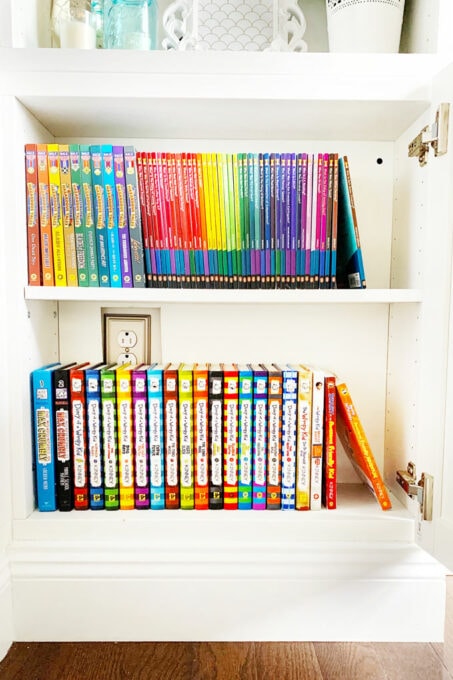
Sometimes I set up a system that I think is going to be absolutely perfect, and it completely flops. For example, I thought it would be so cute to store my kids’ books on these floating shelves, just using bookends to help support them. And I was able to get some pretty pictures!
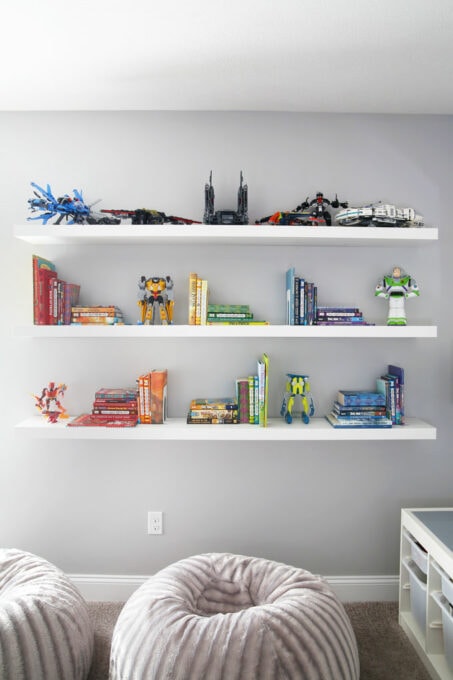
But for practical, everyday purposes, this system didn’t work well at all. It was hard for the boys to get to the books they wanted. Putting them back was even trickier. And while sorting by color looks nice, sorting by series makes it easier for them to find the book they’re looking for.
Plus, they use that outlet below the shelves to charge their devices, and they kept bumping their heads on the bottom shelf– ouch!
When I find myself (or my kids) not using our stuff, dreading putting things back, or if there is constantly a mess in a certain area, I know it’s time to tweak my system! This was definitely the case with the boys’ books.
We had some empty cabinets in our entertainment unit in our living room, so I ended up relocating the books there, and it was a much better solution. They could reach the books easily, everything stays organized by series, and putting the books back is a cinch.
29. Pay attention/listen to how the kids want to use their space.
When we took down the two lower shelves in the playroom that had been holding books, my idea was just to put a few framed art pieces on the wall and call it a day.
But Caleb asked if we could use the spot for a separate desk for him instead since Connor is the primary user of the other desk in this room. He had been trekking down the hall to my office and using my desk when he needed one (and leaving all of his supplies there!), so I thought it was a brilliant idea!
We got him all squared away with his own little spot, and he uses it all the time! Sometimes our kids are the best judges of how they’ll use their space!
What systems have worked best for you when it comes to keeping the playroom organized? I would love to hear about them in the comments below!
If you’d like to save this post so you can find it easily later, be sure to pin this image!
More Kids Organization Ideas
Thank you so much for following along! Have a wonderful day!

This post contains affiliate links. For more information, see my disclosures here.