How to Design, Install, and Add Trim to an IKEA BESTA Built-In System
IKEA hack! We created a DIY entertainment system using the IKEA’s BESTA Planner for a custom look that can be completed in a weekend!


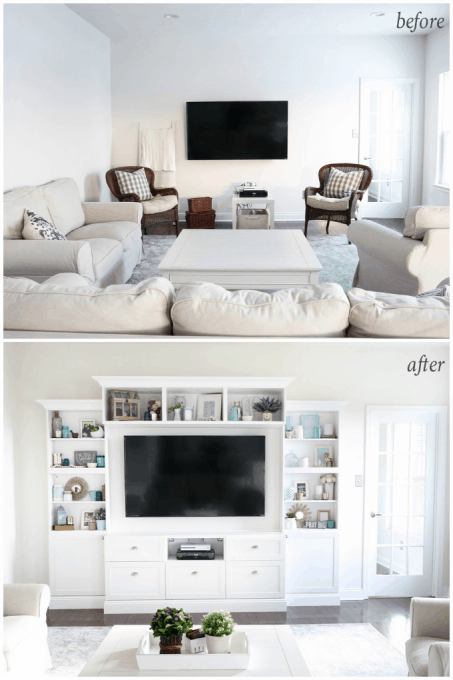
When we first moved into our new house, filling up the living room felt like a daunting (yet super exciting!) task because it was a big, white, open space:
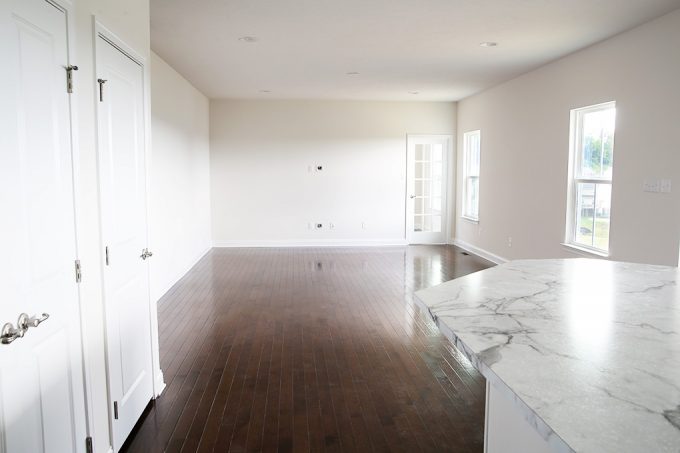
our living room on the day we moved in
We brought in our furniture, which helped a bit, but we knew we needed something significant on the TV wall, both for storage purposes and to add some visual interest. That little side table just wasn’t going to cut it!
We knew we needed something fairly substantial to take up space on that wall, but of course we wanted it to look beautiful as well. While I was visiting our local IKEA, I happened to find the perfect solution.
How to Create an Entertainment Unit with the IKEA BESTA System Step-by-Step
This post contains affiliate links. For more information, see my disclosures here.
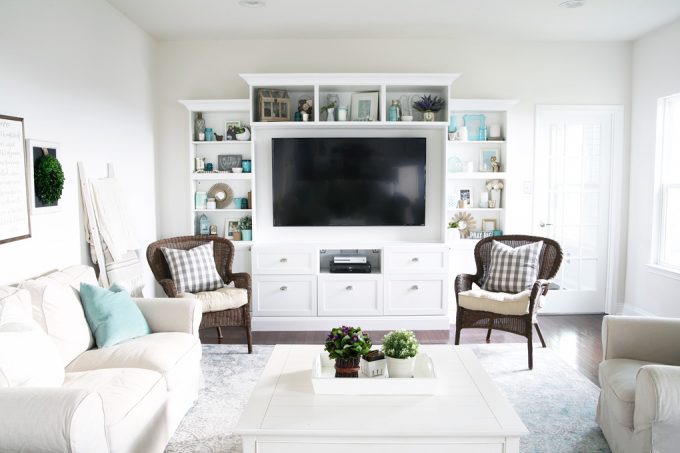
We ultimately decided to go with the IKEA BESTA system and make some modifications to give it a more custom built-in look. (Because really, who doesn’t love a good IKEA hack?!)
1. Use the IKEA BESTA planner.
Our first step was to use IKEA’s BESTA Storage Planner to recreate the dimensions of our living room and design a 3D mockup of our custom built-ins. We went through several versions, trying to find an arrangement that fit our vision of what the space would look like AND creating some storage space, which was seriously lacking in our previous living room setup.
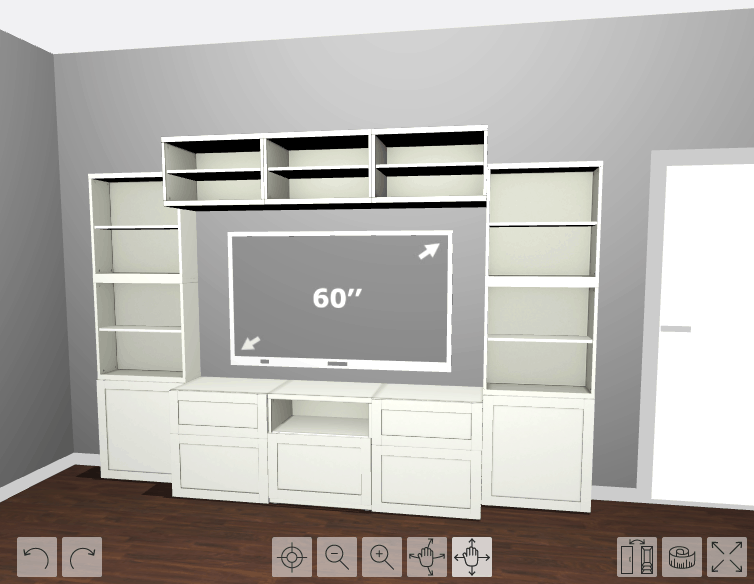
Here are some of the versions we didn’t choose:
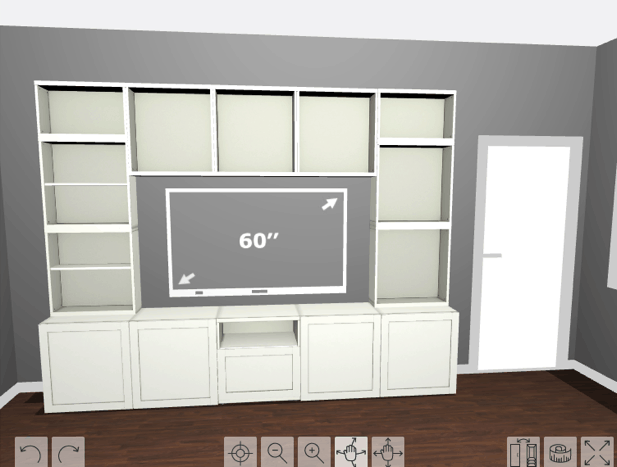
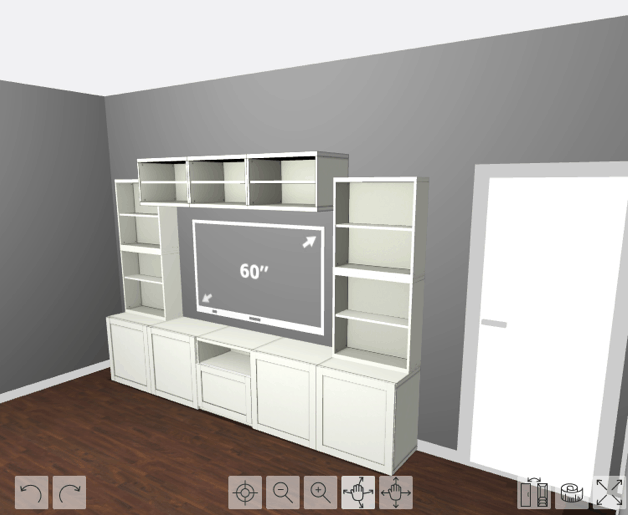
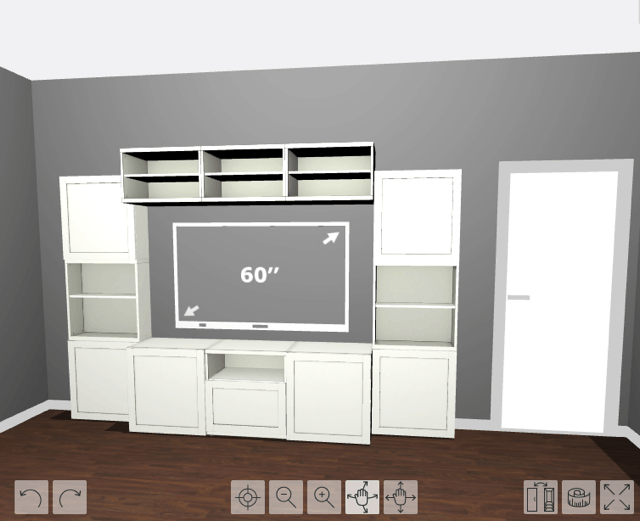
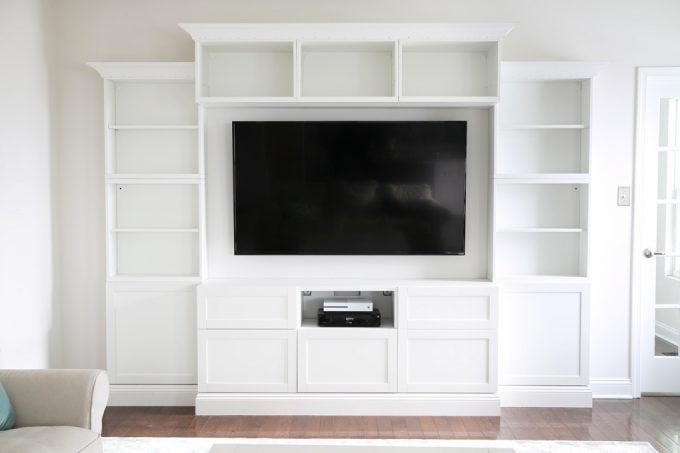
After playing around with the different options and designs for way longer than we probably should have, we finally settled on this setup:
This version gave us the storage we wanted, worked well in our space, and definitely provided visual interest for that big, blank wall!
2. Choose the BESTA pieces for your DIY entertainment unit.
You can see IKEA’s current door options here; we used the HANVIKEN door fronts. Here are the measurements of the doors/drawer fronts we used:
- 2- 23 5/8″ x 25 1/4″ Doors
- 3- 23 5/8″ x 15″ Door/Drawer Fronts
- 2- 23 5/8″ x 10 1/4″ Drawer Fronts
We loved the unit as-is, but we knew we wanted to give it a more custom, built-in look. Our plan to achieve this included:
- Adding crown moulding to all three top sections
- Raising the unit off the ground so we could have baseboards running from the wall around the sides and front of the shelves
- Adding wooden trim pieces to fill any visible gaps
- Adding drawer pulls and hardware
Because we started this project in the midst of the Christmas season, we worked on it a little bit at time over the period of a few weeks. From start to finish, though, this could all be done in a single weekend, including the extra trim work.
Tools and Materials
In addition to the BESTA pieces, we also used the following materials and tools to complete the final built-in unit:
Since Donnie was the mastermind behind actually assembling and building everything, I’m going to let him take it from here…
3. Assemble the BESTA built-ins.

I started by assembling the BESTA flat-packed cabinet frames. This felt like a small job after assembling all of the IKEA cabinets during our townhouse kitchen reno!
Building a Base for the Lower Cabinets
Once I had put the cabinets together, I added some plywood to the bottom of the base cabinets to raise everything up above the baseboard level in our living room. This was so we could eventually tie in our existing baseboards to the baseboards that would go around the bottom of the entertainment unit.
All of the plywood pieces I added sit flush with the cabinet from except in the back. I had to leave room so the shelves would sit against the wall and not bump into the baseboard.
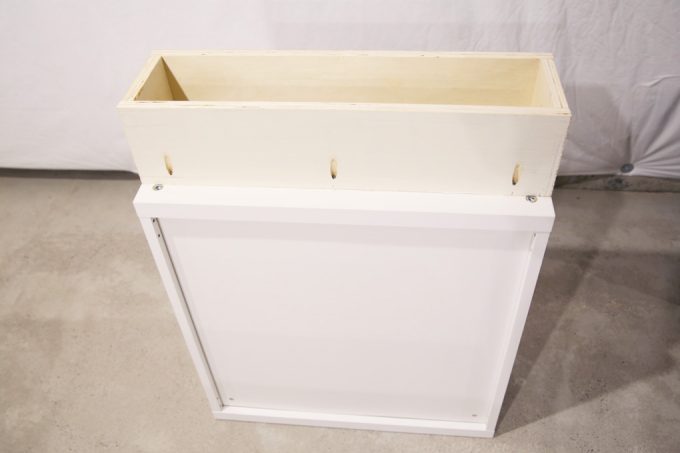
My table saw was packed away, so I had the guy at the home improvement store rip down a sheet of 3/4″ plywood into the little “strips” of plywood I would need to assemble the cabinet bases.
Once I had all of my plywood pieces, I used my little Kreg Jig to create some pocket hole joints. To make the joints as strong as possible, I was sure to drill my pocket holes so that I wasn’t screwing into the end grain of the wood. I always glue the joints as well.
After I added the bases for all three floor shelf units, I also measured the locations of our outlets, cable hookups, and all of the HDMI and network cables coming down from the TV, and used an oscillating multi tool to create cutouts in the back of the unit to accommodate the cords.
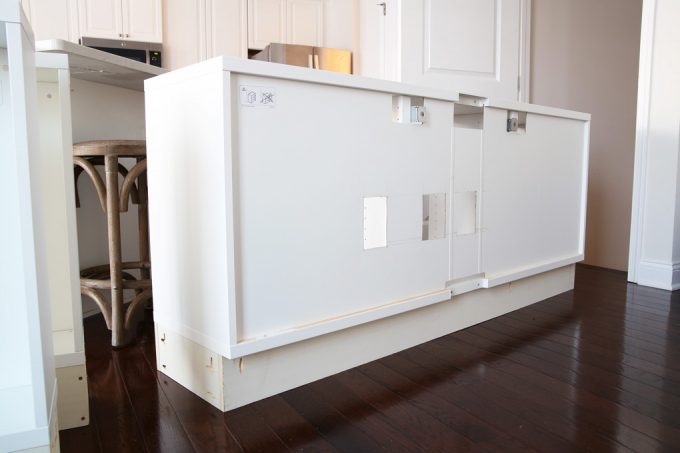
We were then ready to slide the units into place. The recessed base frame sat nicely over the existing baseboards.
For a week or so, the base cabinets sat alone under the TV. Though I knew we still had a lot of work to do, it already seemed like a big improvement!

Attaching the Side Cabinet Pieces
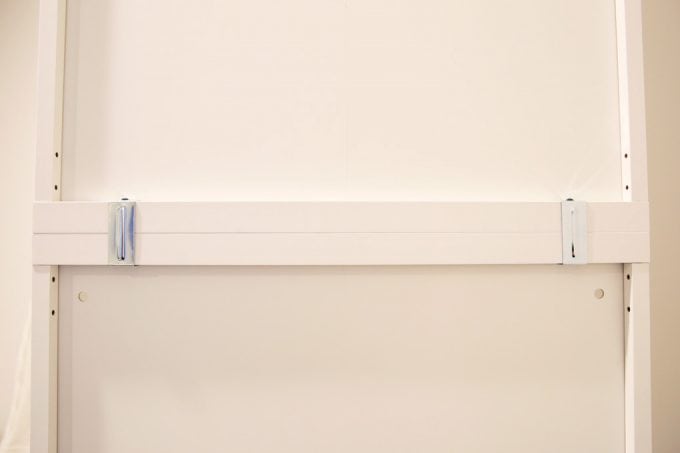
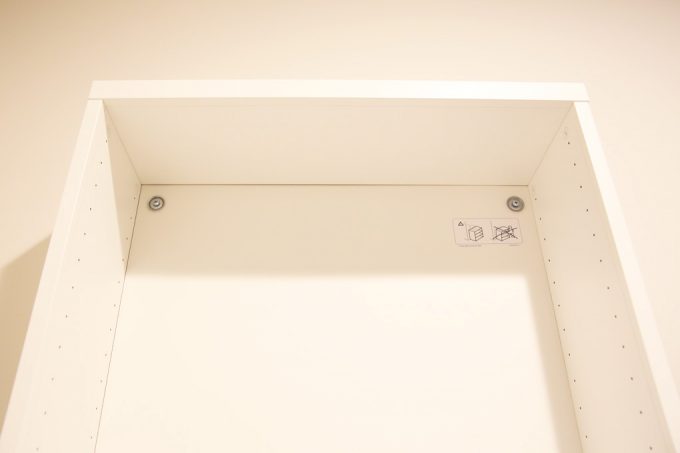
The next step was to add the cabinets on either side of the TV. The BESTA system is modular, so with each shelf, IKEA includes little brackets to join shelves together.
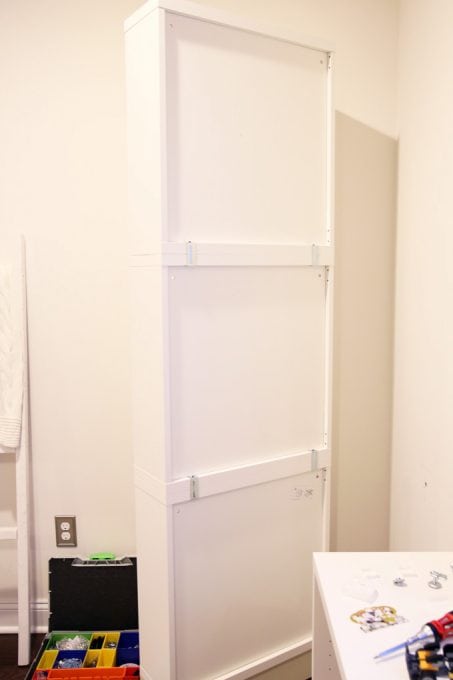
It was easy to set the shelves on top of each other and click the little metal brackets into place. The brackets helped to ensure that everything was lined up properly.
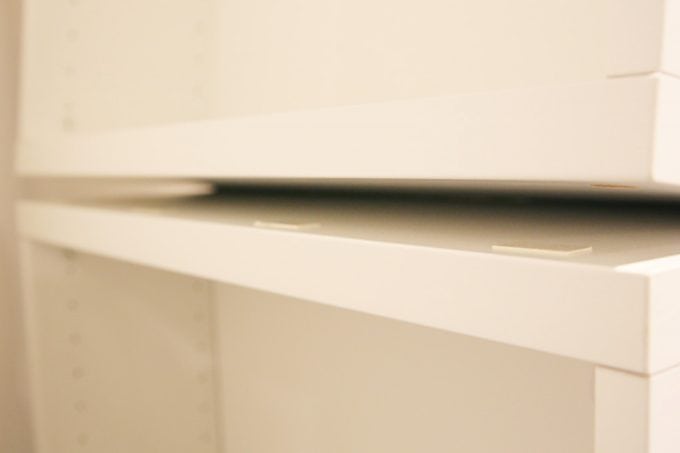
After clicking the shelves into place, we could rock the top shelf backward and insert little double sided sticky foam pads to keep the top shelf from sliding around.
4. Anchor the IKEA BESTA shelving to the wall.
Next, it was time to anchor the shelves into the wall. Similar to when we were installing our townhouse’s kitchen cabinets, IKEA provides a rail system on which to anchor the shelves. I love this because I’ve always found that without a rail system, it’s hard to get shelves perfectly level and exactly where you want them. It’s just too hard to maneuver something that big and heavy up on a wall.
The rail system makes it easy to make sure I installed the rail perfectly level and exactly where I wanted it to be. I used one rail on each of the side top shelves, and I made sure to tie each rail into at least one stud so that it was nice and sturdy.
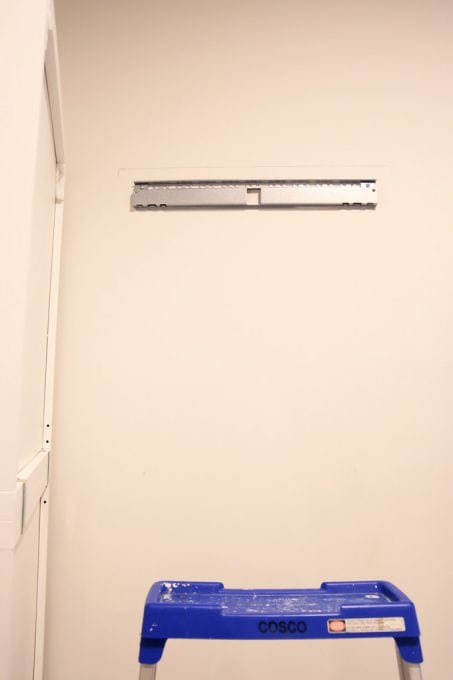
After the rail was installed and leveled, I was able to hang my shelf directly on the rail, line up the anchor points with the holes in the front of the cabinet, and attach it with the provided screws.
The deeper cabinets above the TV were up next. I connected three rails together for the top three cabinets and attached everything just as I had for the side units.
Once everything was hung and in place, I used cabinet screws to anchor all of the cabinets to the cabinet immediately adjacent. It secured everything together and made one big, solid unit. I used about a dozen cabinet screws in all.
5. Install cabinet fronts and drawers.
At this point, we could begin adding cabinet fronts and drawers. The IKEA instructions made it easy to install all the hinges and cabinet doors as well as drawer fronts and slides, and everything fit together perfectly.
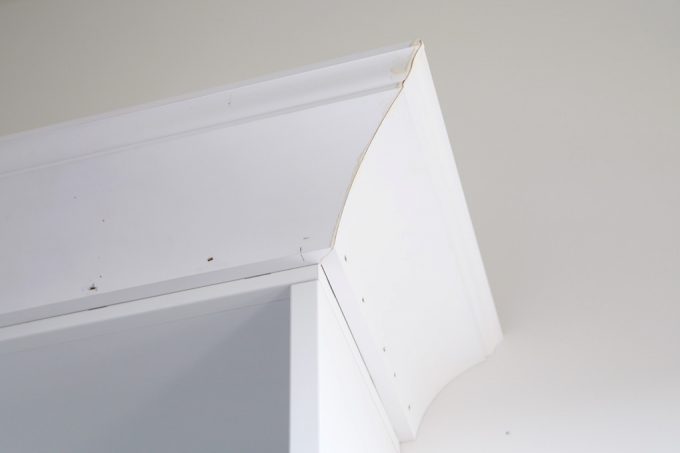
6. Add crown moulding.
Like I did a few years ago with Abby’s office office bookshelves, I decided to add crown moulding to the top of the entertainment unit to give it a more built-in look. We decided to use Windsor One Classical Craftsman Crown Molding, which is the same moulding we’re planning to add along the ceiling line in this entire space.
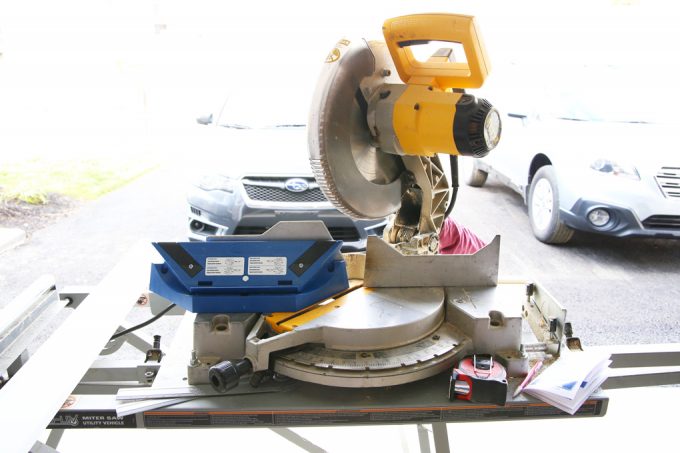
For the crown molding, I wheeled out the miter saw and bought a Kreg Crown Jig to help with all my crown moulding cuts.
In the future I’m going to cut crown without any type of jig. Once you realize that the saw bed is the ceiling and left is right and right is left, it becomes easy to visualize everything. The key to cutting crown without a jig is to firmly set your piece against the saw base and fence at the right spring angle, and then clamp a support board to your saw so that all all other pieces are seated perfectly before making any cuts.
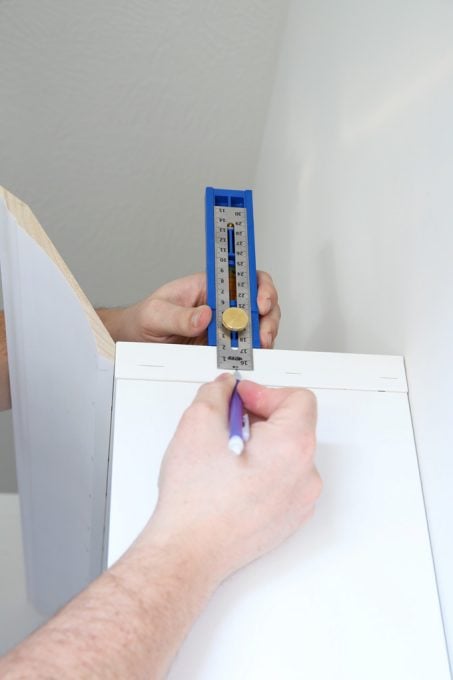
Once the crown was cut, I used a multi mark tool to set a consistent depth for the base of the crown to sit all the way around the shelves.
I then used my 18 gauge brad nailer to attach the crown to the shelves.
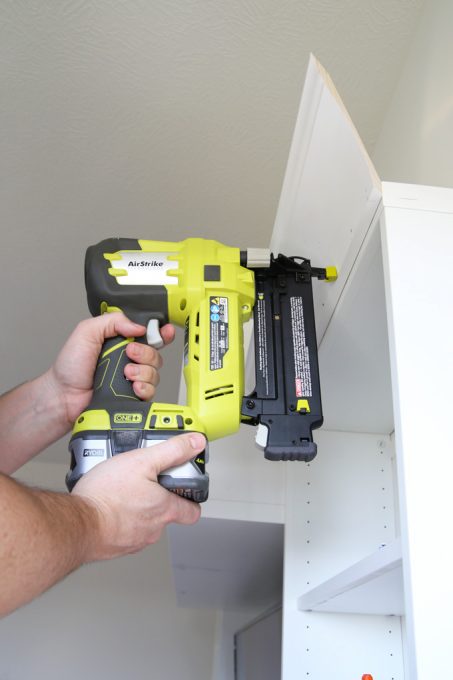
Once the first piece of crown was attached, I added wood glue to the corner before I nailed in the adjacent piece of crown so that the corners don’t separate over time.
I continued this process until I had added crown moulding around the entire top section of the entertainment unit.
7. Install baseboards on the IKEA BESTA entertainment unit.
After I finished the crown moulding, it was time to tackle the baseboards. We wanted it to appear as if the baseboards ran from the wall and then out and around the bottom of the built-in shelves.
A few things made this a little difficult…
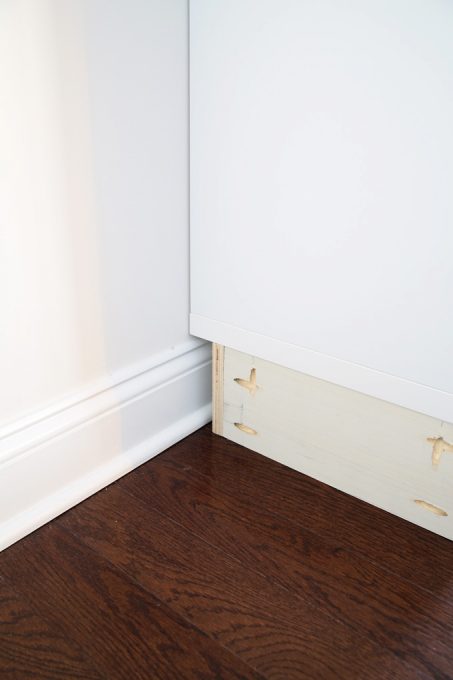
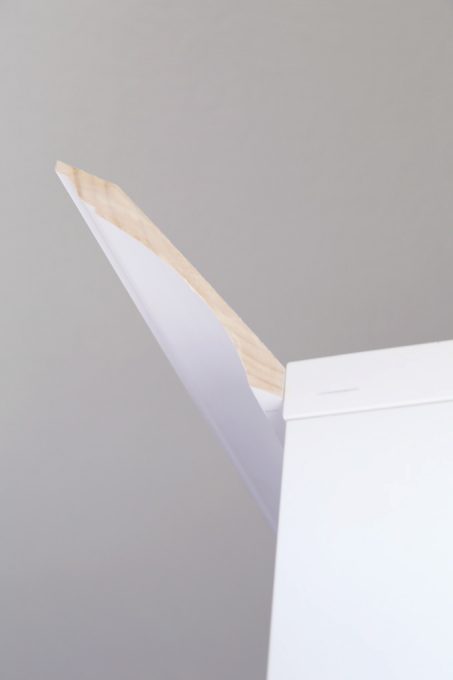
First, when I elevated the shelves on the plywood base, I made everything flush with the front of the cabinet frame. I didn’t take into account that the doors would stick out away from the cabinet frame. If I attached baseboards directly to the base that I built, they would look almost recessed when I installed the doors. To compensate for this, I used some ripped down 1x5s to build out the front of the base to be flush with the cabinet doors.
Second, it was difficult to match our existing baseboards. I took measurements and sketched out the profile of our baseboards, but when I went to the home improvement store, I couldn’t find anything that matched the profile perfectly. I was able to find something close, though, and I doubt anyone but me will end up noticing the slight differences!

Using a coping method, I was able to run the new cabinet baseboards right into the existing wall baseboards. Because the baseboard profiles didn’t match exactly, it wasn’t a perfect fit, but I used spackling to fill in any necessary gaps.
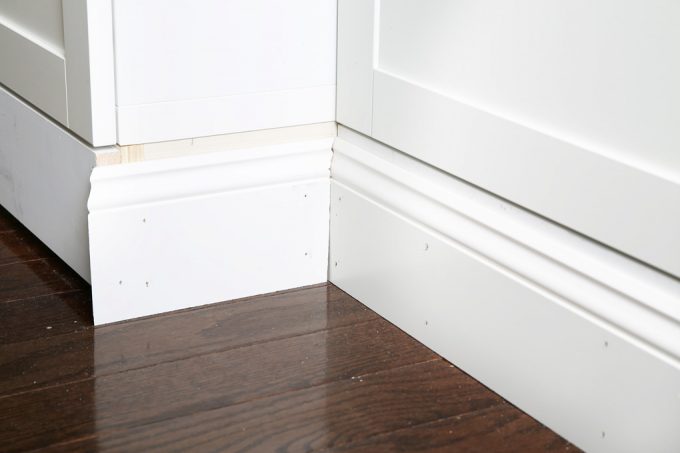
The rest of the baseboard installation was pretty simple with my miter saw, brad nailer, and lots of wood glue for outside corners.
After I installed the baseboards, the only thing left for me to do was fill the nail holes with spackling, sand, caulk all gaps, and paint the trim. I also added some knobs and cup pulls, and then it was on to Abby’s favorite part– the pretty stuff!
Working around a fireplace rather than a TV? This tutorial for IKEA built ins around fireplace uses cabinets for a beautiful transformation!
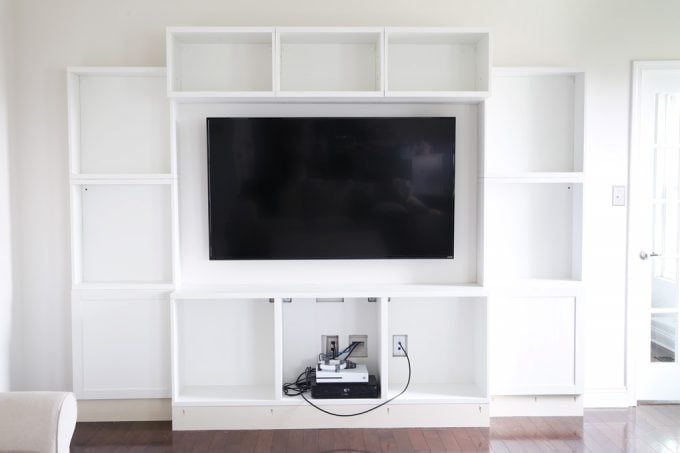
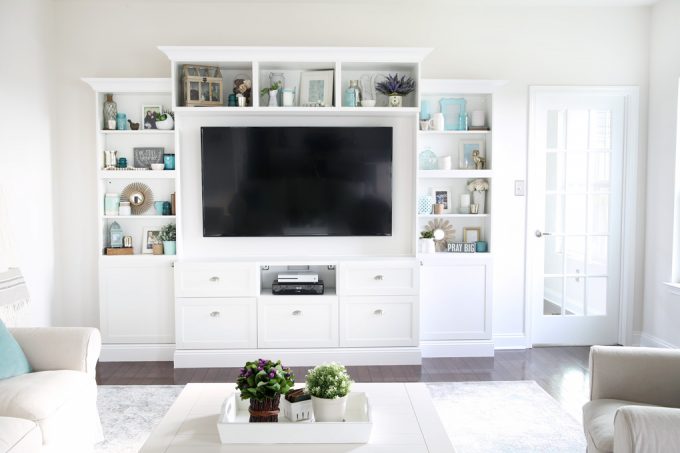
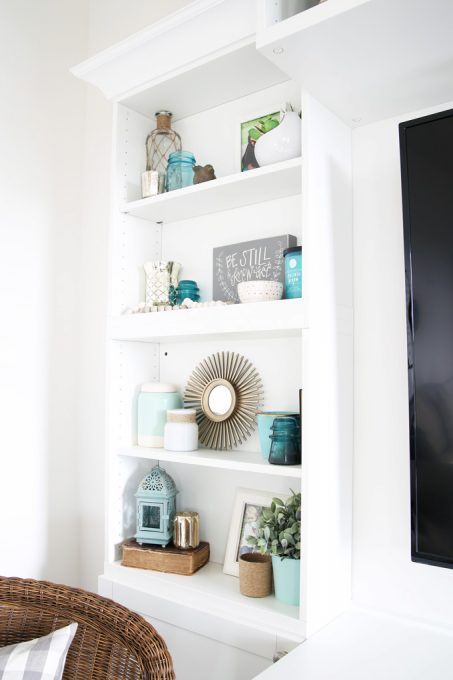
8. Decorate the open shelving.
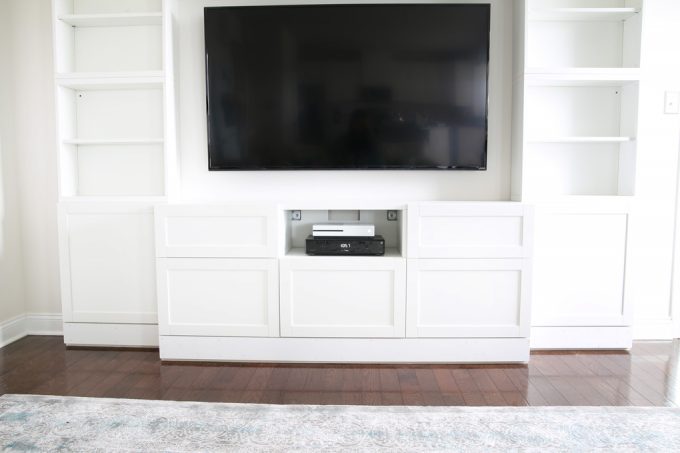
I loved the built-ins even plain, but I think adding the decor pieces really gave it a finished look! We used a color scheme of aqua, white, gray, and metallics to keep everything looking cohesive. Then I added some faux greenery throughout.
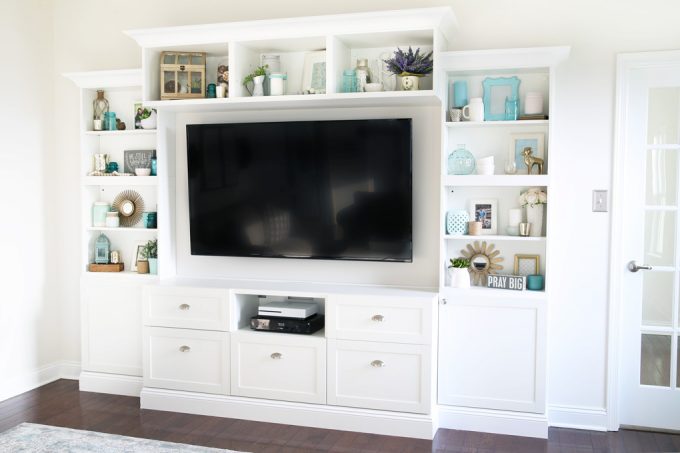
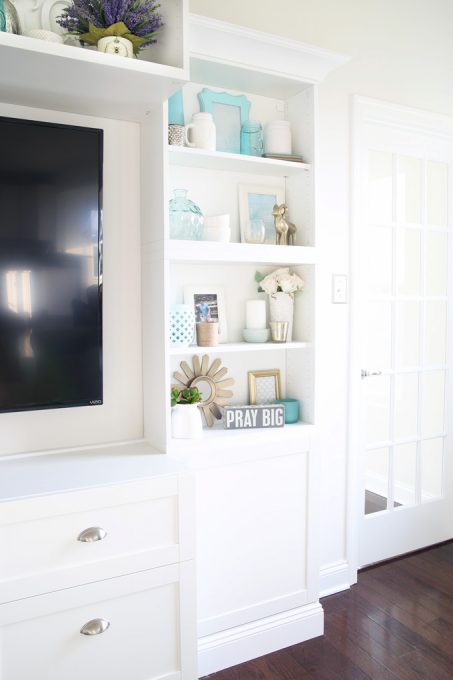
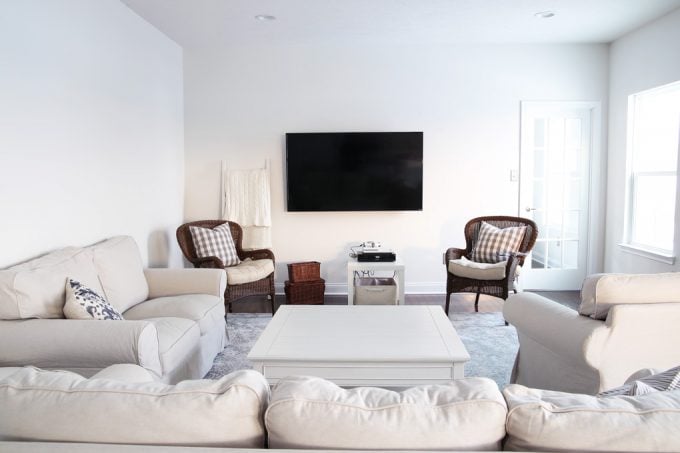
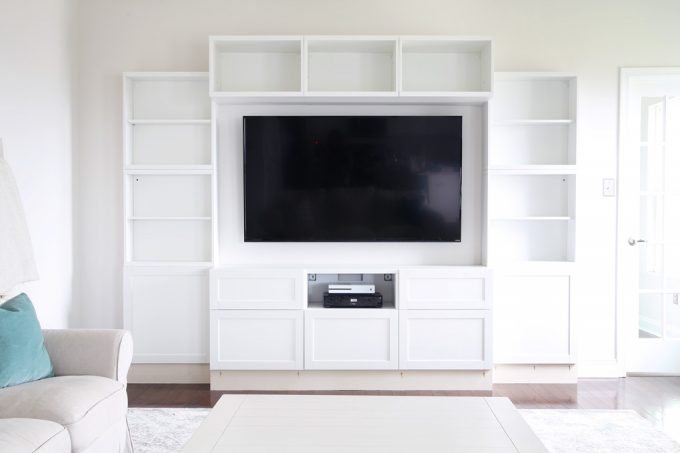
I really love how the built-ins make the room look more “finished” and way less stark!
Let’s take one more look at the before and after:
IKEA BESTA Built-Ins: Final Thoughts
This project definitely took some planning, time, and effort, but the final result was well worth it!
We ended up spending less than if we would have purchased a large entertainment unit, and we were able to create the exact size and shape we wanted. Using the BESTA system for this project was also way less work than if we would have tried to build the entire thing from scratch.
Update: It has now been more than 5 years since we built our custom IKEA entertainment system, and it is still holding up beautifully! It’s the perfect centerpiece to our living room, has tons of storage, and I love to decorate the open shelving for each season. We’d do another IKEA BESTA project in a heartbeat!
Have you completed any fun DIY projects recently? I’d love to hear about them in the comments!
Custom IKEA Entertainment System: Frequently Asked Questions
More IKEA Projects
Thanks so much for following along! Hope you’re having a wonderful week!

This post contains affiliate links. For more information, see my disclosures here.
Incredible transformation! Thanks for outlining all the steps from taking an IKEA system from basic to eye popping! When you paint the trim for the unit; do you take a piece to color match the white?
Good job, guys! Living room looks very complete and stylish. Abby, very nice arrangement on the shelves!
What a transformation! Turned out gorgeous! The trim really adds that extra wow factor!
Thanks so much! I was excited with how it turned out! 🙂 Hope you’re having a wonderful week!
~Abby =)
Hi Abby, I hope you had a great Valentine’s Day celebration. This is really an incredible transformation. I loved your way of providing complete step by step guide to perform this awesome transformation. Thanks a ton.
Thanks so much, Mahesh! Happy Wednesday!
~Abby =)
I love your new “built-Ins”! They just make the room look more finished – great job. Was there a reason you didn’t take them up to the ceiling? And out to either side?
This looks fantastic Abby! We put molding around our Billy Bookcases, but nothing this extensive. Great Job! You’re always inspiring me.
You’re too sweet, Christina! Thanks so much! Have a wonderful day!
~Abby =)
how come your doors are so fancy and not the flat finish that the besta doors have?
So these are actually BESTA doors, but they discontinued this style right after we did this project! I am so sad about it because it was definitely my favorite door style! We did another BESTA project recently and used the white frames with the glass doors, and they worked well too. (https://justagirlandherblog.com/home-office-storage-with-the-ikea-besta-system/) Hope you’re having a great week, Jacqueline!
~Abby =)
Hi Abby! I just have to echo the kudos expressed in the other comments and say THANK YOU to both you and your “sweetheart.” You guys are by far two of the most talented and giving/selfless people I have ever seen on the internet. Thanks again!
Aw, you’re too sweet! Thank you, Kisha!
~Abby =)
Abby where is your coffee table from! I love it!
Thanks, Amanda! It’s from Joss and Main! 🙂
~Abby =)
Wow, I’m so impressed! You know they say couples who can assemble Ikea together, stay together!
Beautiful furniture, beautiful room. You two are so creative. 🙂
Lol! I hope that’s true! 🙂 Thanks, Renee! Hope you’re having a wonderful week!
~Abby =)
I love the look but I am courious about the tv. Is it attached to the wall or the bookcase? If it is attached to the bookcase did you have to do anything special to support the tv?
It is attached directly to the wall, and we made sure that the mount was tied into a stud so that it was strong enough!
~Abby =)
Hi! Looks amazing! Your cabinet doors look like they have raised paneling, I can’t seem to find anything that looks like that on Ikea, did you add those or do you remember the name of the cabinet fronts you used?
Hi, Heather! I’m sorry it has taken me so long to get back to you on this! I have been looking everywhere and even reached out to my contacts at IKEA and they did some research for me as well. It looks like our cabinet fronts may have been continued on April 1. 🙁 So sorry about that! I hope you’re having a great week!
~Abby =)
Thanks so much for looking into it!! You’re awesome!
LOVE it!!! What color White did y’all use?? (Because type know there are 1,000,000 different shades of white!)
Hi, Kelly! We used Benjamin Moore Simply White, which actually ended up being a little too bright white. It’s not so much of a difference that it would be too noticeable, but we’re planning on using Behr Marquee Cameo White for some of our other trim work because it is less bright. I hope this helps! Have a great day!
~Abby =)
SO helpful!!! Thank you thank you!!
This looks amazing, I’m just playing around with the besta planner now. Can I ask how did you place a module on top of another one when playing around with designs for some reason it won’t let me. I’m seriously struggling with this.
Many thanks
The online tool can be a little strange sometimes. In real life there are clips that join units stacked on top of each other.
Do you have a list of the items you purchased from Ikea? I’m trying to do something similar but would like file drawers all across the bottom and book shelf on top. Thanks
Hi, Tara! There are 6 of the shallow depth shelves on the sides, 3 deep ones in the middle bottom, and three deep short ones at the top. We have doors on the two bottom end shallow cabinets and one in the very middle, and then the other 4 are drawers, though I think they’ve discontinued these exact fronts, unfortunately. I hope this helps!
~Abby =)
Hi Abby!
Thanks so much for this detailed DIY. I’m going to try to tackle it this week. Do you remember the name of the door fronts/drawers you used?
Thank you!
Lisa
Hi, Lisa! Sadly, they discontinued these exact fronts shortly after we built our system. 🙁 I’m hoping they bring them back or add something similar soon because they were my favorite!
~Abby =)
Regarding the cut-outs for the outlets. I do not trust myself with an “oscillating multi-tool”. Is it possible to leave the backing off the Besta unit when installing? I have a small Besta shelf with a door that I’d lime to hang on the wall. It would be much easier to hang without the back.
You could absolutely leave the backing off. It’s not part of the structure of the cabinet.
Hi Abby!
Love this – actually tackling this project this coming weekend! I have a question for you. What drawer fronts did you use ?? I’m having trouble finding them!
Thank you,
Lisa
Also – is that white or off white?
Hi, Lisa! Sadly, they discontinued these exact fronts shortly after we did our project. :-/ There are a bunch of other options, but they don’t carry these anymore. Ours are white. Best of luck with your project!
~Abby =)
Love it! Which Besta units did you use to create this? And is the center unit deeper than the rest or is there a gap you had to fill where it met the wall? I really want to do something just like this in our home!
Thanks!!
Hi, Jenn! We used 3 shallow units on each side (24″ w x 8″ d x 25″ h), then 3 short, deeper units at the top (24″ w x 16″ d x 15″ h), and 3 taller, deeper units on the bottom (24″ w x 16″ d x 25″ h). (So yes, our middle pieces are deeper than the end pieces we used.) Then we just added the doors, drawers, and shelves we wanted. I highly recommend going onto IKEA’s site and playing around with the BESTA planner. (http://www.ikea.com/ms/en_US/rooms_ideas/planner_bestauppleva/index.html) It is really user friendly and allows you to play around with a bunch of different combinations so you can see what they will look like before you decide on your pieces. I hope this helps!
~Abby =)
Hi, nice post! I am thinking about building a media wall for the basement using the Besta cabinets. For the main TV unit piece that will sit under the TV, I would like to expand the depth of the frame since I have some components that require more than 16″ of depth (my A/V receiver most notably). Did you run into any structural issues when drilling into the bottom for the frame you build to raise your unit up off the ground? My understanding is that these use the “honeycomb” cardboard interior. I’m afraid that if I try to build a custom frame off the back to extend the depth, that I might run into issues fastening it with screws into what is essentially a hollow honeycomb cardboard construction rather than solid plywood. Is there anything for the screws to bite into on those back edges?
I was able to make a secure connection. It also helps that the unit was sitting on top of the frame.
Beautiful! How were you able to match the paint color and finish of the cabinets for your moulding?
We actually just used Behr’s Ultra Pure White for this trim. It’s not an exact match, but it was close enough to blend in! 🙂
~Abby =)
Hi! My husband and I are wanting to do something very similar in our living room. Do you know what the doors are called that you used? That’s exactly what we’re looking for, but I don’t see them on the IKEA site. Thanks so much! Looks amazing!
Sadly, they discontinued this style shortly after we created our unit. :-/ I wish they’d bring them back, though– they were my favorite style too!
~Abby =)
Hi! Thank you for this tutorial. I’m about to do the same project (unfortunately without the amazing shaker-style doors…that’s what I get for procrastinating! ?).
I noticed on the closeup of the baseboards, there looks like there’s a small gap between the top of the baseboard and the bottom of the drawers/doors. Did you do anything special to cover that up or did you just paint it?
We just painted it! I actually just laid down on the floor to look and see what you meant, lol. It is not noticeable at all when you’re standing up and looking down on it. We had to leave the gap so the doors and drawers didn’t scrape against the trim. I hope this helps! Best of luck with your project!
~Abby =)
Great post! How did you deal with the quarter round at the baseboards? I couldn’t really tell from the photos.
Hi, Meagan! We didn’t put quarter round on the trim that went around bottom of the entertainment unit, so the quarter round on the baseboards on the wall just butted up against the trim work on the entertainment unit. I hope this makes sense!
~Abby =)
IKEA has brought back the Hanviken doors. 🙂
YAY!!!! I had not seen that yet! I am so excited– they were my favorite design by far! Thanks for the heads up!
~Abby =)
Can you tell me the final dimensions
Hi, Kelly! It is about 118″ long x 92″ high x 17″ deep at the deepest point. I hope this helps! Have a great day!
Hey, could you tell me how you guys attached or put up the large back piece that the tv is mounted on to? I couldn’t find that in the article.
Hi, Monika! The TV is just mounted to the wall. There is no backing piece behind it. I hope this helps! Have a great week!
Hi! Gorgeous! Did you use anything to fill in the spaces between the cabinets that were stacked on top of each other?
Nope! There was no space in between them, so we just followed IKEA’s instructions for assembly. 🙂
Hey there- are you still happy with the quality? I’ve never purchased Ikea furniture and don’t live near one to see pieces of the BESTÅ system for myself. Is it noticeably pressed wood?
We are! We’ve had the BESTA system in our living room for nearly 4 years and have had a BESTA unit in my office for about 3 years now, and they have both held up incredibly well. There is no wood grain to them, so they don’t look like they’re made of wood, but they are clean and bright and crisp. We really love them. I hope this helps!
I love this! Can I ask what you room measurements are?
Hi, Vicky! Our living room is 19′ x 15’4″. Have a great day!